Example: Group Conditions for Project Search
Use Advanced Settings to create searches that contain multiple conditions that can be grouped, nested, and viewed as plain text. This sets the order of operations within the search query and enables you to embed conditions and create different levels of the search.
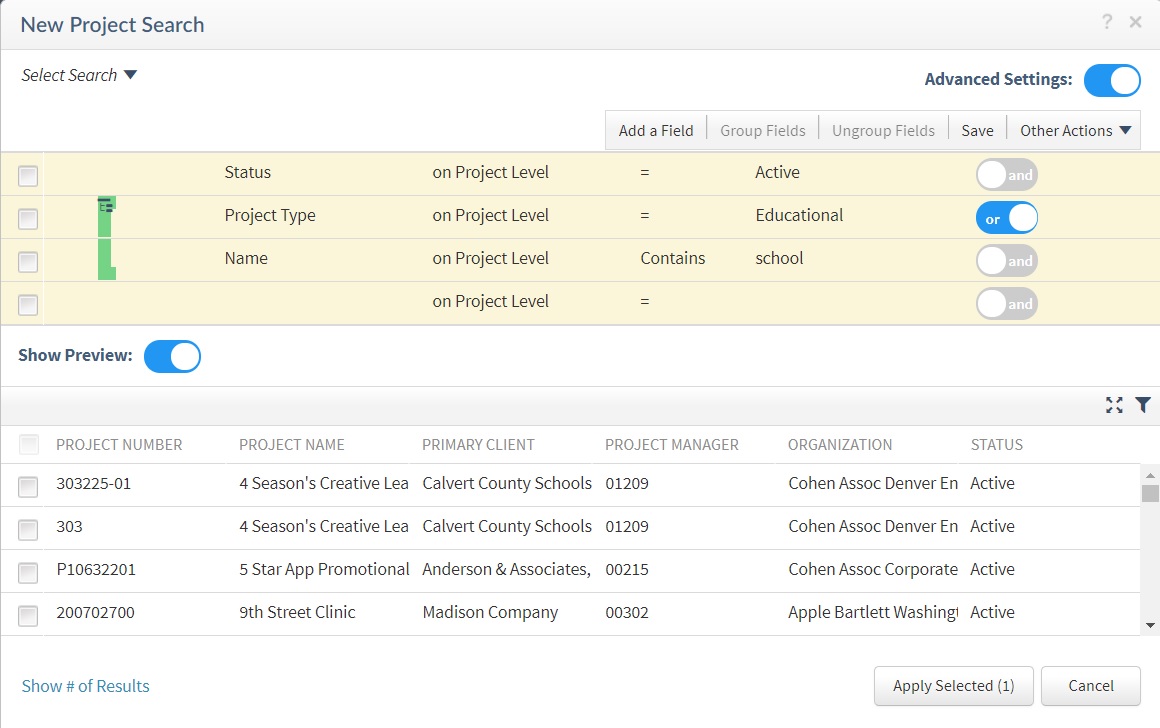
For example, you need to create a search that locates all active projects that are either educational or have the term "School" in the project name.
A regular search without grouping would be created using the following:
- Status = Active AND
- Project Type = Educational OR
- Name Contains School
The search results will populate with all active projects that have a project type of Education or any project (active or not) that contains the term "School." It will not filter the results combining Active with the other two criteria because they are not grouped together.
To structure the search correctly, create a group for the conditions:
- Status = Active AND
- (Project Type = Educational OR
- Name Contains School)
Grouping the Project Type and Name ensures that the active criteria apply to both rows in the grid. You will receive all Active Projects with a Project Type of Education and all Active Projects that have a name containing School.
To set this up:
| Step | Procedure | Related Information |
|---|---|---|
| Access the Search Dialog | ||
| 1 | Create a new search. | Create a New Search |
| Enter Search Criteria | ||
| All new searches default to display the Status = Active criteria as the first condition so you do not need to change this. | ||
| 2 | Click the Add a Field button to add a new condition (row) to the Search Criteria grid. | Add a Field to a Search |
| 3 | In the shaded portion of the Search Criteria grid, use the Select a Field column select Project Type. | |
| 4 | In the Operator field, select =. | |
| 5 | In the Add Value field, select Educational. | |
| 6 | Click the Add a Field button to add a new condition (row) to the Search Criteria grid. | Add a Field to a Search |
| 7 | In the shaded portion of the Search Criteria grid, use the Select a Field column select Name. | |
| 8 | In the Operator field, select Contains. | |
| 9 | In the Add Value field, enter School. | |
| 10 | Click
 Advanced Settings to access additional options for building a custom search.
|
Advanced Search Settings |
| 11 | Change the operator from And to Or between the Project Type and Name conditions. | |
| 12 |
Click the Select Field checkbox next to the Project Type and Name conditions. If these two conditions were not next to each other (if a status were listed in between them), you would need to drag and drop them so that they were next to each other before grouping. |
|
| 13 | Click the
Group Fields button.
The grouping bar displays to show the three conditions are grouped. The search structure is now:Status = Active AND (Project Type = Education OR Name Contains School) |
Group Conditions |
| Preview Search Results | ||
| 14 | If you do not see a list of matching results, click
Show Preview
to display the search results.
The Search Results Grid displays a list of all records matching your search criteria. These records also display when you use the Select Searches List on the main form for a hub record or in the Records or Saved Searches list on the Reports tab or form for a specific report. |
Preview the Search Results |
| 15 | Click
 at the top right of the Search Results grid to expand the grid to full screen, allowing you to more easily view long lists of search results. at the top right of the Search Results grid to expand the grid to full screen, allowing you to more easily view long lists of search results.
|
Maximize the Search Results Preview |
| 16 | Click
 at the top right of the Search Results grid to filter the search results based on the values you select in one or more columns. at the top right of the Search Results grid to filter the search results based on the values you select in one or more columns.
|
Filter Search Records |
| 17 | Some searches have a link to show the number of results. The Show # of Results field displays the total record count for the Search Results grid. This number is dynamic based on the criteria in the search. | Preview the Search Results |
| 18 | Click Apply All to select all records in the search or use the check boxes to select a few and select Apply Selected (#). | Refine the Search Results |
| Save the Search | ||
| 19 | On the Actions bar, click Save. On the Save Options dialog box, choose either Save to update an existing search, or Save As to save a new search. | Save a Search |
| 20 | To allow other users access to this search, click
 in the
Save For field. in the
Save For field.
Depending on your security rights, you can save for everyone (all security roles), your role, or specific security roles. If you do not have security rights to save for others, you can only save searches for yourself. |
|
| 21 | To add the search to one of the folder directories in the
Select Searches
list, click
in the
Add This Search To field. The Folder Options dialog box opens. You can either select an existing folder directory from the list or click
+New Folder to create a new folder directory for the search.
|
|
| 22 | Click Save to save the search and close the Save Options dialog box. Vantagepoint adds the search to the designated folder in the Select Searches list. | |
| Execute a Search | ||
| 23 | Click Apply to execute the search, close the search dialog box, and return to the main form of the application. Vantagepoint displays the search records in the Find field. | |