Using MS SQL Server
This section describes how to use an SQL server as the solution repository.
Workflow:
- Initialize SQL Server Pentaho Repository Database
- Step 1: Adjust MS SQL Server Configuration Settings
- Step 2: Change Default Passwords
- Step 3: Run SQL Scripts
- Configure the SQL Server Pentaho Repository Database
- Step 1: Set Up Quartz on SQL Server
- Step 2: Set Hibernate Settings for SQL Server
- Step 3: Replace Default Version of Audit Log File with SQL Server Version
- Step 4: Modify Jackrabbit Repository Information for SQL Server
- Perform Tomcat-Specific Connection Tasks
- Step 1: Download Driver and Apply to Pentaho Server
- Step 2: Modify JDBC Connection Information in the Tomcat XML File
- Start the Server
Components
- Jackrabbit: Contains the solution repository, examples, security data and content data from reports for which you use the Pentaho software to create.
- Quartz: Holds data related to scheduling reports and jobs.
- Hibernate: Holds data related to audit logging.
Initialize SQL Server Pentaho Repository Database
To initialize SQL Server so that it serves as the Pentaho Repository, you will need to run several SQL scripts to create Hibernate, Quartz, and Jackrabbit (JCR)
Step 1: Adjust MS SQL Server Configuration Settings
Configure the following MS SQL Server settings in Microsoft SQL Server Management Studio or another tool of your choice.
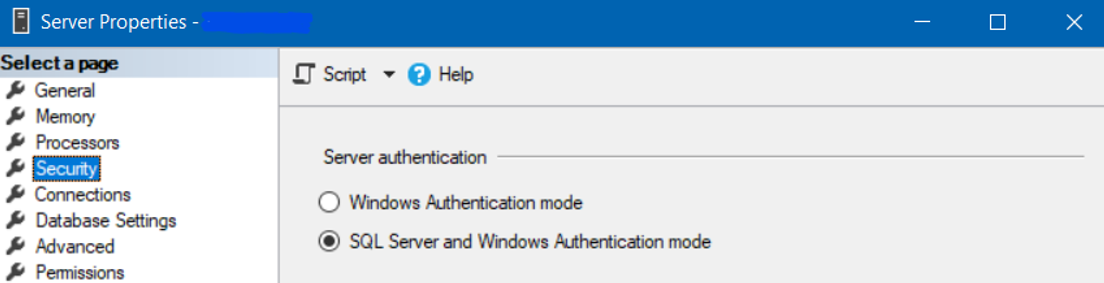
- Select
SQL Server and Windows Authentication Mode to use mixed authentication.
- Open the SQL Server Management Studio.
- Log in with either your Windows Account or SQL Server account.
- On the left side, right-click the SQL Server instance
- Select Properties » Security.
- Under Server Authentication, select
SQL Server and Windows Authentication Mode.
- Enable
TCP/IP for MS SQL Server.
- Open the SQL Server Configuration Manager.
- From the menu panel, navigate to the SQL Server Network Configuration.
- Select Protocols for <SQL Server instance>.
- Right-click TCP/IP then select Enable.
- Make sure that MS SQL Server is listening on an external IP, and not the localhost.
Step 2: Change Default Passwords
For the production server, follow best practices to change the default passwords in the following SQL script files to secure the databases.
- Navigate to the <pentaho_directory>/pentaho-server/data/sqlserver folder.
- Use any text editor to modify the following
CREATE scripts as needed according to the existing setup for the user, password, database and other required information:
- create_jcr_sqlServer.sql
- create_quartz_sqlServer.sql
- create_repository_sqlServer.sql
- Save and close the files.
Step 3: Run SQL Scripts
Procedure:
- Open a command prompt window.
- Run the following scripts in the order listed below:
- sqlcmd -S <host> -U <username> -P <password> -i "<pentaho_directory>/pentaho-server/data/sqlserver/create_quartz_sqlServer.sql"
- sqlcmd -S <host> -U <username> -P <password> -i "<pentaho_directory>/pentaho-server/data/sqlserver/create_repository_sqlServer.sql"
- sqlcmd -S <host> -U <username> -P <password> -i "<pentaho_directory>/pentaho-server/data/sqlserver/create_jcr_sqlServer.sql"
- Log into the SQL Server Management Studio.
- Navigate to
Security » Logins and verify that the following users exist:
- hibuser
- jcr_user
- pentaho_user
Configure the SQL Server Pentaho Repository Database
After initializing the repository database, you must configure Quartz, Hibernate and Jackrabbit for an SQL Server database. Make sure that you change the password and port number in these examples to match the ones in your configuration.
Step 1: Set Up Quartz on SQL Server
- Open the pentaho/server/pentaho-server/pentaho-solutions/system/scheduler-plugin/quartz/quartz.properties file in any text editor.
- Locate the
#_replace_jobstore_properties section and set the org.quartz.jobStore.driverDelegateClass as shown:
org.quartz.jobStore.driverDelegateClass = org.quartz.impl.jdbcjobstore. MSSQLDelegate
- Save the file and close the text editor.
Step 2: Set Hibernate Settings for SQL Server
- Open the hibernate-settings.xml file in a text editor.
- Find the
<config-file> tags and change
postgresql.hibernate.cfg.xml to
sqlserver.hibernate.cfg.xml as shown:
From: <config-file>system/hibernate/postgresql.hibernate.cfg.xml</config-file>
To: <config-file>system/hibernate/sqlserver.hibernate.cfg.xml</config-file>
- Save and close the file.
Step 3: Replace Default Version of Audit Log File with SQL Server Version
- Locate the pentaho-solutions/system/dialects/sqlserver/audit_sql.xml file.
- Copy it into the pentaho-solutions/system directory.
Step 4: Modify Jackrabbit Repository Information for SQL Server
- Download PentahoServer-config.zip.
- Copy sqlServer_repository.xml from /config/jackrabbit/sqlServer.
- Place sqlServer_repository.xml into pentaho/server/pentaho-server/pentaho-solutions/system/jackrabbit.
- Back up and delete the repository.xml file in the same folder as the previous step.
- Rename sqlServer_repository.xml to repository.xml
Perform Tomcat-Specific Connection Tasks
After your repository has been configured, you must configure the web application servers to connect to the Pentaho Repository. In this step, you will make JDBC and JNDI connections to the Hibernate, Jackrabbit, and Quartz components.
Step 1: Download Driver and Apply to Pentaho Server
To connect to a database, including the Pentaho repository database, you must download and copy a JDBC driver to the appropriate locations for the Pentaho server, as well as on the web application server.
- Download a JDBC Driver JAR from your database vendor or a third-party driver developer:
- Copy the JDBC driver JAR downloaded to the pentaho/server/pentaho-server/tomcat/lib folder.
Step 2: Modify JDBC Connection Information in the Tomcat XML File
- Download PentahoServer-config.zip.
- Copy sqlServer_context.xml from /config/tomcat/sqlServer.
- Place sqlServer_context.xml to the /pentaho-server/tomcat/webapps/pentaho/META-INF.
- Backup and delete the context.xml file in the same folder as the previous step.
- Rename sqlServer_context.xml to context.xml.
- Open the new context.xml file with any text editor.
- Replace all the password="password" with the corresponding database user's password.
- Replace all the url="jdbc:sqlserver://localhost:1433 value with the correct host and port.
- Save the
context.xml file, then close it.
Warning:
After changing to another database type (for example, PostgreSQL to Oracle) make sure to clean up the following cache:
- \pentaho-solutions\system\jackrabbit\repository\*
- \pentaho-solutions\system\karaf\cache\*
Otherwise, it could result in unpredictable errors like "java.sql.SQLSyntaxErrorException: ORA-00906: missing left parenthesis" as it tries to use the older syntax for the new database type
Start Your Server
Now that you have completed the initial Pentaho archive installation steps, you are ready to start the Pentaho Server. Follow these steps:
- Navigate to the <pentaho_directory>/server/pentaho-server folder.
- Run the startup script, start-pentaho.bat.
- From a workstation, open a web browser and enter
http://<hostname>:<port>/pentaho in the address bar.
Note: The default port is 8080.
- In the the Pentaho User Console (PUC), enter your username and password then click Login.