Work with Grids
Much of the information for opportunities, companies, and contacts is entered and displayed in grids. For example, when you enter a new milestone for an opportunity, you add it to a grid that also contains all of the previously entered milestones.
Add a New Grid Row
To add a new row of data to a grid, click + Add <type of data> (for example, + Add Milestone) below the grid. That adds a row to the grid in which you can enter the data.

Reveal Additional Fields for a Row
In some grids, all fields do not fit on a row. In those cases,
 displays near the end of the row when you hover over the row. Click that icon to display the additional fields in a dialog box.
Other icons with special purposes may also display in grid rows. For example, if your firm implements the integration with Kona Business,
 may display in touchpoint grid rows, and you can click that icon to add a task in Kona for that touchpoint.
Save Your Work in a Grid
When you add a row to a grid or make a change to the information in an existing row, your work is saved automatically when you tab or click off of that row.
Delete a Grid Row
To delete a grid row, hover over the row and click
 at the end of the row.
Grids with Many Rows
In grids with many rows, iAccess may load only part of the rows initially so that the tab displays quickly. If you then scroll the grid, the scrolling action sometimes pauses to load the next set of rows as you approach the bottom of the scroll bar. The same thing may happen if you have scrolled down in the grid and then start scrolling up and approach the top of the scroll bar.
A more efficient method than scrolling a grid with many rows is to use the search option that is available for most grids to locate the row that you want (see below).
Search a Grid
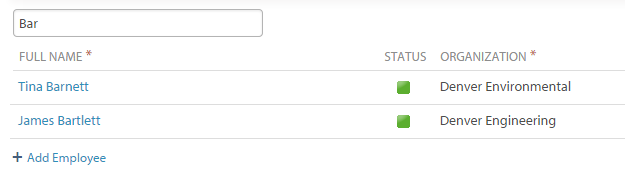
If a grid contains many rows and you want to locate a particular row, you can use the search field above the grid. In that field, type one or more characters from the name or other key field and pause to display only rows that contain that sequence of characters. In the example below, typing "Bar" reduces the contents of this employees grid to just two employees whose names contain those characters.
Change the Sort Order for a Grid
If a grid displays a sort icon ( or
or
 ) next to one of the column headings, you can change the default order of the rows in that grid. The column in which the sort icon appears is the current sort column, and the direction the icon points indicates whether the rows are sorted in ascending () or descending () order based on the values in that column.
- To reverse the sort order without changing the current sort column, click the column heading for that column. The sort icon changes to indicate the new order.
- To sort the rows based on the values in a different column, click the column heading for that column. The sort icon displays next to the heading for the new sort column.