Lesson 2: Other important features
In this topic, you'll focus on some of the remaining features that will help you get the most out of Ajera.
Security
You have many options in determining who can use the various functions of Ajera and who can see reporting information.
How it works
You set up
Ajera automatically contains these default
- Administrator
- Employee
- Entry clerks
- Project managers
- Marketing
- Principal
When setting
up an employee, you indicate the
When an employee logs into Ajera, the Ajera menu is customized to display the employee's tasks and reports based on the access you set up for that employee.
Reports and inquiries
Ajera gives you a lot of flexibility in selecting who you want to allow to see reports and inquiries (and even the specific information in them).
Reports
With reports, you can restrict access to a report to only certain employees.
In addition, you can create a view of a report to allow different employees to see a version of a report with information that only pertains to them.
For example, you may want project managers to see the Billing report with only their projects on it. You would create a view for the Billing report and select the Limited By Project Manager option.
Inquiry
With inquiries, you can restrict access to an inquiry to only certain employees.
In addition, you can create one inquiry and allow different employees in your firm to log into Ajera, use the same inquiry, and see only their data. You can determine the way inquiries you create appear on the
Contacts
When you set up contacts, you enter contact information for a person one time so it is available whenever you need to use it.
You can enter contact information for anyone you may need to contact. Ajera includes a field for contacts on windows that involve your work with bank accounts, clients, employees, projects, phases, and vendors.
You typically set up a contact in
Setup > Contacts. However, you can also add a contact while working
in other areas of Ajera where a Contact field appears. Simply click
![]() in the Contact field, and then click the New
button.
in the Contact field, and then click the New
button.
To help you organize and find your various types of contacts (for employees, vendors, bank accounts, and so on), do the following:
- Categorize your contacts by setting up contact types (through Setup > Contact Types).
- Assign a contact type to each contact you enter.
Where contact information appears
As you work in Ajera, you may often reference contact information as follows:
| Use contacts for | In this area of Ajera |
|---|---|
|
Billing on projects |
|
|
Employees |
Setup > Employees > Contacts tab |
|
Clients |
Setup > Clients > Contacts tab |
|
Vendors |
Setup > Vendors > Contacts tab |
|
Bank accounts |
|
Printing contact information
You can print a list of contacts, contacts by contact type, or contact types as follows:
| To see a list of | Do this |
|---|---|
|
Contacts |
Click You can sort the inquiry by any of the column headings (status, first name, middle name, last name, company, title, phone number, email) or any other column you add to the inquiry (such as contact type). Right-click the column heading and click Sort ascending. |
|
Contacts |
Click Reports > Setup > Contact. You can sort contacts by First Name or Last Name only. |
|
Contacts by contact type |
Click You can see a list of all contact types you set up, and then drill down to see a list of all the contacts you added for each type. For example, you click Vendors in the list and see a list of all the people you added as Vendor contacts. |
|
Contact types |
Click Reports > List > Contact Type. You see a list of the contact types you set up. |
Attachments
Attachments make it easy to reference supporting information while you are performing a task in Ajera.
What they are
An attachment is a link to a file or URL. For example, you can add an attachment to an Ajera window by linking to a CAD drawing, contract document, spreadsheet, PDF, or URL.
The path to that file, not the file itself, is attached to the Ajera window. The file must be in a shared location for other people to open it (for example, on a shared network or a website).
When you make an attachment, the date and time are stamped to the link. You can categorize attachments for easier identification and search.
Where can you add them
You can add attachments to many windows in Ajera. When you can add an attachment, you will see either the attachments button or tab.
![]()
Custom fields
Although Ajera is designed specifically for your industry, you may need to record and track information that is unique to your firm.
You can add custom fields to many of the windows used for setup tasks in Ajera. You can use these fields to:
- Enter short text.
- Enter a note.
- Select from a list of several items.
- Enter a number.
- Enter a date, optionally using a calendar.
- Select or clear a check box.
Custom fields do not update other fields or appear on standard reports. They provide an excellent way for you to record and review customized information for setup tasks in Ajera.
Custom fields can also be used in an inquiry to capture information. For example, you could use a custom field in an inquiry to report on square feet in a project.
Billing review
( unavailable in ajeraCore)
What is billing review?
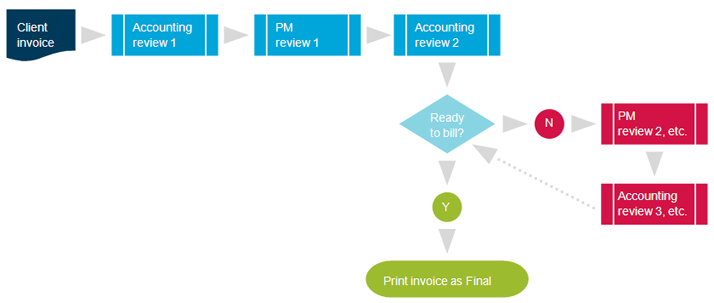
Billing review is the approval process that occurs before a client invoice is billed. The first person in the process reviews the invoice, makes comments or corrections, and passes it to the next reviewer. The process usually continues until the invoice is approved and can be billed. In cases involving outstanding invoices, the process might proceed through a collections stage until payment is received.
What are billing review stages?
In Ajera, you can use billing review stages to help move client invoices smoothly through the billing review process. The invoices must be based on a standard invoice format or on a custom design created with the Client Invoice Designer.
A billing review stage indicates where an invoice is in the review, and can notify a reviewer when an invoice is ready. Billing review stages are optional and have no effect on the general ledger.
Ajera provides two stages by default, Pre-review and Final; you cannot change or delete them. When you set up a project or an invoice group, Ajera creates an invoice and sets it to the Pre-review stage. When you print an invoice as final, the billing review stage automatically updates to Final.
You can set up additional billing review stages in Setup > Billing Review Stages to mirror the stages in your firm's billing review process.
How do you use billing review stages?
Review an invoice in the Client Invoice Preview window. This window is available from Manage > Client Invoices > Preview button or from
Click the Show Review History button to open the Billing Review History window. After entering your notes and adding any attachments, select a review stage to indicate that your review is completed.
A notification can appear in the project list of the Project Command Center for the next reviewer. You can also filter the Client Invoice List window so that it displays only invoices requiring your review.
At any time, you can view the billing review information for an invoice in the Billing Review History window. The billing review table lists all the preceding billing reviews for the invoice and can display notes, contacts, attachments, stages, and dates. You can do any of the following in the table:
- Change the due date, attachments, contact, notes or stage of any row of the table.
- Delete a row if you are the author or an administrator.
Why use billing review in Ajera?
Ajera streamlines the billing review process in the following ways:
- Review notes and attachments are kept with their corresponding client invoices.
- Reviewer notifications keep the billing review process moving smoothly.
- Project managers can review their invoices easily on the Invoices tab of the Project Command Center. The tab contains the PCC Invoices inquiry, which displays invoice information for a selected project.
- You can easily track the progress of your client invoices in the review process from either the Client Invoice List window or the Project Command Center. There is no need to open each invoice.
- You can extend this process through a collections stage, keeping track of outstanding invoices until payment is received.
Work with your implementation consultant to determine the billing review stages your firm would like to use and to get project managers trained on how to do paperless billing review.
Learn the details
These links go to help. To return to this course, click the Back button.
Understanding the billing review process 
Test your knowledge
Quiz: Other important features
Congratulations!
You've completed the How Ajera Works course.