User security refers to rights the user has to access the Costpoint
web applications. This
topic describes how user access is controlled in Costpoint web and highlights
the major security feature differences between Costpoint web and Costpoint
client/server.
Note: For
subsequent releases of new web applications, Deltek may designate some
of the released applications as critical from a security standpoint, in
which case such applications will be initially deployed with "DENY"
rights assigned to the "Everyone" user group for each critical
application.
This will effectively disable the application
and will provide an opportunity for a system administrator to review and
modify access rights prior to releasing an application into the production
environment. Specific
instructions will be included in the release notes.
Major Concepts
Setup Scheme
Costpoint web does not share the same security tables as client/server.
You must set up and maintain Costpoint web security separately from
the existing Costpoint client/server security. Costpoint web has its own
security setup screens using the Users and User Groups screens (Administration\Maintain\Users).
Level of Security
In client/server, rights are defined at the module level. Application
rights are inherited from module rights unless overridden at the application
level.
Similarly, in Costpoint web, rights start at the module level and flow
down to the application level. However,
you can set up Costpoint web rights at more granular levels below the
application level. You can define rights at the Result Set (RS) level,
which is a screen or a subtask within an application. Below the RS level,
you can define rights specifically for the Reports or Actions associated
with such result set.
User Group
In client/server, a user can belong to only one user group. The rights
granted for the user group are inherited by the user unless overridden
at the user level.
In Costpoint web, a user group acts as a role. You can assign a user
to one user group, many user groups, or no user groups. Rights granted
for the user group are inherited by the user of such group. You can still
explicitly define rights at the user level.
When a user has his own rights and also belongs to a group or multiple
groups, rights are additive across the user and user groups except when
set to "Deny." (See the subsequent Resolving Group Rights Inheritance
section of this topic.)
The "Everyone" User Group
The "Everyone" user group is initially set up to have full
access rights to the User Preferences application (Administration\Maintain\Users).
This application
allows each user to modify his preferences while working in Costpoint
web. By
default, all users belong to the "Everyone" user group.
Classification of Rights
Rights in Costpoint web are classified into three levels:
Deny:
No rights, and the user cannot enter the application
Read-Only:
The user can enter the application and can select and view data, but cannot
update the data.
Full:
The user can enter the application and can select and update the data.
Resolving Group Rights Inheritance
When a user has his own rights and belongs to a group or multiple groups,
rights are additive across the user and user groups except when rights
are set to "Deny." Deny
rights override other rights assigned to that user and to the user groups
linked to that user.
For instance, if a user is given Full rights to a specific application
but the user is also linked to one or more user groups that have Deny
rights assigned for the same application, the user cannot access that
application.
Other rights (i.e., non-Deny rights) are considered additive. If
a user is assigned Read-Only rights to an application but his user groups
are given Full rights to the same application, the user has Full rights
to such application.
Resolving Module Rights Inheritance
Rights set at the module level are inherited at the application level.
You can set an override at the application level for one or many applications
in a module. Once
you have explicitly set rights for an application, such application rights
will be used and module rights inherited from any other groups will be
ignored.
If application rights are explicitly set for the user and user groups,
those application rights are resolved together using the Deny vs. Additive
rule explained above (Resolving Group Rights Inheritance).
Security Rights
You do not need to explicitly specify security rights in the database
at each of the three levels in order to fully view/access applications
and result sets:
If no Module rights
are set up for a user or any of the user groups to which the user is assigned,
the user will not be able to access that application.
If no Application
rights are set up for a user or any of his user groups, Module rights
will be used.
If no Result Set
rights are set up for a user or his user groups, Application rights will
be used.
Module-Level Rights
Module level security is available in Costpoint web, despite the fact
that the menu is no longer organized by module.
You can define module rights for all companies or for a specific company.
For instance,
you can give a user/user group Full rights to the Accounts Payable module
in Company 1, but Read-Only rights to the Accounts Payable module in Company
2.
Application-Level Rights
Application rights inherit from Module rights. Once
explicitly set, they override Module rights for such application.
With Read-Only rights, a user can view/select the data for result sets
in that application. With Full rights, users can select and update data.
Result Set-Level Rights
Result Set rights determine the specific activities a user can perform
within a given result set. A
result set can be a common screen used in more than one application. In
such cases, the Result Set security applies to all applications that call
that result set.
You can grant rights for any or all of the following actions: Insert,
Update, Delete, and Select.
If Result Set rights are not explicitly set, the following default rights
are inherited from Application rights:
If a user has Deny
rights to the application, the user cannot access the application and
the user has no Result Set rights.
If a user has Read-Only
rights to the application, the user has Select rights for the result set.
If a user has Full
rights to the application, the user has all Select, Insert, Update, and
Delete rights for the result set.
If Result Set rights are explicitly set, they cannot enhance the default
rights from the Application (default rights); they can only be set to
reduce those default rights.
For example, if a user has Deny rights to an application, that user
will not be able to view any result sets from within that application,
regardless of the user's Result Set rights. If a user has Read-Only rights
to an application, that user will not be able to modify data in any result
set from within that application, even with Full rights to the result
set.
Action and Report Level
Within a result set, you can give users rights to individual actions
and/or reports linked to that result set. If
these are not defined, the following logic is used to determine Action/Report
rights:
If a user has Select
rights to view the data, the user can run reports but can perform no actions.
If a user has Update
or Delete rights, the user can run reports and perform actions.
For example, if no Result Set rights are defined, Read-Only Application
rights will only allow users to print reports, but not process database
updates, as a user will only have Select rights for a result set. With
Full rights, users can execute processes and print.
How to Set Up User and User Group Rights
Note: In
the next Costpoint web release, Deltek plans to provide a utility to convert
Costpoint client/server rights to Costpoint web.
CPSUPERUSER
This user is a special administrative user. No
rights are explicitly assigned to this user, although this user has Full
rights to all of the modules, applications, result sets, actions, and
reports.
A system administrator logs in as this user to assign security rights
to all other users.
Note: This user is still subject to all the
same other application restrictions as a normal user (e.g., password expiration,
lockout, color scheme preferences, organization security, company assignment,
etc.)
Create User Groups
Create a user group if you want to set up a profile of rights and assign
such rights to users later. A group can be set up for specific module
or application rights. Then when you assign the user to such group, the
user will inherit all the rights for that group.
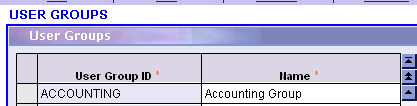
In the User Groups screen (Administration\Maintain\Users),
add a new user group. Assign group ID and enter group name.
You can skip over the Assign Users to Group subtask,
as you can assign users to a user group in this screen or later when you
create users in the Users screen (Administration\Maintain\Users).
Click on the Module Rights link to open the subtask.
This subtask displays all available licensed modules on the left. Select
the modules to assign to this group by highlighting the header column
and click on the “Select” button. The modules selected will display on
the right.
On the right side, choose the module rights level.
"Read Only" rights allow the user group to query but no ability
to insert, delete, or update. "Full"
rights includes all these abilities, and "Deny" excludes all
these functions. Then
select the company to which this rights level applies. If
it applies to all companies, select "ALL."
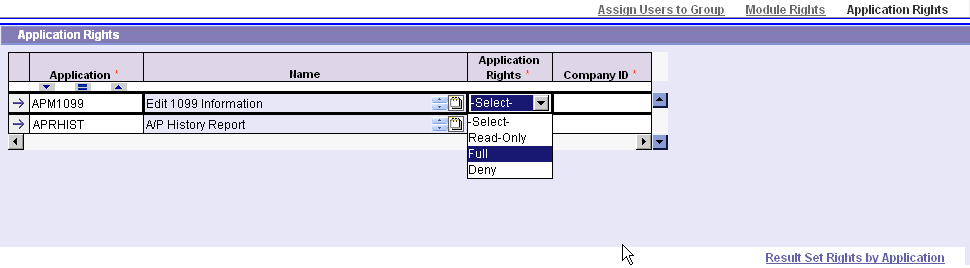
If you need to assign specific application rights
to the user group, click on the Application Rights link to open the subtask.
There is no need to enter data in this subtask unless the rights for applications
within a module should be different than those assigned to the module.
If so,
click to enter Application Rights.
In the Application Rights subtask (as desired),
click on the New icon to add an application that has different rights.
Select Lookup to view and select the application ID and choose the appropriate
rights level.
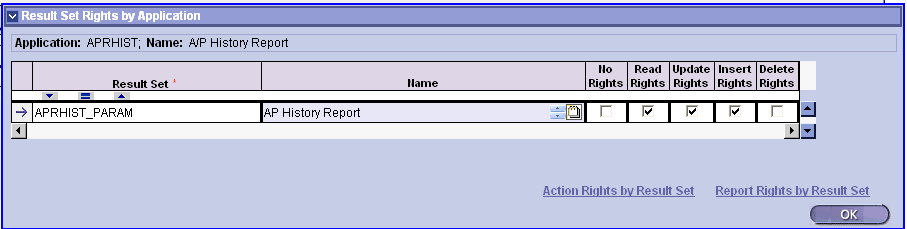
In the Application Rights subtask there is a Result
Set Rights by Applications subtask. There
is no need to enter data in this subtask unless the rights for each result
set (or screen) used in such application should be different from the
rights assigned to the application. If so, click to enter Result Set Rights
by Application.
In the Result Set Rights by Application subtask
(as desired), click on the New icon to add a result set that should have
different rights from the application. Select
Lookup to view and select the result set ID. Click all the rights as applicable
(Read, Update, Insert, Delete) or No Rights.
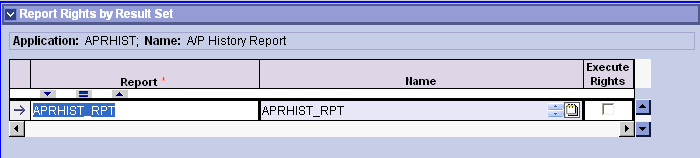
There are two available subtasks under Result
Set Rights by Application: Actions Rights and Report Rights. These are
only applicable for Report or Process parameter screens. There
is no need to enter data in this subtask unless the rights to execute
the report or action/process should be different from the rights assigned
to the result set.
In the Reports or Action Rights subtask (as applicable),
click on the New icon to add a specific report or action that should have
different rights from the result set. Select Lookup to view and select
the Report ID or Action ID. Select the Execute
Rights checkbox if this user group should have rights to execute
this report or action.
Create Users
After you have created a user group, you can create a user and assign
the user to this group.
In the Users screen (Administration\Maintain\Users)
complete the entry of the basic user information. Click
on the “Assign User Groups” link to open the subtask.
Assign this user to one or more groups. Note that
rights are additive (per the discussion at the beginning of this section).
If there are specific rights that this user should
have that are not inherited from any of the assigned user groups, they
should be added specifically for this user. Begin at the Module Rights
level and follow the same instructions as for User Groups, above, to enter
Module/Application/Result Set/Report or Action Rights, as explained for
User Group above.
Additional Security Controls
Access to Archived Reports
Costpoint web provides the ability to archive reports. Once a report
is archived, it can be opened subsequently for viewing, printing, emailing,
downloading, etc.
You can control access to archived Costpoint reports in the Report Archive
Security Rights screen (Administration\Maintain\Reports). In
this application, you can link users and/or user groups to:
All archived report
files produced from a user-defined group of report applications
All archived report
files generated from a specific report application
An individual archived
report file generated from a report application
You can give users and user groups rights to view, delete, or modify
the expiration date of the file.
Users can always view archive files they generated themselves, unless
those rights are overridden by assigning no rights to the report application
or archive file in the Report Archive Security Rights screen (Administration\Maintain\Reports).
In addition, by default, (in the absence of explicit Archive rights),
any user who has rights to execute a specific report can view an archive
produced by this report if the user has the same or higher labor suppression
privileges and organization group security as the user who generated the
archive.
Access to Printers
Unless a report is Emailed or downloaded to a workstation for local
printing, all printing in Costpoint web is done at the server printers.
Server printers are printers attached to the Report server. You can
set them up in Costpoint web in the System Printers screen (Administration\Maintain\Printers).
You can then link rights to use these printers to the user and/or user
groups (Users screen and User Groups screen (Administration\Maintain\Users).
Set Up Printers
Printers must be set up in the server machine hosting the Actuate Report
Server. After they have been set up, they are made available to Costpoint
web users via the System Printers application.
Click on the New icon to add a printer. Select Lookup to display a list
of printers attached to the Actuate Report Server. Select the desired
printer and designate a meaningful name for the printer.
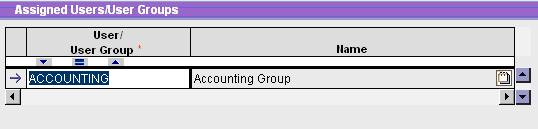
Assign Printer Rights
After the printer has been added, in the same application, assign the
printer rights to users or user groups in the subtask below. Without this
assignment, no user or user group will be able to use this printer.
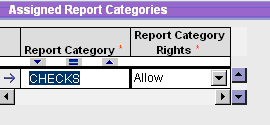
To further control printer rights, you can also assign it to print only
certain report categories. If this is the case, enter the report categories
in the subtask on the right. Without this assignment, the printer is available
for all categories. (Report categories are setup in the Report Categories
screen (Administration\Maintain\Reports).
Access to File Locations
Several Costpoint web applications require the processing of files (input
or output). As a result, you must upload the files to the database or
copy them to a server file location.
Server file locations are set up in Costpoint web in the Alternate File
Location screen (Maintain\Files). Rights
to use these file locations or folders are then linked to the user and/or
user groups (Users screen and User Groups screen (Administration\Maintain\Users).
Alternate File Location Security
Alternate file locations are physical folders in a disk drive and must
be accessible to the application server. They are set up to store files
created by Costpoint web applications or to make files available to users
or third party applications. Alternate file locations can be on the network
or on the local drive of the application server.
Alternate file locations must be created by the Administrator of the
machines or drives where they are created. After they are created, they
are made available to Costpoint web users via the Alternate File Locations
screen (Administration\Maintain\Files).
Click on the New icon to add a file location. Enter an ID and a name
that is meaningful to Costpoint web users. In the URL field, enter the
physical address of the folder.