While Deltek has attempted to verify that the information in this document is accurate and complete, some typographical or technical errors may exist. The recipient of this document is solely responsible for all decisions relating to or use of the information provided herein.
The information contained in this publication is effective as of the publication date below and is subject to change without notice.
This publication contains proprietary information that is protected by copyright. All rights are reserved. No part of this document may be reproduced or transmitted in any form or by any means, electronic or mechanical, or translated into another language, without the prior written consent of Deltek, Inc.
Draft edition published January 2026.
© Deltek, Inc.
Deltek’s software is protected by copyright law and constitutes valuable confidential and proprietary information of Deltek, Inc. and its licensors. The Deltek software, and all related documentation, is provided for use only in accordance with the terms of the license agreement. Unauthorized reproduction or distribution of the program or any portion thereof could result in severe civil or criminal penalties.
All trademarks are the property of their respective owners.
Deltek WorkBook 14.0 CU02
Version DB: 14.0.37 / HTML: 14.0.37.0
Release Date: January 26, 2026
Welcome to the WorkBook 14.0 CU02 Release Notes, which describe the features and enhancements and issues resolved in this release.
Overview
This document provides the following information:
WorkBook Documentation
Key Features
WorkBook 14.0 includes the following new and updated documentation:
- Release Notes in updated user-centric format for ease of use. Contains a summary of new and updated features and enhancements (and links to supporting documentation, where applicable), resolved software issues, and known issues.
Additional Documentation
Feedback
Technical Considerations
Installation
Supported Products
Compatibility Matrix
Information about platform requirements is maintained in the Deltek Product Support Compatibility Matrix, located on the Deltek Support Center. In the Matrix, search on "WorkBook" to navigate quickly to the information that you need.
Database Changes
Columns Removed
The following columns are removed as of Release 14.0:
- Table Act Column AllowExpenseAdditionalInformation
- Table CompAct Column AllowExpenseAdditionalInformation
- Table ExpenseEntry Column AdditionalInformation
Tables Added
The following tables were added as of Release 14.0:
Security Enhancements
This section includes a summary of the security enhancements in this release.
WorkBook Security Enhancements
Deltek Tracking: 2259942, 2030823, 2469588, 2387249
Numerous security enhancements are implemented, including updates to chat functionality, filesystem access, and tighter 2FA authentication.
Software Issues Resolved
This section includes all fixes in this release. Some descriptions might contain extra information, including ways to work around the defects.
Deltek Tracking: 2578664Creditor Invoice Upload Using AI Dela - VAT Error Message
When you created a creditor invoice via Dela from an Australian invoice document that used an ABN prefix instead of VAT/Tax, the creditor invoice could not be created.
Deltek Tracking: 2578658Schedule Assistant Does Not Work When SV 1029 Is Enabled
When you enabled System Variable 1029 and used the AI Schedule Assistant to generate a draft schedule, tasks could not be created without an activity attached. The system now uses a fallback mechanism to set the activity on tasks: first, it uses the user's default activity from employee settings, and if no default activity is set, it uses the first active activity in the system, ordered by ID.
Deltek Tracking: 2578665Schedule Assistant: Time Zone Bug Causes "Start Date Is a Day Off" Error When Adjusting AI-Generated Job Plan
When your time zone was set to an America (UTC -7) time zone and you used the AI Schedule Assistant to generate a job plan, the Start Date was set to one day earlier, and when you adjusted the plan so that the Start Date fell on a Monday, you received the response: "It looks like the chosen start date - <MM/DD/YYYY> - is a day off. Please pick a different date instead," and no plan was regenerated.
Software Issues Resolved
This section includes all fixes in this release. Some descriptions might contain extra information, including ways to work around the defects.
Deltek Tracking: 2571245Agents That Execute Stored Procedures Time Out After 10 Seconds
When you tried to run agents that executed stored procedures, they timed out after 10 seconds, or after up to 1 minute if a custom maximum execution time was specified.
Features and Enhancements
This section provides a summary of all the features and enhancements included in this release.
Personal API Keys
Deltek Tracking: 2451773
Correction: The 14.0 release notes previously stated that System Administrators can generate personal API keys for other users. This is incorrect. Only the user can generate their own personal API keys. In API Key Setup, System Administrators can view key information and invalidate keys for both personal API keys and API keys for API-only users, and they can generate new API keys for API-only users only.
Previous releases of WorkBook restricted API access to special
Advanced Users that have the application access role of API Only and that are
not allowed to log in via the user interface. This prevented customer
integrations that require administrative access to perform tasks like creating admin
users. In addition, this approach prevented users from building personal
automation use cases such as AI assistants that interact with WorkBook.
This feature enables any login-enabled employee—whether a
System Administrator, Advanced User, or Basic User—to generate per-user
personal API keys for their own use. Note: Contact Users (sometimes
known as Portal Users) cannot generate or use personal API keys.
In addition, System Administrators can view and invalidate personal API
keys for other users, as well as themselves.
Key Features
- Self-Service
Management – You can generate your own personal API keys via My
Settings > Login Settings. You can have multiple personal API keys.
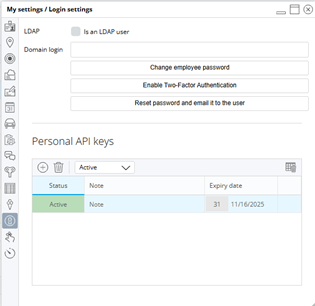
You can view the list of your personal API keys at Login Settings;
however, you cannot see the actual key values, which are hidden to retain
security. You can see the key status—active, expired, or invalidated—and
invalidate your keys. The following figure shows an example of the
Personal API Keys section in the My Settings / Login Settings dialog box.
- Same
Access Level – Personal API keys grant exactly the same permissions as
your normal login credentials.
- Secure by Design – WorkBook displays personal API key values only
once, when they are generated. Thus, you must note the value of a personal API
key when you generate it. Personal API key values remain hidden otherwise. (Personal
API keys are hashed, so that even if a user has direct access to the database, it
is impossible to recover the value of a personal API key.)
Personal
API keys must have expiration dates. The maximum expiration date is three
months from the date of the personal API key’s creation. If you try to create a personal API key with a longer active period, WorkBook still sets the expiration date to three months from the creation date.
WorkBook sends a notification email to you when you generate a personal
API key; thus, you are alerted if a key was somehow generated without your
knowledge.
- Using
Personal API Keys – Using a personal API key is similar to using “regular”
API keys for API-only users. Having a personal API key enables you to build custom workflows
using AI assistants and other tools to read data and perform actions on
your behalf.
- Enhanced
Integration Capabilities – Previously, API-only users could not build
any integration that required calling endpoints or performing actions that
are only for administrators because API-only users are Advanced Users.
With this enhancement, you can now work around this limitation by using an
administrator’s personal API key.
API-only users are preferred for
building integrations, unless the integration specifically needs to perform actions
as an administrator.
Note: Because personal API
keys expire at most three months after being created, when you use personal API
keys for integrations, it is a best practice to set up a process (automated or
manual) for rotating keys.
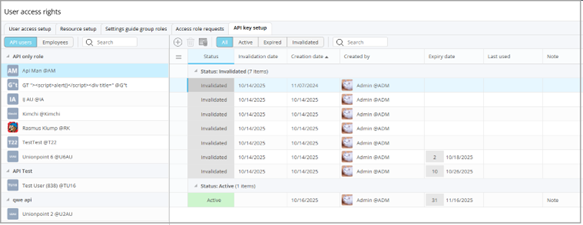
- Management
of Users’ Personal API Keys – System Administrators can view information about personal API keys for employees and API keys for API-only users via a new tab at Settings > Advanced Tools > User Access Rights > API Key Setup. They can view details such as status, Note, Created by, creation date, expiration date, and last-used date (some columns may be hidden by default). However, they cannot view the actual key values, which are only displayed when a key is created. System Administrators can also invalidate keys. Important: System Administrators cannot generate personal API keys for other employees. Only the user can generate their own personal API keys. For API-only users only, System Administrators can generate new API keys. The following figure shows an example of the API Key Setup tab.
Setup
To use the Personal API Keys feature, you must enable System
Variable 1198, Enable Personal API Keys. This System Variable is enabled by
default; however, if you are a System Administrator you can disable
it.
Updated Icons Used for Creditor Invoice Line Types
Deltek Tracking: 2496601
The creditor invoice detail grid at Finance & Administration > Creditors > Creditor Invoices has new icons that represent creditor invoice line types.
|
Icon
|
Creditor Invoice Line Type
|

|
Operating
|

|
Project
|

|
VAT
|

|
Accrued Operating
|
Price Quote Label on Sales Invoice
Deltek Tracking: 2349787
This feature improves the traceability of billing workflows
by displaying the numbers of the Price Quotes (PQs) that were used to generate
sales invoices directly on the sales invoices. This enables you to easily
identify which PQs contributed to the creation or update of a sales invoice,
ensuring accurate documentation and your ability to audit.
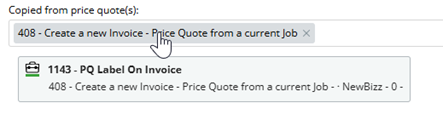
A new read-only field, Copied from Price Quote(s),
appears on the sales invoice header tab, just below the Client Account Number.
This field displays a label that provides the source PQ’s number and title. If
there are multiple PQs that are related to a sales invoice, all of them are displayed. This field is only present on a sales invoice when at least one PQ
was used to generate that sales invoice.
When WorkBook generates a sales invoice from a PQ, it
automatically adds this field to the header tab. When you use Copy Price
Quote to the Current Invoice to add lines to an existing sales invoice,
WorkBook updates the field to include the new PQ(s).
If you delete lines from a sales invoice, you can remove the
label if that sales invoice is in Status-10. You can remove a label even if you
did not remove the line from the sales invoice; you can also remove a line from
a sales invoice without removing the label. The label is an indicator that enables
you to properly reflect the underlying source PQ. WorkBook prompts you to
confirm deletions.
You can interact with labels as follows:
- Click a label to access the associated PQ directly.
- Right-click on a label to delete that label from
a sales invoice.
When you hover on a label, a tooltip displays additional
details. The following figure shows an example.
Norwegian SAF-T Updates for 1.3
Deltek Tracking: 2336849
To align with the latest SAF-T 1.3 regulatory requirements
and facilitate accurate submissions through Deloitte’s TaxCube platform, this
feature updates the Journal Entries export structure in WorkBook. This
update introduces new field elements and revised data segmentation to ensure
full compatibility with TaxCube’s specified format.
The following columns are added to the Journal Entries output
to meet TaxCube’s metadata specifications:
- VoucherType
- VoucherDescription
- ModificationDate
In addition, the following amount data columns are restructured as shown in
the following table.
|
Existing Column
|
New Format
|
Old Format
|
Requirement
|
|
AnalysisAmount
|
8 columns
|
4 columns
|
Split into 8 columns to separate Debit
and Credit for each relevant category to ensure granular parsing by TaxCube.
|
|
Tax(VAT)Amount
|
8 columns
|
4 columns
|
Split into 8 columns to separate Debit
and Credit for each relevant category to ensure granular parsing by TaxCube.
|
Creditors > Creditor invoices > Intelligent Character Recognition (ICR) for Creditor Invoice Creation using Dela™ AI
Deltek Tracking: 1877739
This feature introduces intelligent optical character recognition
(ICR) technology that reads your invoices and credit notes and then uses Dela™ AI
to extract data to create creditor invoice records. This reduces manual data
entry and the time that that takes and improves accuracy in your Accounts Payable
process.
This functionality creates creditor invoice records with
both header information and individual line items, just as if you had entered
them manually. Creditor invoices that WorkBook creates with Dela AI assistance
are identified by the

Dela AI-assisted
icon, accompanied by a
tooltip (
This invoice was created with Dela assistance.). This icon
remains with the creditor invoice throughout its life, even if you modify the
invoice manually at some point.
The following are some of the key capabilities and benefits
of this feature:
- File
Upload & Processing
- Enhanced Uploading — Uploads invoices in
PDF, JPEG, and PNG formats. You can drag and drop or select files. The upload
component ensures that only allowed file types are uploaded. Existing System
Variable settings ensure the security of allowed file extensions, significantly
reducing the risk of malware uploads. The ICR functionality can handle source
records in multiple languages, and generates the new records in the language of
the original documents.
- Single Invoice or Batch Processing —
Uploads single invoices or multiple invoices at the same time. The file
uploader has been updated for Release 14.0; it now enables you to remove
individual files from bulk uploads, shows the sizes of files, and enables you
to clear all selected files from the upload area. See Updated File Uploader
Functionality (Deltek Tracking: 2445063) for more information.
- Background Processing — Uploads invoices
to a temporary folder on your Storage Provider. WorkBook then automatically processes
the uploaded invoices in the background, so that you can continue working.
- Automatic Attachment — Uploaded files are
automatically attached to the created creditor invoice records.
- Error Logging — WorkBook logs any errors
that it encounters during the file upload process. WorkBook also sends
notifications to the Finance Responsible. If the Finance Responsible is
inactive, WorkBook sends notifications to the Company Responsible.
- Intelligent
Data Recognition
This process automatically extracts
and populates the following information if it is provided in the original
uploaded files:
- Invoice
Header information:
- Invoice number
- Invoice date
- Creditor/supplier information
- Total amount
- Currency
- Description
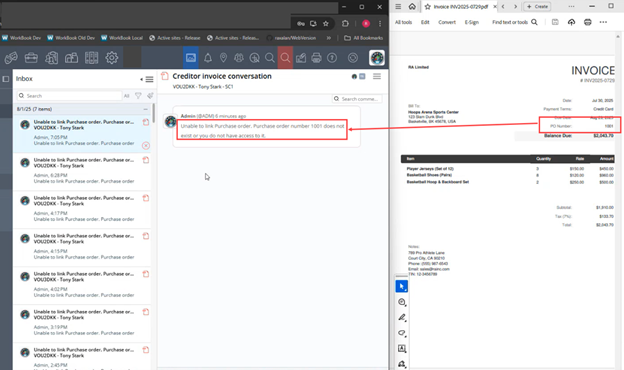
If some data cannot be linked, the Finance Responsible
receives an inbox notification that explains the reason. The following figure
shows an example.
- Line
Item details:
- Individual line amounts
- Currency information
- Line descriptions
- Smart
Creditor Matching
- Automatically matches supplier information from
invoices to existing creditor records in your WorkBook system.
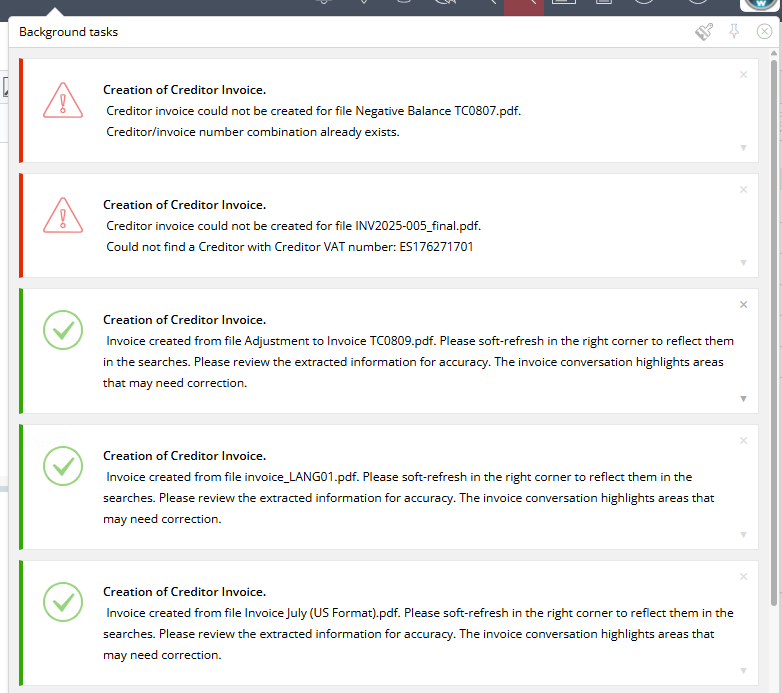
- If no matching creditor is found, WorkBook does
not create the creditor invoice. If a matching creditor is found, but is
blocked, WorkBook does not create the creditor invoice. This is flagged in the
process log, which you can view by clicking Background Tasks. The
process log also shows success messages. The following figure shows an example.
- Integration
with Existing Workflows
- Maintains all existing invoice processing
workflows.
- Works seamlessly with your current creditor invoice
agents.
- Documents that are processed through existing
agents can also use ICR functionality.
- The fallback behavior if an error occurs during the
extraction of header and detail information from uploaded files or attachments
is to revert to the original functionality:
- WorkBook creates the creditor invoice header
without any details.
- WorkBook attaches the file to the header.
- WorkBook notifies the Finance Responsible of the
error and the reason that the details were not applied to the creditor invoice.
- Straightforward
Setup
- A
System Administrator enables this functionality
using the ICR for Creditor Invoices feature opt-in section of the AI
Features page under Settings > Company Settings > AI Features.
When this feature is enabled, new upload options are displayed in your Creditor
Invoice workflow that enable you to take advantage of ICR processing.
To begin the process of creating creditor invoices
using Dela’s intelligent character recognition, navigate to
Finance &
Administration > Creditors > Creditor Invoices. On the Creditor
Invoices page, click the
 Create Invoices with Dela
icon on the grid toolbar.
Automatic Cleanup of Databoard Statistics Table
Deltek Tracking: 2431089
The General System Maintenance agent has been improved so that WorkBook stores only 3 months' worth of data in the DataboardStatistics table. If the cleanup of this table is interrupted (when it reaches the maximum agent run time), it continues on the next agent execution.
Pagero Handling of Invoices
Deltek Tracking: 2347340
The
Pagero Handling of Invoices feature enhances the integration between the Pagero
e-invoicing platform and the WorkBook Finance & Administration module by focusing
on invoice lifecycle management, data reliability, and user control during both
the implementation/testing and production stages.
Enhanced Invoice Management – These enhancements give
you, as a Finance User, more control over invoices that you import through
Pagero, for example:
- Automatic
Duplicate Invoice Handling – The
Pagero Agent (Agent Type 182, Fetch
Inbound Invoices from Pagero) automatically detects duplicate invoices coming from
Pagero and marks them as duplicates. When the agent finds a duplicate invoice,
WorkBook automatically sends a notification to the Finance Responsible in the
Company where the invoice would normally be posted. Detection of a duplicate
invoice does not cause the import to fail, so your invoice processing runs more
smoothly without manual intervention.
- Removal of Invalid Production Invoices – You can delete production invoices when appropriate, such as incorrectly imported invoices. A warning and confirmation prompt informs you that deletion can cause discrepancies between the WorkBook and Pagero systems.
Audit
Trail – WorkBook
logs the details about who performed deletions, and when and why, for audit purposes.
Production / Testing Mode Toggle – A new System Variable (1197, Pagero Integration Mode) enables you to control whether you are processing invoice files in testing mode or production mode. When you install Release 14.0, this setting defaults to production mode so that you do not have to change the setting manually if you are already using the Pagero integration. Note, however, that if you have never imported or sent invoices through Pagero, it defaults to test mode. Valid values for System Variable 1197 are as follows:
- 1 – Test Mode (Default Value ) – Invoice file processing between Pagero and WorkBook is in test mode.
- 2 – Certification Mode – Invoice files that are sent to Pagero are processed fully, but are not delivered to the end recipient. This enables testing of the connection between WorkBook and Pagero.
- 3 – Production Mode – Invoice file processing between Pagero and WorkBook is in production mode.
Deletion of Test Invoices – Test invoices are automatically flagged, making them easy to identify and remove. This helps you to clean up invoices that were created during your import testing without affecting production data. You can delete and cancel these invoices without any required comment. No logging or tracking is involved when you delete test invoices.
AI-Driven Project Schedule Generation
Deltek Tracking: 2211777
This release introduces AI-powered schedule generation using
Dela™ via the Schedule Assistant. This gives you the ability to quickly create
detailed project schedules without creating individual tasks manually. You enter
text prompts, and the Schedule Assistant creates comprehensive project plans
tailored to your specific needs. The resulting project plans use the same
WorkBook scheduling functionality with which you are already familiar.
- Natural
Language Input – Describe your project requirements in your own words,
providing specific guidance about the processes and objectives involved in
the project.
- Customizable
Parameters – Include fields like start date and suggested number of
days. Note that schedules are based on work days, rather than calendar
days. You can also use templates or previous schedules as foundations. For
example, if you often have projects that typically involve the same sets
of tasks—such as creating websites or marketing campaigns—you can create
templates that the Schedule Assistant can use as the basis when generating
a project schedule.
- Project
Context – Include project briefs to inform the Schedule Assistant
about requirements, financial constraints, and other pertinent factors.
- Interactive
Refinement – After the Schedule Assistant generates an initial
schedule, you can continue to iterate through draft schedules using
conversational interactions.
- Preview
and Validate – Preview iterations until you arrive at the schedule
that meets your requirements.
- Finalize
– Load the final schedule, and it becomes the project schedule. You
interact with final AI-assisted generated project schedules just as you do
with manually created schedules.
- Controlled
Access – Only authorized users who have appropriate schedule
permissions can access the Schedule Assistant functionality. Using the
Schedule Assistant is opt-in and is disabled by default. (See Straightforward
Setup.) All data transmission follows standard security and privacy practices
and regulations.
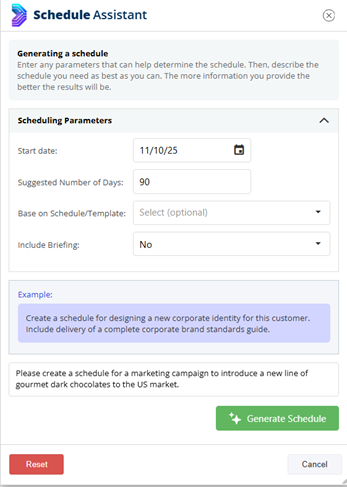
The following is an example of how you generate a schedule
using the Schedule Assistant. In this example, the project is to create a
marketing campaign to introduce a line of gourmet chocolates to the US market.
The flow begins with Jobs. Select a job > open the job
card > click the Tasks tab > Click
Schedule Assistant.
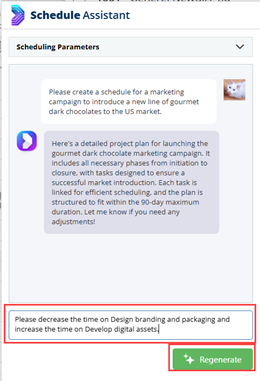
WorkBook displays the Schedule Assistant dialog box.
Note the example text in the purple box that provides a
guideline. You enter your description of your project in the field below the
example, as the preceding figure shows.
You can click Reset to clear all of the information
that you entered in the dialog box and start over. Click Cancel to discard
all of the information and close the dialog box.
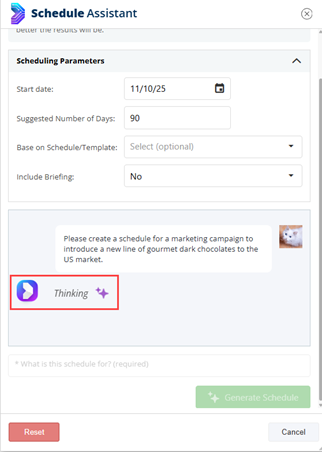
After you click Generate Schedule, the Schedule
Assistant indicates that it is processing the information that you provided.
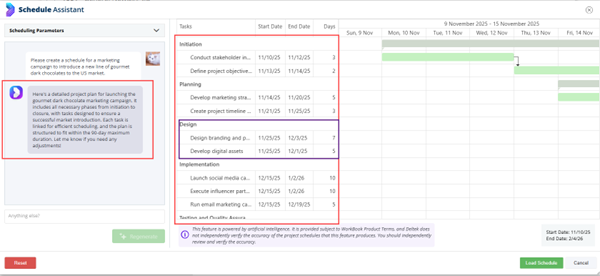
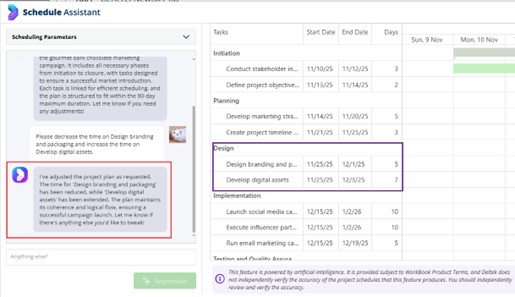
Next, the Schedule Assistant displays the first draft of the
schedule in the right pane. In the Scheduling Parameters pane, it describes in natural language what it did. The right pane lists the tasks, their start and end dates, and durations on the left side, and the total project duration (in work days)
appears at the bottom of the first column. The Gantt chart shows the distribution
and duration of tasks across the project, and their relationships and flow.
The Schedule Assistant intelligently distributes tasks,
including figuring out when tasks can run concurrently. The schedule can also
include unlinked tasks.
At the bottom of the Scheduling Parameters pane, if the first iteration does not meet your requirements, you can refine
parameters, enter additional parameters, or change values, and then click Regenerate
to create another iteration of the schedule.
The Schedule Assistant generates another draft schedule
according to your revised prompt, displays it in the right pane, and again describes
what it did in the Scheduling Parameters pane.
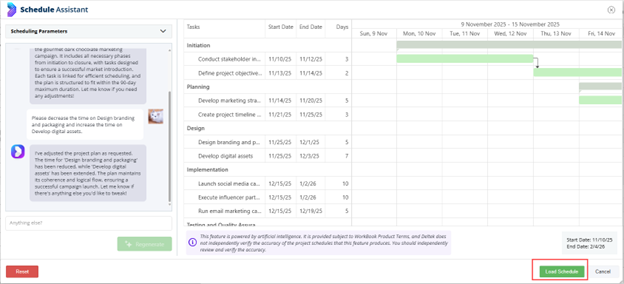
If you decide that this schedule meets your requirements,
click Load Schedule to finalize this iteration and load it as the
project schedule.
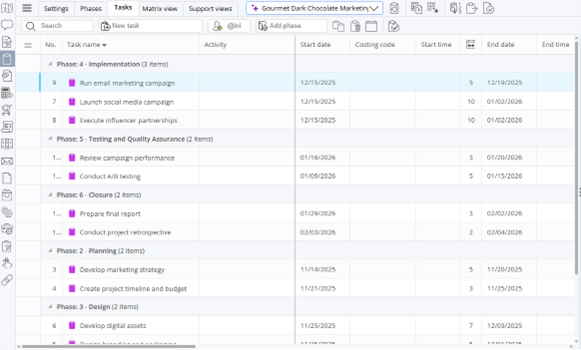
You can see the finalized schedule after you have loaded it.
Notes
- You can see in the preceding figure that the
 icon
appears next to the project schedule name above the schedule toolbar. This icon
stays with the schedule throughout its life cycle, even if you change the
schedule manually.
icon
appears next to the project schedule name above the schedule toolbar. This icon
stays with the schedule throughout its life cycle, even if you change the
schedule manually. - Schedules that you create with the Schedule
Assistant can only start on today’s date or in the future.
- You can set specific dates for tasks. For
example, if your schedule includes a pre-launch meeting for a campaign on a
certain date, you can specify that date for the meeting in your prompts. The
Schedule Assistant can even create lead-up tasks to prepare for the meeting
that occur before the specified date.
Example Use Case Prompts
The following are example prompts that you might use as the
initial prompts for generating a project schedule:
- Create a website redesign project with a
duration of 6 months, with discovery, design, development, and testing phases,
starting on March 1.
- Build a product launch schedule for Q3 with
marketing and sales.
Straightforward Setup
Setting up the Schedule Assistant involves two steps that
System Administrators perform on the form at Settings > Company Settings
> AI Features:
- Enable the Schedule Assistant on the AI Features
page by scrolling to the Schedule Assistant section and selecting Enable
this Feature (required).
- Enter information that provides context to the Schedule
Assistant in the top section of the AI Features page, such as Company
narrative, target audience/customer segments, countries of operation, and primary
market size and business scale. This step is optional, but the Schedule
Assistant is better able to create more project-specific and Company-specific results
if you provide this additional information.
For more detailed, step-by-step instructions for setting up
and using the Schedule Assistant, see the WorkBook online help.
Scrum Boards - New Availability of Multiple Scrum Boards
Deltek Tracking 2030226
Project teams require flexibility in how they manage and monitor task progress. This enhancement introduces customizable Scrum Board configurations, which enable teams to use different sprint Scrum Boards that include different task progress statuses to track their work during scrum sprints.
Note: When you install WorkBook 14.0, existing scrum sprints are assigned a Standard configuration, which preserves existing sprint structures, task progress statuses, and task positions post-upgrade. At the time of installation, the Standard configuration is established as the default configuration; you cannot edit it. However, you can create another configuration and designate that configuration as your new default configuration for sprints that you create after the installation. Creating and assigning a new default configuration has no effect on existing data.
You must be a System Administrator or Advanced User and have access to the Settings module to create custom Scrum Board configurations.
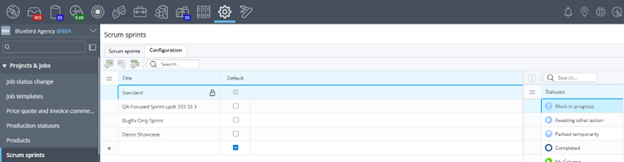
To access this functionality, navigate to Settings > Projects & Jobs > Scrum Sprints > Configuration tab. The following figure shows an example of this tab.
On the Configuration tab, you can create, copy, edit, and delete Scrum Board configurations. Updates to configuration changes happen in real time.
- Each configuration must have a unique name.
- You select preset task progress statuses from a master list of statuses. Note: Only System Administrators or Advanced Users with access to Settings can create preset task progress statuses for your WorkBook system at Settings > Projects & Jobs > Task Progress Status.
- If you delete a task progress status from a configuration, WorkBook reverts any tasks that have that status to the backlog.
- You cannot delete a configuration if it is active—that is, it is applied to scrum sprints that are active.
- Every scrum sprint must have an active configuration. If you do not specify a configuration, WorkBook assigns the Standard configuration to it, or another configuration that you have designated as the default configuration.
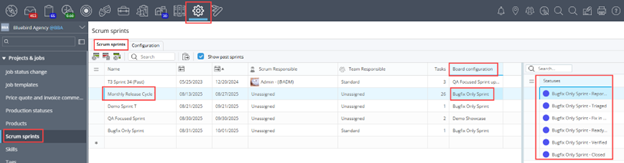
On the Scrum Sprints tab, the new Board Configuration column indicates which sprint Scrum Board configuration is assigned to the scrum sprint that you select in the grid. This column is a drop-down list field, so that you can select a different configuration. If you select another configuration, and its set of task progress statuses is different from the configuration that was previously selected, the Statuses pane is updated to display the newly selected configuration’s set of task progress statuses. The following figures show an example of this, using an example scrum sprint named Monthly Release Cycle 1 that initially has the board configuration BugFix Only Sprint assigned to it.
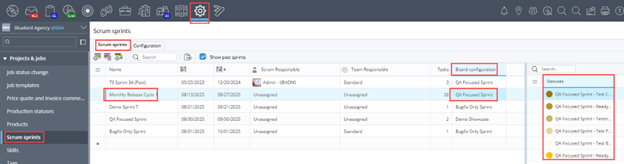
After a change to the QA Focused Sprint board configuration, the task progress statuses that that configuration includes are displayed in the Statuses pane.
Any tasks that had statuses under the first board configuration (BugFix Only) that do not exist in the newly selected board configuration (QA Focused Sprint) are automatically moved to the backlog (which is the same thing that happens when you move multiple tasks to a different sprint).
When you access a Scrum Board for a selected sprint, the columns that you see are only those for the task progress statuses that are included in the specification for the board configuration that is assigned to that sprint. The following figure shows the Scrum Board for the same example Monthly Release Cycle 1 sprint, using the example QA Focused Sprint configuration. The columns on the Scrum Board are the task progress statuses that are specified for the QA Focused Sprint configuration—Test Case Design, Ready for Testing, Testing in Progress, and so on.
For more detailed information about setting up Scrum Board configurations and using them, see related
online help topics.
Dela Features Opt-In in Company Settings
Deltek Tracking: 2367303
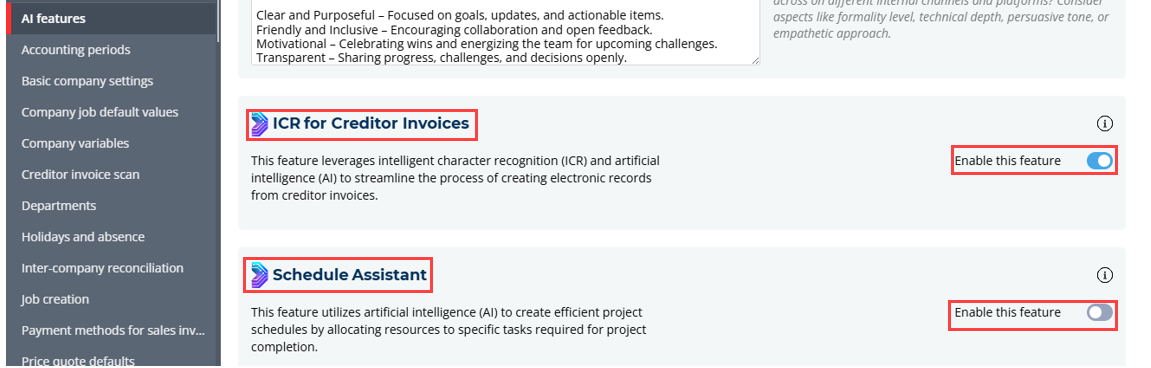
WorkBook integrates Dela AI into various functionalities and workflows. This enhancement gives you the option to take advantage of this or to opt out on a per-Company basis of one or all features that use Dela AI. You have full control over which Dela AI integrated functionalities you enable.
If you are a System Administrator or Advanced User who has access to Settings, you do this by navigating to Settings > Company Settings > AI Features. Select the Company for which you want to determine Dela AI feature use in the drop-down list above the left pane, then scroll down the list of Dela AI integrated features and enable or disable the ones that you want to opt in/out of. The following image shows an example of the AI Features page.
The Schedule Assistant using Dela AI uses the information in the upper section of this form. See the feature overview for the Schedule Assistant for detailed information.
Note that if later you deselect a feature, you lose access to that functionality, but data that was created using that feature is preserved.
Software Issues Resolved
This section includes all fixes in this release. Some descriptions might contain extra information, including ways to work around the defects.
Deltek Tracking: 1918105Creditors - Creditor Invoices - Cannot Approve Vouchers with Zero Markup
Description: If you tried to approve creditor invoices with attached Purchase Orders that had profit margins below 1, you could not approve them because creditor invoices did not allow profit margins to be below 1.
Deltek Tracking: 2035281Journal Entry - Fields Disappear after Browser Page Scaled Down
Description: When you scaled down the browser page, the Voucher Balance, Journal Balance, and Error Description fields disappeared.
Deltek Tracking: 2169606Reports - Cannot Edit Address Label Format
Description: You could not control the format of the address label for some reports.
Additional Information: The following reports now have their address format pulled from the country label composition. Then as a fallback, WorkBook uses System Variable 1055, Set Address Label Composition for Debtors and Suppliers,.
- 223 Statement of accounts (Open items)
- 224 Statement of accounts (Open items)
- 225 Statement of accounts (Transactions)
- 226 Statement of accounts (Transactions)
- 433 Debtor interest note
- 522 Statement of accounts (Transactions Currency)
- 523 Statement of accounts (Transactions Currency)
Deltek Tracking: 2267478Monthly WIP Adjustments Follow-Up - Notifications Sent to All Companies Regardless of Selected Company
Description: When you manually created notifications using the button on the Monthly WIP Follow-Up administration page, WorkBook sent notifications to all Project Managers on all jobs with required follow-up, regardless of Company. Now only Project Managers on jobs with required follow-up in the selected Company are notified.
Deltek Tracking: 2347291Cost Entry - Expense Entry - Personal Expense Approval - Information is not Displayed
Description: When as an approver who did not have access to the client, you received expenses for approval, the client, the creditor, the job, and the activity were not displayed.
Deltek Tracking: 2406111Cannot Send E-Invoices with Zero-Amount Lines Via Sproom
You could not send e-invoices that included lines that contained zero amounts via Sproom. Zero-amount lines on e-invoices caused the following error: [F-LIB400] When TaxCategory/ID is ZeroRated, TaxAmount and Percent must be 0. When the percent was 0, the TaxCategory/ID was showing StandardRated.
Deltek Tracking: 2417824VAT Tax - HMRC - Sales Tax Code Calculation Display and Scale Issues
Description: For sales tax expense calculations, the total row in the preview grid of the sales tax setup showed the incorrect tax rate. It showed a value from an intermediate step in the calculation, rather than the total tax rate that was applied.
In addition, the sales tax code calculation scaled poorly with a large number of invoice lines, which led to slow performance on large documents.
Deltek Tracking: 2512359Journals - Timeouts when Approving a Journal
Description: When you approved a journal that had a large number of journal entries, a timeout could occur.
Deltek Tracking: 2513763Rounding Issue with VAT on Creditor Invoices Causes Incorrect Values to be Posted to Debit and Credit Accounts
Description: If in creditor invoices several lines rounded the VAT up or down, resulting in mismatched total VAT values, and you posted it, WorkBook posted incorrect values to the debit and credit accounts. This happened only when you used import VAT types .
Deltek Tracking: 2519595Reporting Currency Data is not Recalculated when System Variable 1188 is Set
Description: When System Variable 1188 was set to a non-zero value, and WorkBook was stuck while processing job key figures, the job key figures (reporting currency data) were never recalculated.
Deltek Tracking: 2463043Creditors - Creditor Invoice Details - Arrow Keys and Focus Behavior Issue
Description: When you edited a cell in creditor invoice details, then you used arrow keys to try select other cells, focus went to the scroll bars and began scrolling in the grid.
Deltek Tracking: 1569314Costs - Open Entries - Purchase Order (PO) Amounts Calculated Incorrectly
Description: When you opened Jobs > Costs > Open Entries, PO amounts were calculated incorrectly when using a currency that is different from the Company currency.
Deltek Tracking: 2342652Arithmetic Overflow Converting IDENTITY to Data Type int Error
Description: When WorkBook processed records for large Companies who have many employees and frequently update jobs, work could be interrupted because of an arithmetic overflow error that was caused by the record ID reaching its maximum value.
Deltek Tracking: 2434277Creating Currency Rate Table and Viewing Detailed Jobs Costs by Age Causes Timeout
Description: When you created a currency rate table and then navigated to the Detailed View by Age jobs costs view, WorkBook timed out.
Deltek Tracking: 2443063Creditor Invoice Lines Import - Long Execution Time or Apparent Time-Out - JobIsDirty Table Size
Description: When you imported a large number of lines to a creditor invoice, the import either took a long time to complete, or it appeared to time out. However, processing continued on the server. The number of rows that were inserted into the JobIsDirty table increased exponentially, depending on the number of invoice lines that were imported. For example, importing hundreds of lines generated millions of lines in the JobIsDirty table
Deltek Tracking: 2255907Pagero Error Reports - Duplicate Invoices
Description: When the Pagero import agent ran, it failed and produced an error about duplicate invoices.
Additional Information: The relevant Company finance responsible now receives only one notification about duplicate invoices.
Deltek Tracking: 2381750Invoices Imported from Pagero Use Incorrect Line Type
Description: When you imported an invoice from Pagero, the resulting creditor invoice did not have the line type that was indicated by the creditor's Primary Delivery setting. It had the creditor default line type, instead.
Deltek Tracking: 2427202Pagero Rejects Sales Invoices that have Discounts
Description: When WorkBook sent sales invoices to Pagero that contained a discount (either through the Extra field or the Discount field), Pagero rejected the invoices because the format for the discount was wrong.
Additional Notes: WorkBook now formats discounts correctly, and Pagero accepts the sales invoices.
Deltek Tracking: 2247920Report 527 Does not Include VAT Code Invoices that have Previous VAT Codes
Description: After you deleted the VAT code that was attached to an invoice, when you printed Report 527 (Debtor Sales List for VAT Reporting), the report did not show all invoices under the new VAT code name.
Deltek Tracking: 2300637Resource Replacement Always Sent for Approval Automatically
Description: When you replaced a resource on a task, WorkBook always automatically sent the resource allocation for approval.
Deltek Tracking: 2077830Task Matrix - Cannot Drag Column Headers to New Position
You could not move column headers in the grid.
Deltek Tracking: 2512354Job Document Approval - Notification Triggered before File Upload is Complete
Description: When you uploaded large files to a new document approval, WorkBook sent the link to the document to the approving user (Basic User or Advanced User) on the Job > Chat > Document Approval page before the file upload was complete. When the approving user tried to open the document, WorkBook displayed a message saying that the file is unavailable.
Deltek Tracking: 2429516Clicking on the Approval Email Link Leads to a Blank Screen
Description: When you clicked on the approval email link for a personal expense, it opened your own personal expense page or a blank page, or it failed to navigate properly. If you restarted or re-clicked the link, it often resulted in blank tabs that displayed only column headers.
Known Issues
This section includes a summary of known issues in this release.
Agents
Agent Company Filtering - Scope is Unclear
Deltek Tracking: 2481166
When you configure agents in Agent Setup, you can specify a Company parameter in the the Apply to Company field. Note that this setting is only supported by specific agent types; it does not apply universally across all agent types.
Only the following agent types support Company-specific filtering:
- Time Entry Weekly Reminder (Agent Type 15)
- Follow-Up Email with Approval, Required Follow-Ups and Open Conversations (Agent Type 50)
- General Import Agent (Agent Type 55)
- General Export Agent (Agent Type (58)
- Job Cost Check Notification. Total Cost Exceeds X % of Approved Price Quote (Agent Type 60)
- Notification: Missing Time Tracking (Agent Type 172)
Note: For all other agent types, if you specify a Company in the Apply to Company field it has no effect; the agent processes data across all Companies in your WorkBook system.
Jobs
Job Document Approval - Admin-Type Approver Sees Link to the File while Upload is still in Progress
Deltek Tracking: 2539232
When you upload large files to a new document approval, WorkBook sends the link to the document to the approving user (Admin User) on the Job > Chat > Document Approval page before it finishes uploading the file. When the approver tries to open the document, WorkBook displays a message that the file is unavailable.
Resources
Cannot Create Employees
Deltek Tracking: 2473456
After upgrading from Release 13.6 to 13.8, Advanced Users might be unable to create an employee. This could happen when the access role had all page permissions disabled, but included full access overrides to selected pages.
About Deltek
Better software means better projects. Deltek delivers software and information solutions that enable superior levels of project intelligence, management and collaboration. Our industry-focused expertise makes your projects successful and helps you achieve performance that maximizes productivity and revenue. www.deltek.com