AI-Driven Project Schedule Generation
Deltek Tracking: 2211777
This release introduces AI-powered schedule generation using
Dela™ via the Schedule Assistant. This gives you the ability to quickly create
detailed project schedules without creating individual tasks manually. You enter
text prompts, and the Schedule Assistant creates comprehensive project plans
tailored to your specific needs. The resulting project plans use the same
WorkBook scheduling functionality with which you are already familiar.
- Natural
Language Input – Describe your project requirements in your own words,
providing specific guidance about the processes and objectives involved in
the project.
- Customizable
Parameters – Include fields like start date and suggested number of
days. Note that schedules are based on work days, rather than calendar
days. You can also use templates or previous schedules as foundations. For
example, if you often have projects that typically involve the same sets
of tasks—such as creating websites or marketing campaigns—you can create
templates that the Schedule Assistant can use as the basis when generating
a project schedule.
- Project
Context – Include project briefs to inform the Schedule Assistant
about requirements, financial constraints, and other pertinent factors.
- Interactive
Refinement – After the Schedule Assistant generates an initial
schedule, you can continue to iterate through draft schedules using
conversational interactions.
- Preview
and Validate – Preview iterations until you arrive at the schedule
that meets your requirements.
- Finalize
– Load the final schedule, and it becomes the project schedule. You
interact with final AI-assisted generated project schedules just as you do
with manually created schedules.
- Controlled
Access – Only authorized users who have appropriate schedule
permissions can access the Schedule Assistant functionality. Using the
Schedule Assistant is opt-in and is disabled by default. (See Straightforward
Setup.) All data transmission follows standard security and privacy practices
and regulations.
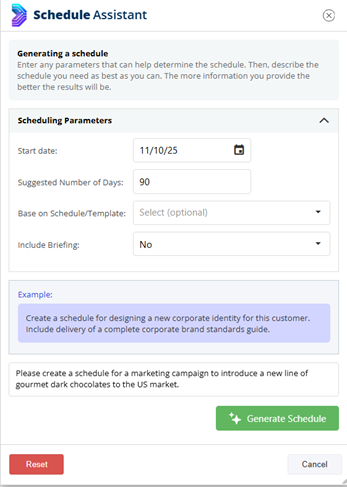
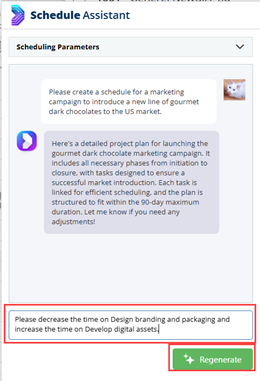
The following is an example of how you generate a schedule
using the Schedule Assistant. In this example, the project is to create a
marketing campaign to introduce a line of gourmet chocolates to the US market.
The flow begins with Jobs. Select a job > open the job
card > click the Tasks tab > Click
Schedule Assistant.
WorkBook displays the Schedule Assistant dialog box.
Note the example text in the purple box that provides a
guideline. You enter your description of your project in the field below the
example, as the preceding figure shows.
You can click Reset to clear all of the information
that you entered in the dialog box and start over. Click Cancel to discard
all of the information and close the dialog box.
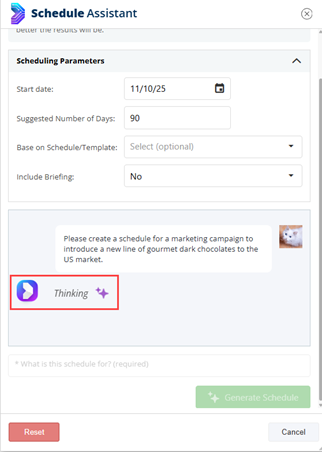
After you click Generate Schedule, the Schedule
Assistant indicates that it is processing the information that you provided.
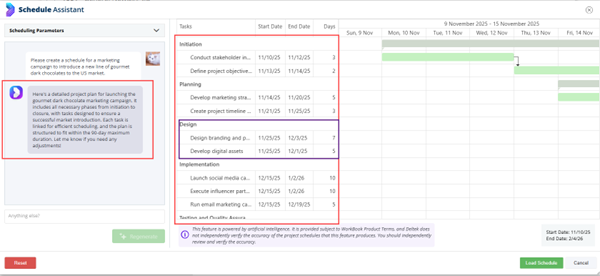
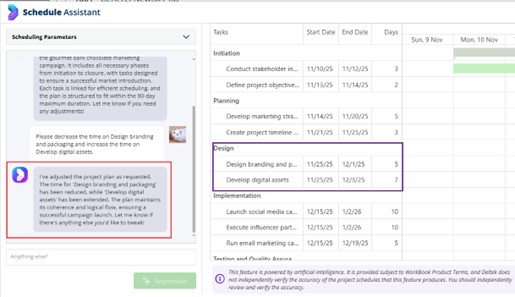
Next, the Schedule Assistant displays the first draft of the
schedule in the right pane. In the Scheduling Parameters pane, it describes in natural language what it did. The right pane lists the tasks, their start and end dates, and durations on the left side, and the total project duration (in work days)
appears at the bottom of the first column. The Gantt chart shows the distribution
and duration of tasks across the project, and their relationships and flow.
The Schedule Assistant intelligently distributes tasks,
including figuring out when tasks can run concurrently. The schedule can also
include unlinked tasks.
At the bottom of the Scheduling Parameters pane, if the first iteration does not meet your requirements, you can refine
parameters, enter additional parameters, or change values, and then click Regenerate
to create another iteration of the schedule.
The Schedule Assistant generates another draft schedule
according to your revised prompt, displays it in the right pane, and again describes
what it did in the Scheduling Parameters pane.
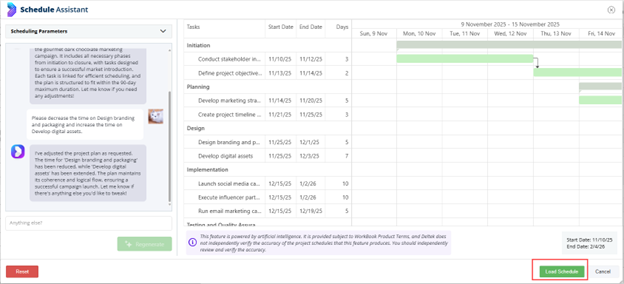
If you decide that this schedule meets your requirements,
click Load Schedule to finalize this iteration and load it as the
project schedule.
You can see the finalized schedule after you have loaded it.
Notes
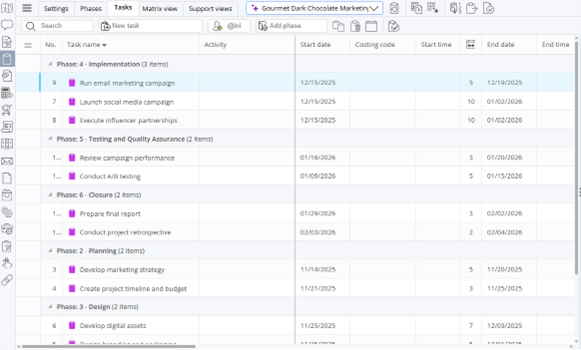
- You can see in the preceding figure that the
 icon
appears next to the project schedule name above the schedule toolbar. This icon
stays with the schedule throughout its life cycle, even if you change the
schedule manually.
icon
appears next to the project schedule name above the schedule toolbar. This icon
stays with the schedule throughout its life cycle, even if you change the
schedule manually. - Schedules that you create with the Schedule
Assistant can only start on today’s date or in the future.
- You can set specific dates for tasks. For
example, if your schedule includes a pre-launch meeting for a campaign on a
certain date, you can specify that date for the meeting in your prompts. The
Schedule Assistant can even create lead-up tasks to prepare for the meeting
that occur before the specified date.
Example Use Case Prompts
The following are example prompts that you might use as the
initial prompts for generating a project schedule:
- Create a website redesign project with a
duration of 6 months, with discovery, design, development, and testing phases,
starting on March 1.
- Build a product launch schedule for Q3 with
marketing and sales.
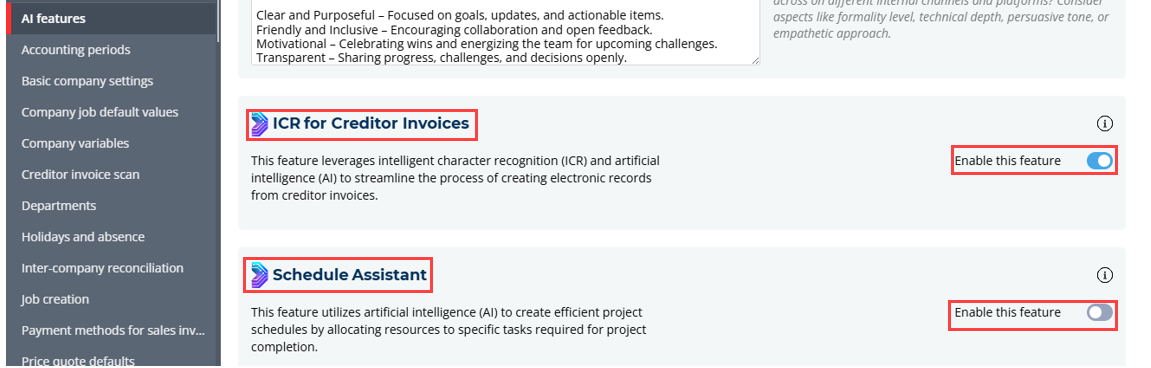
Straightforward Setup
Setting up the Schedule Assistant involves two steps that
System Administrators perform on the form at Settings > Company Settings
> AI Features:
- Enable the Schedule Assistant on the AI Features
page by scrolling to the Schedule Assistant section and selecting Enable
this Feature (required).
- Enter information that provides context to the Schedule
Assistant in the top section of the AI Features page, such as Company
narrative, target audience/customer segments, countries of operation, and primary
market size and business scale. This step is optional, but the Schedule
Assistant is better able to create more project-specific and Company-specific results
if you provide this additional information.
For more detailed, step-by-step instructions for setting up
and using the Schedule Assistant, see the WorkBook online help.
Scrum Boards - New Availability of Multiple Scrum Boards
Deltek Tracking 2030226
Project teams require flexibility in how they manage and monitor task progress. This enhancement introduces customizable Scrum Board configurations, which enable teams to use different sprint Scrum Boards that include different task progress statuses to track their work during scrum sprints.
Note: When you install WorkBook 14.0, existing scrum sprints are assigned a Standard configuration, which preserves existing sprint structures, task progress statuses, and task positions post-upgrade. At the time of installation, the Standard configuration is established as the default configuration; you cannot edit it. However, you can create another configuration and designate that configuration as your new default configuration for sprints that you create after the installation. Creating and assigning a new default configuration has no effect on existing data.
You must be a System Administrator or Advanced User and have access to the Settings module to create custom Scrum Board configurations.
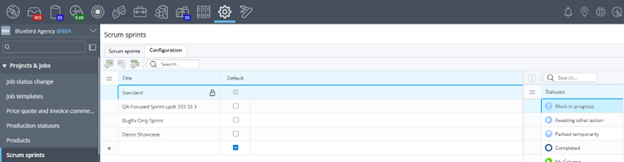
To access this functionality, navigate to Settings > Projects & Jobs > Scrum Sprints > Configuration tab. The following figure shows an example of this tab.
On the Configuration tab, you can create, copy, edit, and delete Scrum Board configurations. Updates to configuration changes happen in real time.
- Each configuration must have a unique name.
- You select preset task progress statuses from a master list of statuses. Note: Only System Administrators or Advanced Users with access to Settings can create preset task progress statuses for your WorkBook system at Settings > Projects & Jobs > Task Progress Status.
- If you delete a task progress status from a configuration, WorkBook reverts any tasks that have that status to the backlog.
- You cannot delete a configuration if it is active—that is, it is applied to scrum sprints that are active.
- Every scrum sprint must have an active configuration. If you do not specify a configuration, WorkBook assigns the Standard configuration to it, or another configuration that you have designated as the default configuration.
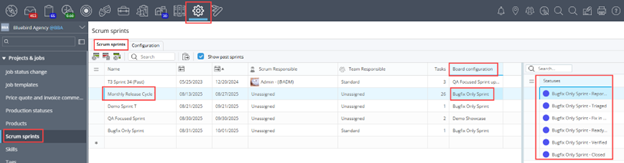
On the Scrum Sprints tab, the new Board Configuration column indicates which sprint Scrum Board configuration is assigned to the scrum sprint that you select in the grid. This column is a drop-down list field, so that you can select a different configuration. If you select another configuration, and its set of task progress statuses is different from the configuration that was previously selected, the Statuses pane is updated to display the newly selected configuration’s set of task progress statuses. The following figures show an example of this, using an example scrum sprint named Monthly Release Cycle 1 that initially has the board configuration BugFix Only Sprint assigned to it.
After a change to the QA Focused Sprint board configuration, the task progress statuses that that configuration includes are displayed in the Statuses pane.
Any tasks that had statuses under the first board configuration (BugFix Only) that do not exist in the newly selected board configuration (QA Focused Sprint) are automatically moved to the backlog (which is the same thing that happens when you move multiple tasks to a different sprint).
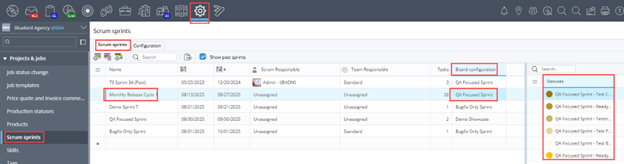
When you access a Scrum Board for a selected sprint, the columns that you see are only those for the task progress statuses that are included in the specification for the board configuration that is assigned to that sprint. The following figure shows the Scrum Board for the same example Monthly Release Cycle 1 sprint, using the example QA Focused Sprint configuration. The columns on the Scrum Board are the task progress statuses that are specified for the QA Focused Sprint configuration—Test Case Design, Ready for Testing, Testing in Progress, and so on.
For more detailed information about setting up Scrum Board configurations and using them, see related
online help topics.
 Dela AI-assisted
icon, accompanied by a
tooltip (This invoice was created with Dela assistance.). This icon
remains with the creditor invoice throughout its life, even if you modify the
invoice manually at some point.
Dela AI-assisted
icon, accompanied by a
tooltip (This invoice was created with Dela assistance.). This icon
remains with the creditor invoice throughout its life, even if you modify the
invoice manually at some point.  Create Invoices with Dela
icon on the grid toolbar.
Create Invoices with Dela
icon on the grid toolbar.