SSO Policy
The SSO Policy form defines the configuration parameters
used to connect/communicate with a Kerberos server for SSO (Single Sign
On) authentication. Single Sign On is similar to LDAP or Trusted Login
authentication, in that the user does not have to enter their User Name
and Password to log into the application. Instead they will be logged
in automatically when they enter their domain user name.
Note: SSO configuration
should only be performed by a system administrator.
SSO Authentication requires the following configuration
steps:
Configure
Shop Floor Time as a Service Principal on the Kerberos Server
Configure Java for Kerberos
Using krb5.conf
Create
an SSO Policy
Assign
the SSO Policy to Your Web Application
You can also configure Shop Floor Time for SSO
Configuration with SAML. The SSO Policy is not needed for this type
of SSO authentication. Refer to the Shop
Floor Time SSO with SAML Configuration Guide for more information.
See Also:
SSO Policy Field
Descriptions
Find,
Add, Modify, Delete, or Copy and SSO Policy
SSO
Policy Field Descriptions
Policy Name
Name of the SSO
Policy.
Use Keytab File
Indicates whether a keytab file will be used to communicate
with the Kerberos server.
If you check this box, Shop Floor Time will communicate
with the server using a keytab file. You will need to specify the name
of this file in the Keytab File field. The keytab file is created when
you configure
Shop Floor Time as a service principal on the Kerberos server. You
will also need to specify the Principal.
If you do not check this box, then Shop Floor Time will
communicate with the server using the User Name and Password of the Service
Principal account. The User Name and Password are specified in the SSO
Policy (see below).
Keytab File
If you checked the Use Keytab File box (see above), you
need to enter the name of the Keytab File in this field. This file must
be located in the \app directory.
Principal
Identifies the Service Principal as registered on the Kerberos
Server. For example, HTTP/autotime7jb.kasg.com.
See Configure
Shop Floor Time as a Service Principal on the Kerberos Server.
User Name
The user name of the Service Principal registered at the
Kerberos Server.
Password
The password of the Service Principal registered at the
Kerberos Server.
Update Date, Updated By
These fields display when the record was created or updated,
and the person who created or updated the record.
Step
1: Configure Shop Floor Time as a Service Principal on the Kerberos Server
The steps that are necessary to configure Shop Floor Time
as a Service Principal on the Kerberos server depend on the type of environment
you are using. The steps below assume that Active Directory is used as
Kerberos Server and that the commands shown below are run on the Active
Directory machine.
The values entered here will be used when creating the
SSO Policy in Shop Floor Time .
Sample values used in these steps:
Domain:
KASG.com
Machine
Name: wfautotime
Domain
Login Name: wfatuser
Domain
Password: abc#12345
1. Create a User Account in Active Directory. In this example,
the Login Name and Password shown above are used (wfatuser/abc#12345)
Account options:
Password Never Expires
User Cannot Change Password
Does Not Require Kerberos Pre-Authentication
(use Account tab)
2. Create Service Principal Name and associate with User
Account
Run the commands from a prompt:
setspn -A HTTP/wfautotime.KASG.com
wfatuser
setspn -A HTTP/wfautotime wfatuser
3. Create the keytab file (if your SSO Policy uses keytabs)
Run the command from a prompt
(all one line):
ktpass -out C:\at7user.keytab
-princ HTTP/wfautotime.KASG.com@KASG.COM - pass abc#12345 -mapuser wfatuser@KASG.COM
-crypto RC4-HMAC-NT -ptype KRB5_NT_PRINCIPAL
Note:
The keytab file must be located in the \app directory.
Step
2: Configure Java for Kerberos Using krb5.conf
The following steps describe one way to configure Java
to use Kerberos as an authentication mechanism. For more information,
see http://download.oracle.com/javase/1.5.0/docs/guide/security/jgss/tutorials/KerberosReq.html.
The Java runtime will look for the krb5.conf file under
JAVA_HOME/jre/lib/security to obtain the “default realm” (Domain) and
“default kdc” (Kerberos Key Distribution Center). All values are case
sensitive.
Sample template for krb5.conf file:
[libdefaults]
default_realm =
[Domain Name Upper Case]
default_tkt_enctypes
= aes128-cts aes256-cts arcfour-hmac-md5
default_tgs_enctypes
= aes128-cts aes256-cts arcfour-hmac-md5
permitted_enctypes
= aes128-cts aes256-cts arcfour-hmac-md5
[realms]
[Domain Name Upper
Case] = {
kdc
= [Kerberos Server].[Domain Name]
default_domain
= [Domain Name Upper Case]
}
[domain_realm]
.[Domain Name] =
[Domain Name Upper Case]
A sample krb5.conf file is shown below using the following
values: Domain Name: KASG.com,
Kerberos Server: kasgldapsrv
[libdefaults]
default_realm =
KASG.COM
default_tkt_enctypes
= aes128-cts aes256-cts arcfour-hmac-md5
default_tgs_enctypes
= aes128-cts aes256-cts arcfour-hmac-md5
permitted_enctypes
= aes128-cts aes256-cts arcfour-hmac-md5
[realms]
KASG.COM =
{
kdc
= kasgldapsrv.kasg.com
default_domain
= KASG.COM
}
[domain_realm]
.kasg.com = KASG.COM
Step 3:
Create an SSO Policy
Click Main
Menu > Configuration > Policies > SSO Policy.
Click Add.
On the Add SSO Policy form,
enter the Policy Name.
Use the remaining fields to
indicate how Shop Floor Time will connect to the Kerberos server.
Select the Use Keytab File
checkbox and enter the name of the Keytab
File or
enter the Username and Password.
If you want to add more than
one SSO policy, click Save and Add
to save your settings and keep the Add SSO Policy window open. Or
click Save to save your SSO
policy and return to the main form.
Step
4: Assign the SSO Policy to Your Web Application
Once you create your SSO policy, you need to assign it
to your Web or Web Time Clock applications. To do so:
Click Main
Menu > Configuration > System > Application Settings.
Select the Application
Name (WEB
or WEB_TIME_CLOCK) and the
Setting Type
policy_sso.
If you have multiple instances of the application
server with unique application settings, click the Servers
tab and select the application server instance to which you will assign
the SSO Policy. On the Server Settings tab, select the Application
Name (WEB
or WEB_TIME_CLOCK) and the
Setting Type
policy_sso.
Click Modify.
From the Setting
Value field, select your SSO
policy.
Click Save.
For the same Application Name,
select the auth_error_url
Setting Type and click Modify.
Enter the relative URL for the
page to which user will be redirected when their SSO authentication
fails. You must enter a relative URL. For example, to display the
Shop Floor Time login page, enter /autotime/login?action=view.
Click Save.
If you are using
Firefox as your web browser, you must also add the server name or
IP address to the network.negotiate-auth.trusted-uris
and network.automatic-ntlm-auth.trusted-uris
settings in about:config.
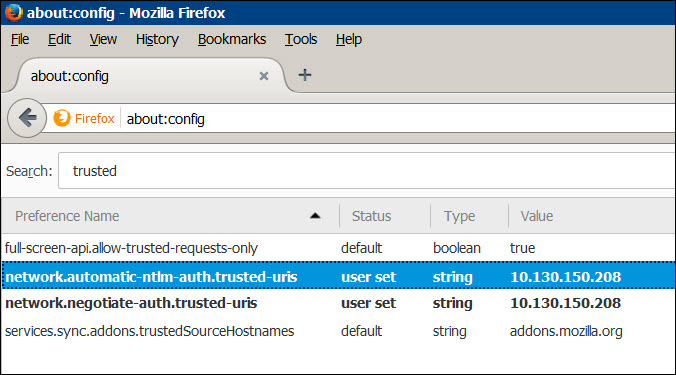
Enter about:config
in the address bar of Firefox to display the advanced settings. In
the Search field, enter trusted and press Enter. Double-click
the network.negotiate-auth.trusted-uris
setting and enter the server name or IP address to which the user
will be redirected when their SSO authentication fails. Click OK to
save your changes. Repeat this configuraiton for the network.automatic-ntlm-auth.trusted-uris
setting.
Note: The Web Time
Clock's Terminal Profile must have the Login Event Name field set to LOGIN_XML_PERSON_NUM
in order for SSO authentication to work properly.
Find,
Add, Modify, Delete, or Copy an SSO Policy
To find a specific
SSO Policy, click the Filter  area at the top of the form to display the Policy Name filter field. Select
the policy you want to view, copy, delete, or modify and click Find.
area at the top of the form to display the Policy Name filter field. Select
the policy you want to view, copy, delete, or modify and click Find.
To add a new SSO
Policy, click Add. Enter values in the fields and click Save.
You can modify
all the fields in the SSO Policy except the Policy Name. To do so, select
the policy and click Modify.
You can copy an
SSO Policy and save the duplicate with a new name. To do so, select the
policy and click Copy. Change the Policy Name, modify the other fields
as necessary, and click Save.
You can delete
an SSO Policy if it is not assigned
as a policy_sso setting on the Application form.