Merge Code Dialog Box

Use this dialog box to add merge codes to a merge template that you are creating in Adobe InDesign within Vision.

This dialog box applies when you add a new InDesign merge template or update an existing InDesign merge template.

The merge codes identify the Vision database fields that you want to include in a merged document.

On this dialog box, you also select the formatting for Vision fields that can be formatted.

Warning: If you turn on hyphenation in an InDesign merge template, it is possible for merge codes to become hyphenated, especially if you use a large font size in the merge template. A hyphenated merge code will not work properly. The solution is to turn off hyphenation or reduce the font size of the merge code.

Location

To display the dialog box:

  1. From the Vision Navigation menu, click Configuration > General > Merge Templates.
  2. On the Merge Templates form, enter an Info Center area for the merge template that you are adding or updating.
  3. Do either of the following:
    • On the Merge Templates grid toolbar, click Add and then click Create Adobe InDesign Template to create a new InDesign template. On the Add Merge Template dialog box, enter a description for the template, and click OK.
    • Select an existing InDesign merge template in the Merge Templates grid, and click Update on the grid toolbar.

Contents

Fields

Field Description
Table From the drop-down list, select the Info Center database table that contains the field (merge code) that you want to add to the merge template. The drop-down list contains only the table options for the Info Center that you selected on the Merge Templates form. The entry that you make in this field determines which fields display in the drop-down list in the Field field.

The items in the drop-down list include:

  • <Info Center Name>: For example, you see Employees in the drop-down list when you create a merge template for the Employees Info Center; you see Projects in the drop-down list when you create a merge template for the Project Info Center; and so on. These options allow you to select fields from an Info Center, but not the grid fields that are contained in associated or non-associated grids on Info Center tabs.
  • <Associated Grid Name>: Select an associated grid table to add grid fields from an Info Center associated grid to a merge template. Examples of associated grids that display in the drop-down list are Associated Projects, Associated Clients, Associated Employees, and so on.
  • <Non-Associated Grid Name>: Select a non-associated grid table to add grid fields from an Info Center non-associated grid to the merge template. For example, Resumes is a non-associated table grid for an Employee Info Center merge template. Awards and Descriptions are non-associated grid tables for a Project Info Center merge template.
  • Firm Setup - Proposals: This displays in the Table field drop-down list when you create a merge template for an Employee, Opportunity, or Project Info Center. When you select Firm Setup - Proposals, the drop-down list in the Field field displays all the fields listed on the General tab of the Firm Setup - Proposals form in Configuration > Organization > Firm Setup - Proposals.
  • Service Estimate Tables

    The following tables display in the Table field when you create a merge template for the Opportunity Info Center if the Enable Service Estimate check box is selected on the Service Estimate tab in Configuration > General > Opportunity Settings:

    • Service Estimate Consultants
    • Service Estimate Expense
    • Service Estimate Labor
    • Service Estimate Unit
Select Specific <xxx> When you select certain tables in the Table field, the Select Specific <xxx> field is enabled. The field name varies, based on the table that you select. For example, Select Specific Role displays for the Associated Employees table, Select Specific Relationship displays for the Associated Clients table, and so on.

In the Select Specific <xxx> field, select an option that will determine whether the associated grid field that you entered in the Field field will display in a merged document for all the records (rows) in the associated grid or for only some of the specific records in the grid.

Example:

  • If you select All in the Select Specific Role field: The last name for all employees who are entered in the associated Employees grid on the Team tab in the Project Info Center are included in the merged document.
  • If you select Principal (a specific role) in the Select Specific Role field: Only employees who are designated as principals for a project (they have Principal entered in the Role column in the associated Employees grid on the Team tab in the Project Info Center) are included in the merged document.

Items in the Drop-Down List

The drop-down list in this field displays different options based on the associated grid that you selected in the Table field.

In addition to specific values, other possible options in the drop-down list are:

  • All: All association grid records are included in the merge template. For some associated grids, All is the only option available, and you cannot change it.
  • Billing: This option displays in the drop-down list when you create a merge template for the Client Info Center, and you select Addresses in the Table field. The client's billing address is included in the merge template.
  • Primary: This option displays in the drop-down list when you create a merge template for the Client or Vendor Info Center, and you select Addresses in the Table field. The primary address for the client or vendor is included in the merge template. This is the address that has the Primary check box selected for a client on the General tab of the Client or Vendor Info Center.

    This option also displays in the drop-down list when you create a merge template for the Employee Info Center, and you select Skills in the Table field. This adds an employee's skills from the Skills grid on the Experience tab of the Employee Info Center that have the Primary check box selected.

  • Proposal: This option displays in the drop-down list when you create a merge template for an Employee Info Center and you select either Degrees or Licenses in the Table field. For Degrees, select Proposal to include only data for the degrees that have the Proposal check box selected in the Education grid on the Experience tab in the Employee Info Center. For Licenses, select Proposal to include only data for the licenses that have the Proposal check box selected in the Education grid on the Experience tab in the Employee Info Center.
  • Proposal Contacts: This option displays in the drop-down list only when you create a merge template for the Client Info Center, and you select Associated Contacts in the Table field. Select Proposal Contacts if you want specific contacts rather than all associated contacts for a client to be included in a Client Info Center section of a custom proposal. You select the specific contacts for clients in Proposals > Custom Proposals on the Client Info Center section tab.

    Proposal Contacts applies only for merge templates that you create specifically for Client Info Center sections of a custom proposal. If, instead, you add this merge code to a merge template that you use in the Client Info Center, the merge codes are displayed instead of any actual contact when you generate a merged document.

  • Proposal Projects: This option displays in the Select Specific Project field drop-down list only when you create a merge template for the Employee Info Center and you select Associated Projects in the Table field on the Merge Code dialog box. Select Proposal Projects if you want specific projects rather than all associated projects for an employee to be included in an Employee Info Center section of a custom proposal. You select the specific projects for employees in Proposals > Custom Proposals on the Employee Info Center section tab (using the Projects toolbar option).

    Proposal Projects applies only for merge templates that you create specifically for Employee Info Center sections of a custom proposal. If, instead, you add this merge code to a merge template that you use in the Employee Info Center, the merge code is displayed instead of any actual projects when you generate a merged document.

  • Proposal Team: This option displays in the drop-down list only when you create a merge template for the Project Info Center, and you select Associated Employees in the Table field. Select Proposal Team if you want specific team members (employees) rather than all associated team members for a project to be included in a Project Info Center section of a custom proposal. You select the specific team members for a project in Proposals > Custom Proposals on the Project Info Center tab.

    Proposal Team applies only for merge templates that you create specifically for Project Info Center sections of a custom proposal. If, instead, you add this merge code to a merge template that you use in the Project Info Center, the merge codes are displayed instead of any actual team member when you generate a merged document.

Address Fields for Associated Clients or Associated Vendors

When you create a merge template for the Project, Employee, or Opportunity Info Center, and you select either Associated Clients or Associated Vendors in the Table field and Address in the Field field, after you click the Insert button on the Merge Codes dialog box, the Client Address or Vendor Address dialog box displays. On these dialog boxes, you can select the appropriate address for the associated client or vendor because each can have multiple addresses entered for them in the Info Center. You can also select which parts of the address (line 1, city, country, and so on) to include in the merge template.

Insert Table Begin/End Codes This button is enabled only after you select an associated or non-associated grid in the Table field.

Grid field merge codes that you add to a merge template must be placed between a [Begin] code and an [End] code. Regular fields (non-grid fields) do not require [Begin] and [End] codes.

Example:

[Begin]

[grid field merge code] [another grid field merge code]

[End]

After you select a grid in the Table field, click in the InDesign active text frame where you want to place the begin and end codes. Then click the Insert Begin/End Codes button to insert a [Begin] and an [End] code into the active text frame. Put your mouse pointer between the [Begin] and [End] codes. Then select a grid field in the Field field on the Merge Code dialog box, and click the Insert button. The grid field is inserted between the [Begin] and [End] codes in the InDesign active text frame.

Add multiple grid fields from the same grid between one set of [Begin] and [End] codes.

Because grids can include many rows of data for multiple records, it is possible for the merged data to exceed the space allotted in an InDesign text frame.

Field From the drop-down list, select a Vision field (merge code) to add to merge template. You can select only one field at a time.

The drop-down list contains only:

  • The fields for the Info Center table that you entered in the Table field.
  • The Lookup fields that you have access to per the Lookup functional area settings for your role security in Vision Configuration > Security > Roles, on the Access Rights tab.

    When you generate a merged document and you do not have at least read only record access rights to a field that is included in a merge template, you will see the merge code (Vision field name) displayed in the merged document instead of the Vision data.

Field Names and Labels

The Vision field names in the drop-down list are based on the field labels that are entered in Vision in Configuration > General > Lookup/Report Labels or in Configuration > General > User Defined Components for grids.

If a field label is changed in Vision Configuration after an InDesign merge template has been created and saved, the correct data will display on a merged document that is generated from the merge template. However, the new field label will not display on a merged document until you update the merge template and replace the merge code (Vision field).

If you make a change to a field label in Vision Screen Designer, you must make the same change in the in Configuration > General > Lookup/Report Labels, or the label change will not be displayed in the Field field.

Grid Fields

When you select an associated or non-associated grid in the Table field, the drop-down list in the Field field includes fields from the grid. For associated grids, it also includes fields from the associated Info Center lookup.

Current User and Current User Title

Current User and Current User Title display in the Field drop-down list when you select an Info Center's name (for example Project for the Project Info Center) in the Table field. Select these fields to add your Vision user name and title (first and last names and title from the Employee Info Center) to a merged document.

Proposal Description

When you create a merge template for the Project Info Center and you select Projects in the Table field, the drop-down list in the Field field includes a Proposal Description merge code. This merge code allows you to insert project descriptions into a section of a Vision custom proposal. The project descriptions are from the Descriptions grid on the Background tab in the Project Info Center.

The Proposal Description merge code appears as the following in the merge template:

[Proposal Description|{BlockText}]

After you create the merge template and insert the Proposal Description merge code, you must add projects and their descriptions on the project section tab in Custom Proposals. When you merge the template in Custom Proposals, the project description text appears in place of the Proposal Description merge code.

Proposal Graphic

When you select one of the following tables in the Table field, the drop-down list in the Field field includes a Proposal Graphic merge code:

  • Clients
  • Employees
  • Opportunities
  • Projects
  • Text Libraries
  • Vendors

Select this merge code to insert an empty graphic frame into the merge template. This is a placeholder that allows you to insert a graphics file in Vision Custom Proposals to a section of a custom proposal.

Proposal Section

Proposal Section displays in the Field drop-down list when you select an Info Center's name (for example Project for the Project Info Center) in the Table field. This field applies only when you create a merge template for a custom proposal. Select this field to display the custom proposal section name on a merged document. This is the section name entered for a section on the Configure Sections dialog box in Custom Proposals when you create a custom proposal section.

Contact Address Fields

Contact address fields apply for merge templates that you create for the Contact Info Center.

To add a contact's Other/Home Address from the General tab of the Contact Info Center to a merged document: Select Contact in the Table field. Then select address fields (such as Address Line 1, City, and so on) in the Field field.

To add a contact's Mailing Address from the General tab of the Contact Info Center to a merged document: Select Mailing Address in the Table field. Then select address fields (such as Address Line 1, City, and so on) in the Field field. The Insert Begin/End Code button is not enabled when you select the Mailing Address table; begin and end codes are not needed for this table.

Total Years of Experience

Total Years of Experience displays in the Field drop-down list when you create a merge template for the Employee Info Center and you select Employee in the Table field. In a merged document, the Total Years of Experience displays the sum of the following fields from the General tab of the Employee Info Center for an employee:

  • Hire Date through today
  • Prior Years with This Firm
  • Years with Other Firms

Cost or Fee Proposals

You can add detailed labor, expense, consultant, and unit information from the Service Estimate tab of the Opportunities Info Center to a merge template for the Opportunities Info Center for cost or fee proposals. When you select Opportunities in the Table field on the Merge Code dialog box, select any of the following fields in the Field field:

  • Total Consultants Planned Bill
  • Total Consultants Planned Cost
  • Total Expenses Planned Bill
  • Total Expenses Planned Cost
  • Total Labor Planned Bill
  • Total Labor Planned Cost
  • Total Units Planned Cost
  • Total Units Planned Bill
  • Total Bill (from the Analysis grid on the Service Estimate tab)
  • Total Cost (from the Analysis grid on the Service Estimate tab)

Field Options Section

Field Description
Preceding Text and Succeeding Text You can add spaces, a comma, or other text before or after fields directly in the InDesign active text frame when you create a merge template.

Examples: In the InDesign active text frame, you add a space between a first name and a last name. You add a comma between the city and state in an address. You add the title "Total Cost" before a total cost field.

However, if you want the separators or text not to display when no data exists for a record, then instead of adding separators and text in the active text frame, enter them in the Preceding text and Succeeding text fields.

After you select a field in the Field field, in the Preceding text field enter the text (or space) that you want to appear before the field. In the Succeeding text field, enter the text (or space) that you want to appear after the field.

Example: You add an employee's first, middle, and last names to a merge template. You enter a space (press the spacebar on your keyboard) in the Succeeding text field for both the Employee First Name and the Employee Middle Name fields. This adds a space between the first and middle name and between the middle and last name. For employees who have no middle name, their first and last name displays correctly with only one space between. If, instead of using the Preceding text and Succeeding text fields to enter the space separators, you entered the spaces directly in the InDesign active text frame between the first, middle, and last names, then the employees with no middle name would have two spaces between their first and last name, instead of one space.

You cannot use the following square bracket and vertical bar characters in the Preceding text and Succeeding text fields: [ ] |

You cannot use a hard return (press the ENTER key on your keyboard) in these fields.

The Preceding text and Succeeding text fields are not enabled for Vision memo fields.

Format Section

Various formatting options display in this section, depending on the specific field or type of field that you select from the Field field drop-down list.

The formatting options affect how the specific fields display in merged documents that are produced by the InDesign merge template. Fields that contain number, date, and currency fields can be formatted.

No format options available for this field

When you select a field that cannot be formatted, "No format options available for this field" displays in the Format section. An example of a field that cannot be formatted is the Project Manager Name field.

Vision memo fields cannot be formatted in the Format section. Some formatting from the Vision Text Editor carries over from a Vision memo field, and you can also apply some formatting in InDesign.

In the Format section field description list that follows, the fields are grouped together by the specific field or the type of field that you enter in the Field field:

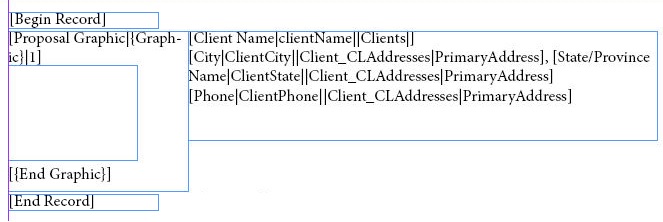
  • Proposal Graphic (an individual field)
  • Currency or Number fields
  • Currency Fields only
  • Date fields

Proposal Graphics

When you select Proposal Graphic from the Field drop-down list, the following Graphic Number field displays in the Format section. Use the Proposal Graphic merge code to add graphics frames to a merge template. Then in Vision Custom Proposals, you can insert one or more graphic into a custom proposal section that uses the merge template.

Field Description
Graphic Number After you select Proposal Graphic in the Field field, place your mouse pointer in the InDesign active text frame where you want to insert the graphic frame. Return to the Merge Code dialog box, and enter the number of the graphic in the Graphic Number field. If this is the first graphic you are inserting, enter 1; if it is the second graphic you are inserting, enter 2, and so on. Numbers are used to identify multiple graphics in a merged document.

After you enter a number in the Graphic Number field, click Insert. This inserts the merge code with an empty graphic frame into the InDesign active text frame.

For merge templates with multiple graphic merge codes, when you insert the graphic files in Custom Proposals, the first graphic file that you insert will be placed where the graphic 1 merge code is located; the second graphic file that you insert will be placed where the graphic 2 merge code is located; and so on.

Currency or Number Fields

The following fields display in the Format section when you select a currency or number field from the Field drop-down list:

Field Description
Type This displays the type of field, Currency or Number, for the field that you entered in the Field field.
Use Regional Settings This check box is selected by default. When it is selected, Microsoft Windows regional settings from the workstation of the user who generates a merged document will be used to format the currency or number field on the merged document.

When you select this check box, only some of the fields listed in this Currency or Number Fields section are enabled for entry.

When you do not select this check box, all of the remaining settings listed in this Currency or Number Fields section are enabled for entry.

Decimal Places From the drop-down list, select the number of decimal places to use.

Options are 0, 1, 2, 3, 4, 5, 6, 7, 8, and 9. When you select 0, no decimal symbol is displayed.

Decimal Symbol This field is enabled only when you do not select the Use Regional Settings check box.

From the drop-down list select the decimal symbol to use.

Options are comma and period: , and .

Display Digit Grouping Symbol Select this check box if you want a symbol, such as the comma, to be used as a thousands separator. This may make large numbers easier to read. You select the separator symbol to use in the next field, Digit Grouping Symbol.

Example that uses a comma as the digit grouping symbol (with two decimal places that use a period symbol):

  • Display Digit Grouping Symbol check box is not selected: 2000000.00
  • Display Digit Grouping Symbol check box is selected: 2,000,000.00
Digit Grouping Symbol This field is enabled only when you do not select the Use Regional Settings check box, and you select the Display Digit Grouping Symbol check box.

From the drop-down list, select a symbol to use as a thousands separator.

Options are comma, period, and (Space):

  • ,
  • .
  • (Space)
Zero Number From the drop-down list, select how you want a zero to display.

The options are:

  • 0
  • Do Not Display (it displays nothing)

If you have preceding or succeeding text next to a zero amount and you selected Do Not Display, the preceding and succeeding text will also not display on a merged document.

Currency Fields Only

The following fields display in the Format section only when you select a currency field in the Field drop-down list:

Field Description
Display Currency Symbol Select this check box if you want the currency symbol to display.

This field applies if you use the Multicurrency feature.

Symbol Location This field is enabled when you select the Display Currency Symbol check box. From the drop-down list, select whether you want the currency symbol placed to the left or right of the currency amount.

The symbols used are the symbols that you set up in Vision Configuration > General > Currencies.

Sample: This displays a sample of how the currency or number will display on a merged document, based on the settings that you selected in the Format section.

If you select the Use Regional Settings check box, a field's format using your workstation's regional settings is displayed. This may be different from the regional settings of another user who generates a merged document using the merge template.

Date Fields

The following fields display in the Format section when you select a date field in the Field drop-down list:

Field Description
Type From the drop-down list, select how you want the date to display in merged documents.

The options are:

  • Short Date: Example: 10/23/2015
  • Medium Date: Example: October 23, 2015
  • Long Date: Example: Friday, October 23, 2015
Use Regional Settings This check box is selected by default. When it is selected, Microsoft Windows regional settings from the workstation of the user who generates a merged document will be used to format the date field on a merged document.

When you select this check box, the Date Separator and the Date Order fields in this section are not enabled.

When you do not select this check box, all the remaining fields in this section are enabled.

Date Separator This field is enabled only when you select Short Date in the Type field, and you do not select the Use Regional Settings check box.

From the drop-down list, select the symbol to use to separate the month, day, and year in a date.

Options are forward slash, hyphen, and period:

  • /
  • -
  • .

Example using the hyphen symbol: 3-6-2015

Date Order This field is enabled only when you do not select the Use Regional Settings check box. From the drop-down list, select the order in which the month, day, and year will display for a date.

Options are:

  • Month Day Year: Example: 3/27/2015
  • Day Month Year — Example: 27/3/2015
  • Year Month Day: Example: 2015/3/27
Display Day, Display Month, and Display Year Select one or more of these check boxes to display one, two, or all of the components that make up a date.

For example, if a date field is a short date:

  • When you select the Display Month and Display Year check boxes, September 5, 2015 displays as 9/15.
  • When you select the Display Day, Display Month, and Display Year check boxes, September 5, 2015 displays as 9/5/15.
Display Four Digit Year This check box is enabled only when you select the Display Year check box.

Select this check box to have the year display with all four digits, such as 2015 (instead of 15).

Display Leading Zeros Select this check box if you want a leading zero to display before a single-digit day or month.

Example: With this check box selected, you will see August 9, 2015 displayed as 08/09/2015 instead of 8/9/2015.

When you select only the Display Day or only the Display Month check box, the Display Leading Zeros check box is selected automatically, and you cannot change it.

Sample: This displays a sample of how dates will display on a merged document, based on the settings that you selected in the Format section.

If you selected the Use Regional Settings check box, Sample displays a field's format using your workstation's regional settings. This may be different from the regional settings of another user who generates a merged document using the merge template.

Insert Field This button is enabled only after you select a table in the Table field and a field in the Field field.

After you select a table and field and you complete the fields on this dialog box, click the Insert button. This inserts the field (merge code) into the active text frame in InDesign.

Graphics and the Insert Button

When you select Proposal Graphic in the Field field, you must put your mouse pointer in the InDesign active text frame in the location where you want to the graphic frame, enter a number in the Graphic Number field in the Format section on the Merge Code dialog box, and then click Insert.

Insert Table Begin/End Codes Button and the Insert Button

For more information about how the Insert and the Insert Begin/End Codes buttons work together when you select an associated or non-associated grid in the Table field, see the description for the Insert Begin/End Codes button.

Buttons

Field Description
Insert Record Begin/End Codes Use this option to insert multiple records on one page or without page breaks when generating a proposal. This is useful when creating project sheets with multiple projects on one page or client reference sheets with multiple clients on one page.

After you insert the record codes, you must insert all table and field merge codes between the [Begin Record] and [End Record] codes. All of the codes, text, graphics, and objects that are between these codes will then repeat for each record that uses the template and is merged into the proposal.

Example:

If you add the following codes in InDesign:

And have the following two records on the Project tab of Proposals > Custom Proposals:

When you generate the proposal, the two records will be listed on the same page follows:

In this example, a table is applied and a picture (graphic) and respective fields that are formatted in InDesign will be included when the proposal is generated in Vision. This same format will be repeated for each record listed for the proposal on the Project tab of Proposals > Custom Proposals.

To insert Record Begin/End codes, click in the InDesign active text frame where you want to place the record codes. Then click the Insert Record Begin/End Codes button to insert a [Begin Record] and an [End Record] code into the active text frame. Put your mouse pointer between these codes and select table and fields to insert. Repeat as needed.

It is important to note that multiple records may exceed the space allotted in an InDesign text frame on one page. To avoid issues with overset, it is helpful to thread, or link, the text frames together before you generate the proposal. Before you add merge codes it is helpful to create additional blank pages in InDesign and use the thread option to thread the text boxes together. When you generate the proposal, the text will flow from page to page as needed.

Save Click this button to save the changes that you made to the merge template. The InDesign merge template .indt file is saved in Vision, and the file remains open so you can still work in it.
Save and Close When you finish adding Vision fields to the InDesign file, click the Save and Close button to save the merge template in Vision, close InDesign, and return to the Vision Merge Templates form.

The InDesign merge template .indt file is saved in Vision. After you save the merge template, you can access it again using the Update icon on the Merge Templates grid toolbar on the Merge Templates form. You cannot access the file directly in the InDesign software.

Cancel Click this button to cancel all changes made to the template since the last save, close InDesign, and return to the Vision Merge Templates form. If the template file has not been saved previously, the template file is not saved.
Help Click this button to open the online help topic for the Merge Code dialog box.