Tab Sequencing in the Screen Designer
When you use the Screen Designer to move fields around on the screen, you affect the sequence in which you move, or tab, through the fields on the screen.
The following information is from a developer's perspective. In most cases, tab sequencing is simple and straight forward: reading left to right and top to bottom. However, this topic describes more detailed/technical issues for times when you add new fields or grids. See your system administrator for more information.
Issues with Tabbing
For most applications, the tab order is determined by explicitly defining a tab index for each control as the application is created. This is not sufficient, however, for those applications that allow you to move fields around on a screen. If the tab order were explicitly defined in those applications, then moving fields would cause the tab order to jump around the screen since each control would retain its original tab index.
Deltek could have dealt with this issue by allowing users to specify the tab indexes from within the Screen Designer; however, because controls can be hidden for specific roles, the tab order specified for one role might not work as well for another.
Instead, Deltek developed an algorithm to calculate an appropriate tab order based on the layout of the controls at run-time. Only visible controls are considered, so each role gets a tab order that makes sense.
How the Algorithm Works
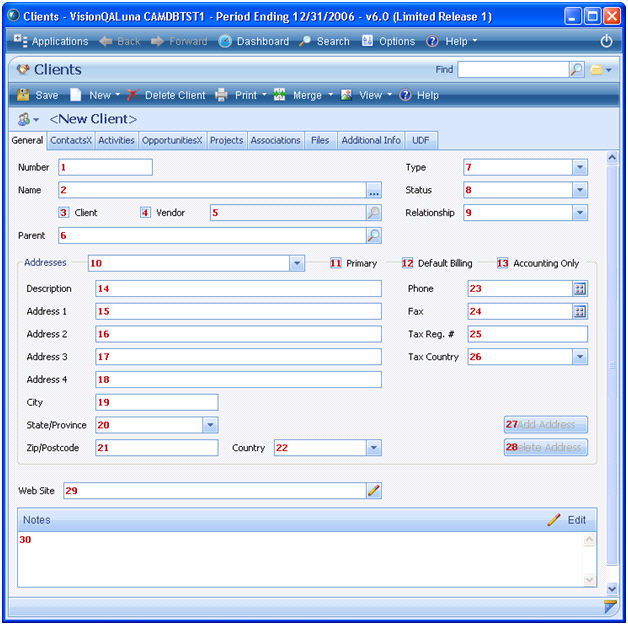
The example below displays how the algorithm works, using the General tab of the Client Info Center.
The algorithm is based on the idea that the fields on the screen can be divided into groups, each of which has a fairly simple tab order, for example, Type, Status, and Relationship at the top-right of the sample screen. Once the groups are established, the final tab order is determined by placing the groups in an appropriate order.
Fields
The way in which fields are grouped together is based upon the layout standards Deltek use when designing screens. To be considered a group, fields must be left-aligned (within two pixels), and their top positions must be no more than 29 pixels apart (our standard is 27 pixels, but the algorithm allows for an additional two pixels as a leeway factor).
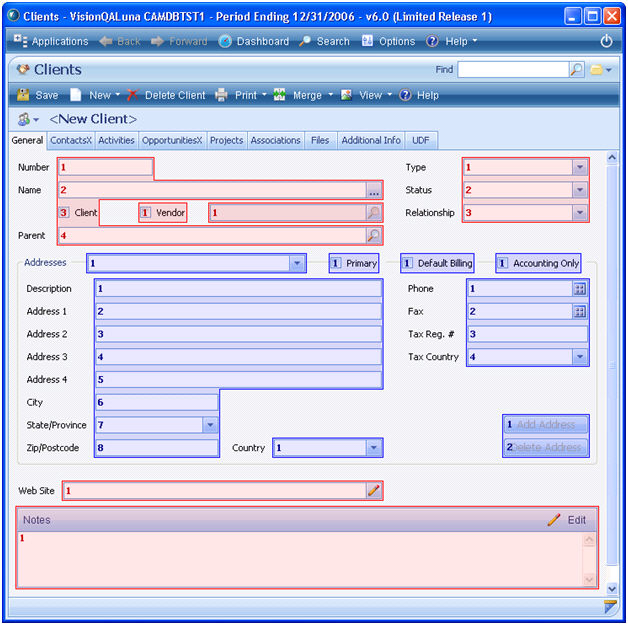
The example below displays the initial field groups for the sample screen, and the tab indexes of each field within the group.
Check Boxes
For most fields, labels are not considered when grouping fields; however, check box labels are usually part of the control itself; therefore, if the caption were to the left of the check box (which sometimes occurs), then the grouping would be based on the left position of the caption, not the check box. Also, even though they do not appear as such, check boxes are the same height as other input controls with the actual check box centered vertically within the control.
Group Boxes
You need to be aware of how group boxes are handled. When the tab order gets to the first field within a group box, it should continue through all of the fields within the group box before going elsewhere. This issue is addressed by treating the group box as a mini-screen. In other words, the entire algorithm is run for just the group box, and then that portion of the tab order is merged into the rest of the screen as if the group box were a single group located at the top left of the group box.
To help illustrate this, the field groups within the group box are colored blue while those outside the group box are red. Note that even if a field only partially overlaps a group box, it is considered to be within the group box.

Merging Groups
You may have noticed that there are quite a few single-field groups in the example above. If we left things as is, the tab order would proceed from the Client check box to the Parent field, and then up to the Type, Status, and Relationship fields, before coming back to the Vendor check box. This is because of the way the groups are ordered, as you’ll see in the Group Order section below. To avoid this problem, the algorithm attempts to merge single-field groups into other groups. If the single-field group has the same top coordinate as any other field, it will be inserted into the other field’s group. If it shares the same top coordinate with multiple fields, it will be placed after the nearest field to its left, if one exists. Otherwise, it will be placed before the nearest field to its right.
The screen example above shows the new group definitions and tab indexes after the merge process is complete. Note that there are still some single-field groups since no matching top coordinates were found.
Group Order
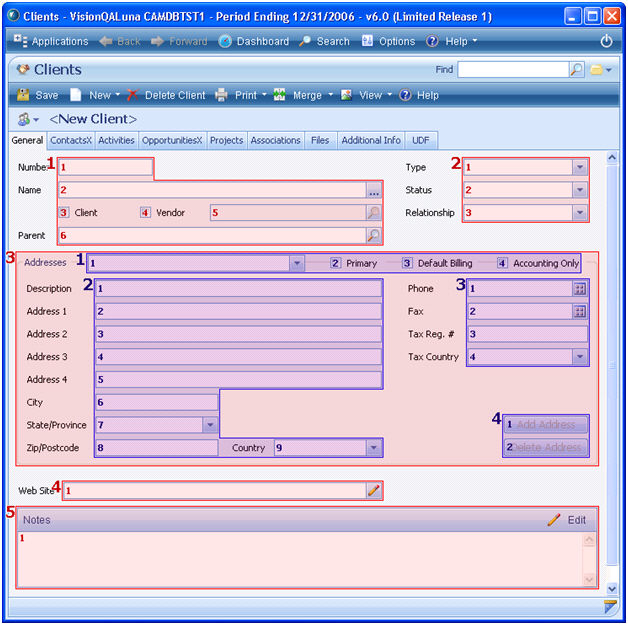
After the field groups have been defined, the groups are ordered based on the top-left corner of the first field within each group. The groups are ordered from top to bottom, and if the top values of any groups match, then they are ordered from left to right.
The large numbers at the top-left of each group in the screen below show the group order for the sample screen. Note that the field groups within the group box are ordered separately from the other groups.

Merging Group Boxes
After determining the group order, any group boxes are merged into the primary group order by treating the entire group box as a single group.
The example below displays the resulting group order after including the group box.
Final Tab Order
At this point, it’s simply a matter of going through each group in order, and within each group, each control in order, adjusting the tab indexes accordingly. When a group box is processed, each internal group is processed in order before proceeding to the next primary group.
The example below displays the resulting tab order for the sample screen.