
Installation
This section describes the installation process for the Maconomy web client. Keep in mind that parts of the installation process (in particular, web server configuration) are specific to the individual installation. As such, this section can only offer general guidelines.
The Maconomy Web Client Manifest
To install the web client, you need an installation of Maconomy and the latest version of MConfig. The web client product is packaged in an archive file format called a web client PU (Packing Unit). A web client PU contains the following components:
- The Tools part which is a set of JavaScript, HTML and CSS files responsible for executing the web client applications in the browser.
- The embedded web client applications, each consisting of a set of JSON files describing workspaces, layouts, and other settings for the web client against a particular range of Maconomy backends
- The web client PU manifest (
manifest.json) which specifies various metadata about the PU such as version info and compatibility constraints.
The web client is released with the rest of Maconomy, which makes it easy to identify the required backend Maconomy version for a given web client. You can also inspect the manifest.json file mentioned above. In the following manifest.json sample, we can see that this web client PU is of version 5.0.0. The application section lists the core Maconomy version with which this web client version is compatible. In this case, it is compatible with 2.6 (internally called 22).
{
  "manifest-version": 4,
  "maconomyVersion": {
    "external": {
      "major": 2,
      "minor": 6,
      "patch": 0,
      "cummulativeUpdate": 0
    },
    "internal": {
      "major": 22,
      "patch": 100,
      "cummulativeUpdate": 0
    }
  },
  "fpuVersion": {
    "major": 5,
    "minor": 0,
    "patch": 0
  },
  "apiVersion": {
    "major": 23,
    "minor": 0,
    "patch": 0
  },
  "application": {
    "requires": "~22.0.0",
    "src": "//depot/Releases/Navigator/Application/22/00/00/",
    "backend": {
      "tpu": {
        "version": "22.0.100",
        "cummulativeUpdate": 0
      },
      "apu": {
        "version": "22.0.100",
        "cummulativeUpdate": 0
      },
      "mconfig": {
        "version": "9.9"
      }
    }
  }
}
Once the Maconomy system is installed and configured, MConfig can install the web client PU on a web server of choice. MConfig will also install a web client application matching the Maconomy backend on the Maconomy server, specifically in the Web folder in MaconomyDir. We currently support IIS and Apache (see release notes for the specific version requirements for these web server products). On the web server, you should also set up a web site with the installed web client index.html in the root. Once the MConfig installation has taken place, and the web site and proxy settings have been completed, the web client is ready. Please observe that certain manual steps may be required for specific installations.
Security Considerations
While Deltek recommends the following procedures, ultimately each company is liable for its own security. The landscape evolves quickly, and each customer should continuously take internal measures to ensure its own security.
Regarding the use of HTTPS/TLS
Deltek best practice recommends that you configure web servers to use HTTPS (instead of HTTP). Using HTTPS/TLS encrypts your network traffic, making it difficult for anyone to access the credentials as they are passed to the web server. Using simple HTTP is tantamount to sending confidential information over the wire in clear text. The web client login page will display a warning message in case HTTP is used instead of HTTPS.
Address Risk of Clickjacking
To reduce the likelihood of clickjacking, Deltek suggests you follow the OWASP guidelines to defend against clickjacking attacks. Based on the OWASP guideline, you can perform additional steps when configuring your webserver. See Additional Related Procedures for more details.
Prerequisites
The following are prerequisites to installing the web client:
- Maconomy 2.6 with Standard Extensions installed
- Latest MConfig version
- Latest Extender version
- RESTful Web Services is enabled in the Coupling Service
- Web client downloaded from DSM, and the web client PU placed in the PUs folder (with the APU and TPU)
- If you are using Apache as the webserver, download the Apache binary package including OpenSSL, and install it from the following link: http://httpd.apache.org/
Additionally, this document assumes that you have already set up an application. For detailed instructions on setting up applications, see the Deltek Maconomy Installation Guide for your specific Maconomy version.
MConfig Installation
To begin installation with MConfig, complete the following steps:
Step 1 : In the MConfig Main Window, double-click the application to open. The Application Instance window displays as shown below.
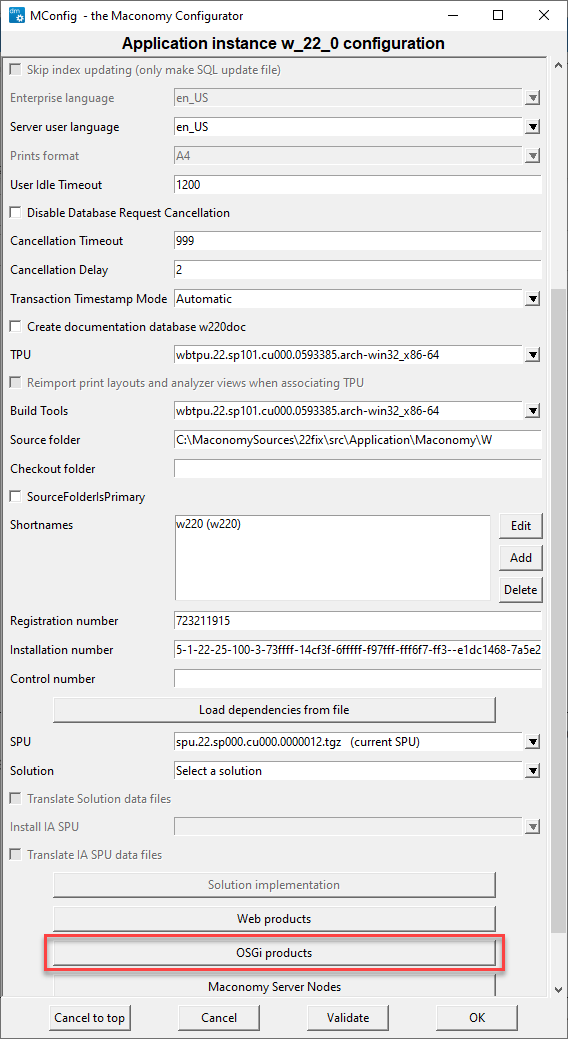
Step 2 : Click OSGi products. The OSGi Server Selection screen appears as shown below.
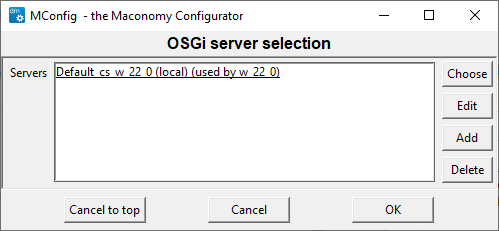
Step 3 : In the OSGi Server Selection window, select the Coupling Service to update.
Step 4 : In the OSGi Products window, select the Enable RESTful Web Services check box as shown below.
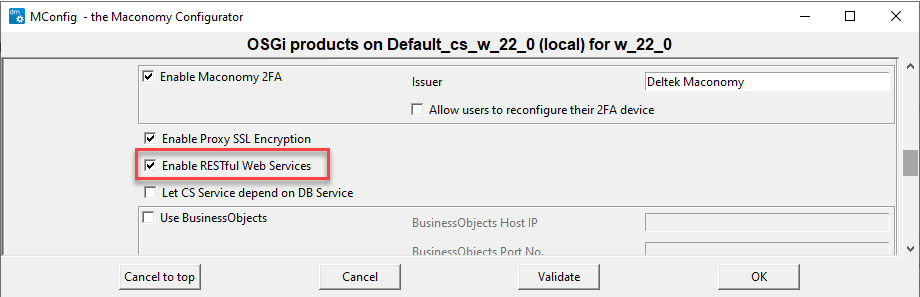
Step 5 : Click OK to save, and click OK at the SSL warning to return to the Application Instance window. In the Application Instance window, click Web products as shown below.
Note: While you can click OK at the SSL warning, Deltek recommends you follow the steps listed in the warning to ensure the security of your system.
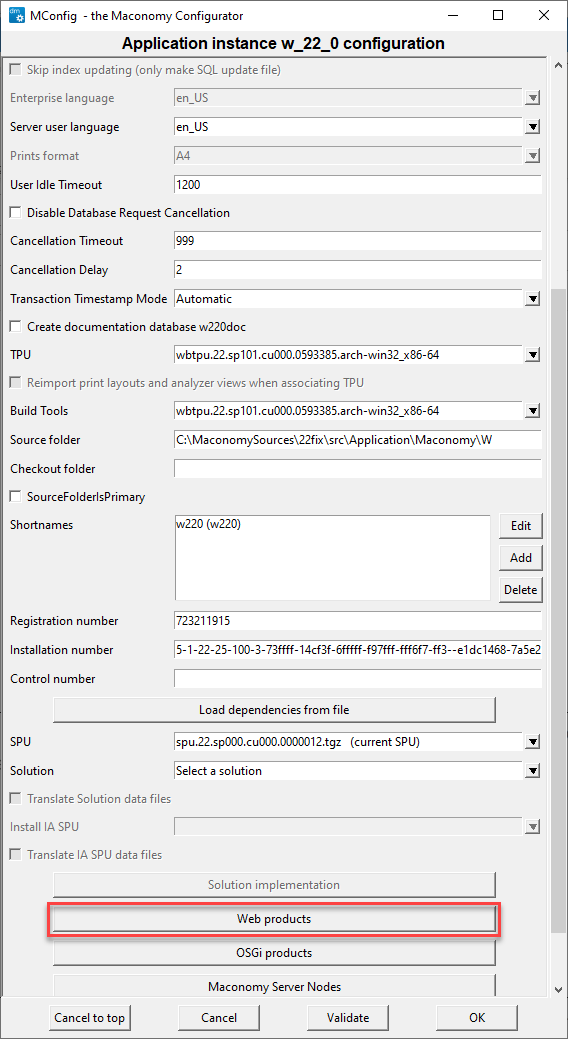
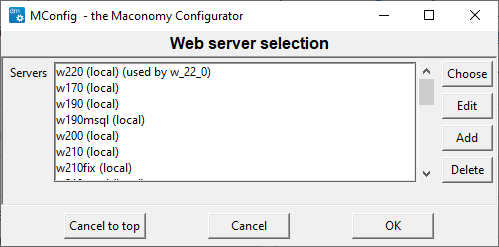
Step 6 : On the Web server selection screen, select the application to update, as shown below.
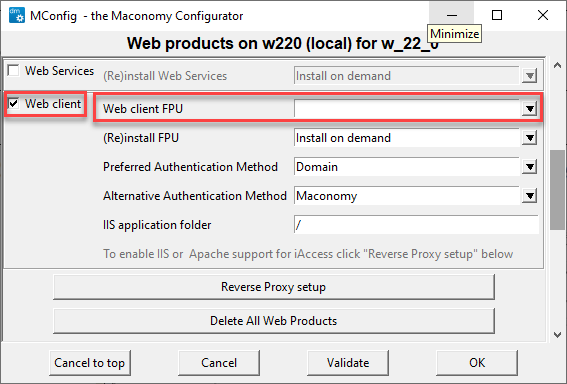
Step 7 : Select the Web client check box as shown below. In the Web Client FPU field, select the relevant web client PU from the dropdown list.
Step 8 : Click Ok a couple of times to return to the main window, and click Next a couple of times, and then click Yes to complete the MConfig installation.
Create a Website Using IIS
To create a website using IIS, you can enable IIS support automatically using MConfig, or perform the steps manually using IIS Manager.
Enabling IIS support with MConfig automatically completes the steps described under the manual installation. Use MConfig for the initial setup of a web client website using IIS. However, modifying the setup later should be done manually using IIS Manager.
Enable IIS Support Automatically Using MConfig
Automatic IIS configuration requires MConfig 9.9 or later. Previous version will not perform a correct configuration of IIS due to a shortcoming in MConfig. To enable IIS support using MConfig, follow these steps:
- In MConfig, go to the Web Products window.
- Select the Enable support for Web client check box and click OK.

Note: After you complete the initial installation with MConfig, you should check the setup in IIS Manager and possibly modify parameters, such as Web Server Port Number.
Note: If you enable IIS support automatically, MConfig also updates the IIS web.xml file with a routing rule that ensures login pages and other non-root URLs load properly.
Enable IIS Support Manually Using IIS Manager
After the web client has been installed on your IIS web server, you can configure it using IIS Manager.
Add the Site
: Connect to your server in the Internet Information Services (IIS) Manager application and setup the web client site.
Add MIME Types
: Click the "MIME Types" and ensure that the MIME Types below are defined
.json application/json
.woff application/font-woff
.woff2 application/font-woff
In IIS 8.0 and up, the .woff extension exists by default but with a different type. Change it to application/font-woff.
Proxy Setup
- Install Microsoft Application Request Routing for IIS ARR.
- Restart IIS Manager.
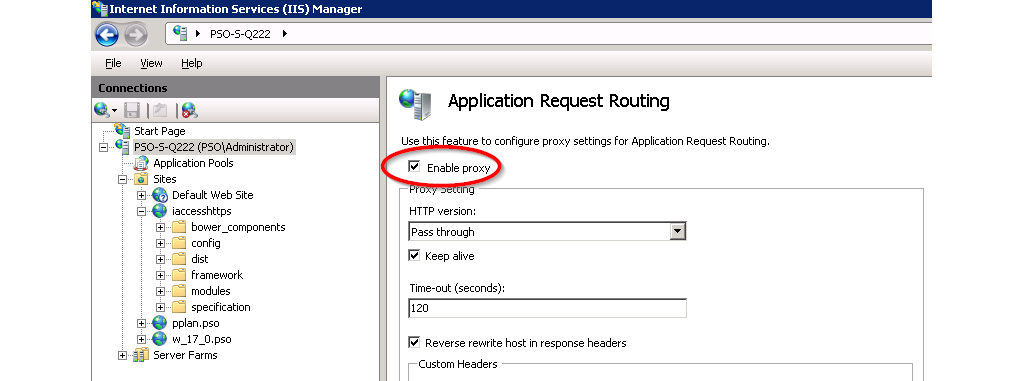
- In the Application Request Routing configuration, click server proxy settings.
- Check Enable proxy as shown in Figure @iis2.
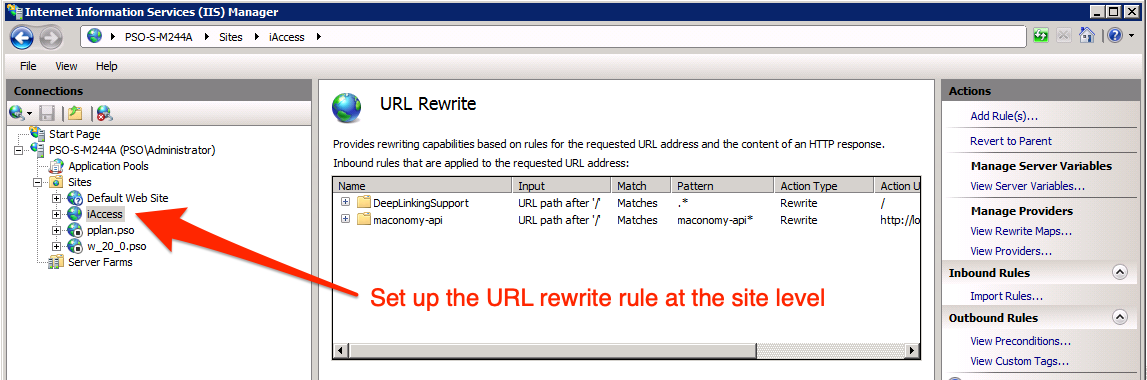
- Open URL Rewrite to add proxy rules for the container, configurations and filedrop APIs. Note: This must be done on the local site, not globally.
In IIS 8.0 and up, you will need to install the Web Platform Installer in order to install the ARR plugin.
Edit Routing Rules
To ensure that login pages (and other non-root URLs) load properly, open the IIS web.xml file and add the following rule before the other routing rules:
<rule name="DeepLinkingSupport" stopProcessing="false">
  <match url=".*" />
    <conditions logicalGrouping="MatchAll" trackAllCaptures="false">
      <add input="{REQUEST_FILENAME}" matchType="IsFile" negate="true" />
      <add input="{REQUEST_FILENAME}" matchType="IsDirectory" negate="true" />
      <add input="{REQUEST_FILENAME}" pattern="maconomy-api*" negate="true" />
    </conditions>
  <action type="Rewrite" url="/" />
</rule>
Note: If you want to install the web client in an IIS Application folder, you should update the rewrite action accordingly.
For example, if the IIS Application folder is called **webclient", then the rewrite action should be:
<action type="Rewrite" url="/webclient/" />
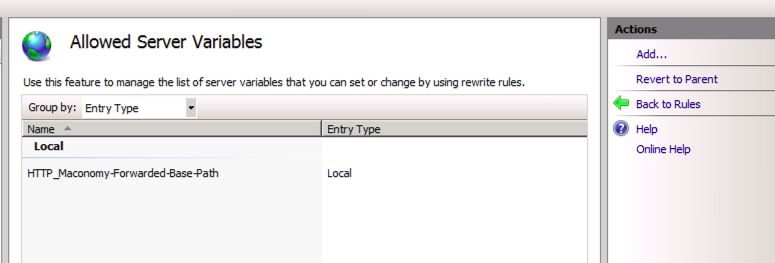
Add the server variable for Maconomy API
- Click View Server Variables
- Click Add...
- Set the name: HTTP_Maconomy-Forwarded-Base-Path
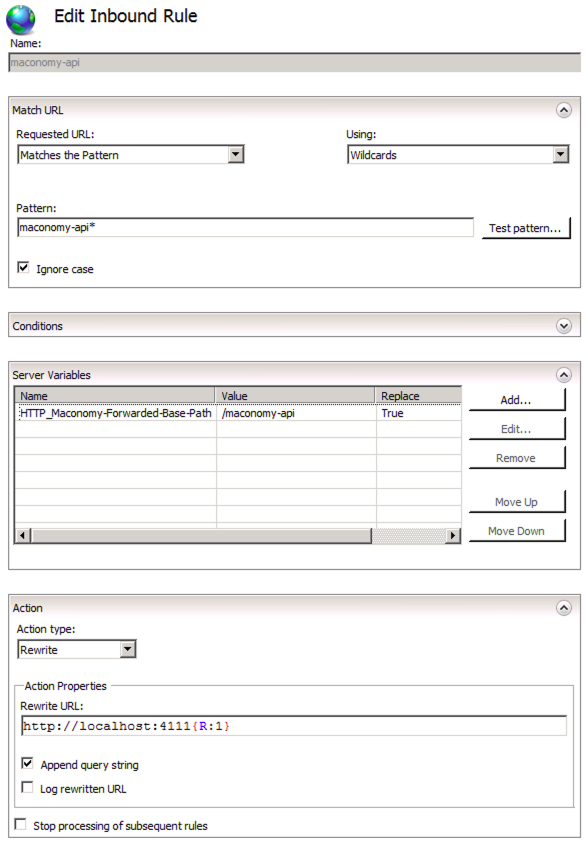
Set up proxy for Maconomy API
- Click Add Rule...
- Select Blank rule.
- Fill out the rule as shown in the section on setting up proxy for Maconomy API, specifically with the following parameters:
Match URL
Requested URL: Matches the Pattern
Using: Wildcards
Pattern: maconomy-api*
Ignore case: checked
Server Variables
Click Add...
Server variable name: HTTP_Maconomy-Forwarded-Base-Path
Value: maconomy-api
Action
Action type: Rewrite
Rewrite URL: http://<coupling-service-host>:<coupling-service-port>{R:1}
Append query string: checked
Preserve the Host Header
Open a console with Administrative privileges, and navigate to
C:\Windows\System32\inetsrv
Enable preserveHostHeader by running the following command:
cd C:\Windows\System32\inetsrv
appcmd.exe set config -section:system.webServer/proxy /preserveHostHeader:"True" /commit:apphost
Note: To preserve the spacing, copy the command and paste it in the command prompt.
Restart the web server.
See AppCmd reference for more details.
Set Up HTTPS
Open the Server Variables screen by clicking View Server Variables... in the URL Rewrite screen.
In the Server Variables screen, click Add... and add the variable HTTP_X_FORWARDED_PROTO as shown below.
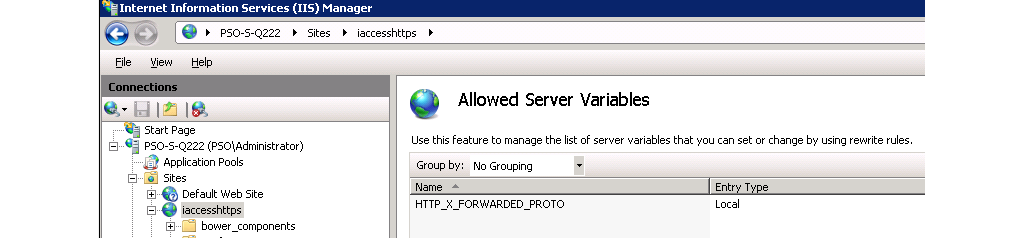
In the URL rewrite rules (both containers, configurations, filedrop, auth, and environment) that proxies the web service, set the server variable HTTP_X_FORWARDED_PROTO to https as shown below.

Restart the webserver.
Note: It is not possible to run both HTTP and HTTPS on the same IIS site.
Create a Website Using Apache
Here is a short guide to setting up the web client on Apache (2.2 and 2.4)
Download Apache
Download the Apache 2.2 binary package including OpenSSL. Install it.
In httpd.conf, comment in the following modules:
LoadModule headers_module modules/mod_headers.so
LoadModule proxy_module modules/mod_proxy.so
LoadModule proxy_http_module modules/mod_proxy_http.so
LoadModule ssl_module modules/mod_ssl.so
LoadModule rewrite_module modules/mod_rewrite.so
Comment in the inclusion: Include conf/extra/httpd-vhosts.conf
Comment out #Listen 80 (we will use the httpd-vhosts.conf file instead)
Enable compression
If using Apache 2.2, comment in the following module: LoadModule deflate_module modules/mod_deflate.so
If using Apache 2.4, use this module: LoadModule filter_module modules/mod_filter.so
Configure the compression:
<IfModule deflate_module>
  AddOutputFilterByType DEFLATE text/html text/plain text/xml text/css text/javascript   application/javascript
  SetOutputFilter DEFLATE
  DeflateCompressionLevel 5
</IfModule>
See Apache Deflation Module for more information.
Setup with SSL
Here is a template for setting up a virtual host that serves webclient _with SSL. Copy contents into the httpd-vhosts.conf file, and replace the variables with the desired values. Please observe that the line Require all granted below is only required for Apache 2.4.
Listen <port>
<VirtualHost *:<port>>
    ServerName <server-name
    # Server web client files from installation directory
    DocumentRoot "<web-client-installation-directory>
    <Directory <web-client-installation-directory>>
       Order deny,allow
       Allow from all
       AllowOverride All
       Require all granted
    </Directory
    <Proxy *>
       Order deny,allow
       Allow from all
    </Proxy
    ProxyRequests      Off
    ProxyPreserveHost  O
    RequestHeader set Maconomy-Forwarded-Base-Path maconomy-api
    # Signal to the coupling service that the originating protocol is HTTPS
    RequestHeader set X-Forwarded-Proto "https
    # Proxy the web services from the coupling service
    ProxyPass  /maconomy-api  http://<coupling-service-host>:<coupling-service-web-port>  retry=
    # Set up this virtual host to use SSL
    SSLEngine              On
    SSLProxyEngine         On
    SSLCertificateFile     <crt-file-location>
    SSLCertificateKeyFile  <key-file-location>
</VirtualHost>
Edit Routing Rules
For more information, refer to Edit Routing Rules under the Enable IIS Support Manually Using IIS Manager section.
Verifying the setup
To quickly verify the setup, open a browser (such as Chrome) and navigate to the following URL:
https://<external-url-and-port>/maconomy-api
If the proxy configuration is correct, the browser should either download, or show an XML or JSON document that looks like the following:
{
  "timeInfo": {
    "time": "2022-07-11T07:38:13.667Z[UTC]",
    "zone": {
      "id": "UTC",
      "offset": {
        "id": "Z", "totalSeconds": 0
      }
    }
  },
  "versions": {
    "apu": {
      "major":"23",
  ...
Domain Login and Single Sign On
The domain login functionality in the web client is based on Kerberos service tickets obtained through the SPNEGO authentication protocol. This protocol allows direct Single Sign On (SSO) when the user is running the web client while already authenticated against the domain (that is, logged in to their computer via a domain account).
If the user is not authenticated against the domain, the browser typically prompts for domain credentials. Click Cancel in the browser login window and use the web client domain login page.
Browser Setup for Single Sign On
Refer to the instructions in this section to set up Single Sign On (SSO) for various browsers.
SSO Setup for Internet Explorer
For Internet Explorer (IE), you may need to add the web client server address to the Local intranet zone if it is not already in this zone, as IE does not permit Kerberos-based SSO for websites in the Internet zone.
More details are available in the "Client Side-Internet Explorer" section of the following Microsoft article about security zones in Internet Explorer:
https://msdn.microsoft.com/en-us/library/ms995329.aspx
SSO Setup for Chrome
You can choose one of two options:
- If using Windows, you can perform the setup required for Internet Explorer. Chrome can replicate the setup for IE.
- To configure Chrome to work with SSO using Kerberos authentication, follow the steps in the "Set Chrome policies for devices" guide (https://support.google.com/chrome/a/answer/187202?hl=en).
The configurations should be done by IT administrators who want to set Chrome policies on their corporate-managed devices. The templates contain hundreds of available policies that can be set, but you should only focus on two of these, namely:
AuthNegotiateDelegateWhitelist
AuthNegotiateDelegateWhitelist
and
AuthServerWhitelist
The properties should be set to the domain you want to authenticate against, such as:
"*. example.com ".
SSO Setup for Chrome on Windows
After following the preceding guide from Google, you can set AuthNegotiateDelegateWhitelist and AuthServerWhitelist as follows:
- Navigate to Administrative Templates >> Classic Administration Templates (ADM) >> Google >> Google Chrome >> Policies for HTTP Authentication.
- Click "Kerberos delegation server whitelist".
- Click Enabled.
- In the Input field, enter the domain you want to authenticate against, such as
\*. example.com. - Click Apply.
- Click on "Authentication server whitelist".
- Click Enabled.
- In the input field, enter the domain you want to authenticate against, such as
\*. example.com. - Click Apply.
- Open Chrome.
- Check the values by navigating to the URL:
chrome://policy
SSO Setup for Chrome on Mac
After following the preceding guide from Google, you should also read the Mac Quick Start guide from Google at:
http://www.chromium.org/administrators/mac-quick-start
If the "Workgroup Manager from Apple" is not available for your version of OS X, then you can set AuthNegotiateDelegateWhitelist and AuthServerWhitelist using one of two recipes.
By creating a com.google.Chrome.plist file:
- Create com.google.Chrome.plist file with the following content:
<?xml version="1.0" encoding="UTF-8"?>
<!DOCTYPE plist PUBLIC "-//Apple//DTD PLIST 1.0//EN"     "http://www.apple.com/DTDs/PropertyList-1.0.dtd">
<plist version="1.0">
  <dict>
    <key>AuthNegotiateDelegateWhitelist</key>
    <string>*.example.com</string>
    <key>AuthNegotiateDelegateWhitelist</key>
    <string>*.example.com</string>
  </dict>
</plist>
- Set the two string attributes to the domain you want to authenticate against.
- Convert the com.google.Chrome.plist to the binary format by running the following command from the Terminal:
plutil -convert binary1 com.google.Chrome.plist
- Copy the file to "/Library/Managed Preferences/" by running the following command from the Terminal:
sudo -s
cp com.google.Chrome.plist /Library/Managed Preferences/<username>
- Open Chrome.
- Check the values by navigating to the following URL:
chrome://policy
By using the "defaults" command:
- Run the following commands:
defaults write com.google.Chrome AuthServerWhitelist "*.example.com"
defaults write com.google.Chrome AuthNegotiateDelegateWhitelist "*.example.com"
Open Chrome.
Check the values by navigating to the following URL:
chrome://policyOr by using the following command:
defaults read com.google.Chrome
Note that using the "defaults" command only sets the "AuthServerWhitelist" and "AuthNegotiateDelegateWhitelist" Chrome properties for the current user.
SSO Setup for Safari
No setup is needed.
SSO Setup for iOS
Follow the steps in the following guide:
https://samuelyates.wordpress.com/2013/10/11/kerberos-single-sign-on-in-ios-7/
Remember to put your own servername on the URLPrefixMatches field. As the name implies, this has to contain a URL prefix. This could be https://myserver.example.com:8080, so basically this will be set to the base server URL including an optional port number.
You can use Apple Configurator 2 to install the profile on a number of iPads:
https://itunes.apple.com/us/app/apple-configurator-2/id1037126344
SSO Setup for Firefox
Complete the following steps:
In the location bar, type:
about:configThis brings up the configuration page.
In the Filter:box, type:
negotiate.This restricts the listing to the configuration options you need.
Edit
network.negotiate-auth.trusted-uristo the domain against which you want to authenticate. For instance:".".example.com
Domain Controller Setup
The SPNEGO authentication protocol works by assuming the presence of a specific Service Principal Name (SPN) on the domain controller:
HTTP/name.domain or HTTP/name
where name and domain are the web server DSN name and domain respectively, as seen from the user's computer.
For example, if the user is opening the web client using the internet address https://some-server.some-domain.com, then the browser expects one of the following SPNs to be present on the domain controller:
HTTP/some-server or HTTP/some-server.some-domain.com.
SPN Setup
It is a task for the domain administrator to ensure that these SPNs are created and associated with the existing domain account used for Maconomy SSO.
SSO with Active Directory
For Active Directory, associating SPNs with the existing domain account is done with the 'setspn' command.
To associate SPN with an existing domain account, complete the following step:
On a command line enter the following:
setspn -A HTTP/name account
setspn -A HTTP/name.domain account
where account is the name of the domain account used for Maconomy SSO.
Special Instructions for SPN Conflicts
If the web client is installed on a web server that already hosts other web applications with SNEGO authentication, this causes a conflict on the SPN, as an SPN can only be associated with one domain account.
To resolve the issue, either install only one web application on each web server, or create multiple local DNS names for the web server, so that each web application can be accessed through different addresses and will map to different SPNs.
Maconomy Server Setup
Please refer to the Single Sign On with Kerberos section in the Deltek Maconomy System Administrator Guide.
Additional Related Procedures
Displaying System Information on the Web Client Interface
You can display the system name along the top margin of your web client installation. For details on how to configure this, refer to the Displaying System Information on Clients section in the Deltek Maconomy System Administrator Guide.
Configure Web Server to Reduce Risk of Clickjacking
You can reduce the risk of clickjacking by performing an additional step when configuring your web server. This step applies to both Apache and IIS.
To configure your web server and reduce the risk of clickjacking, complete the following step:
Configure your web server to always reply with the following response headers:
Content-Security-Policy: frame-ancestors 'self'
X-Frame-Options: SAMEORIGIN
These headers are then added to all responses.