
Supported Markdown Syntax
The web client supports standard Markdown syntax for attached documents. You can find Markdown files (usually identified by a .md extension) in many areas: as receipts in the expenses layout, as Help documentation, or as invoices.
There are numerous Markdown processors available, each with its own way of interpreting and sometimes extending the Markdown syntax. This guide focuses specifically on the processor used in the web client. The included sample file illustrates how the styling is interpreted within that environment.
Sample File
Note that the styling shown in this installation guide may not exactly match the styling in the web client. Additionally, styling may vary across different versions or iterations of the web client. Therefore a sample file has been included, which you can import into the web client. You will then be able to see the styling of Markdown elements for your specific web client version.
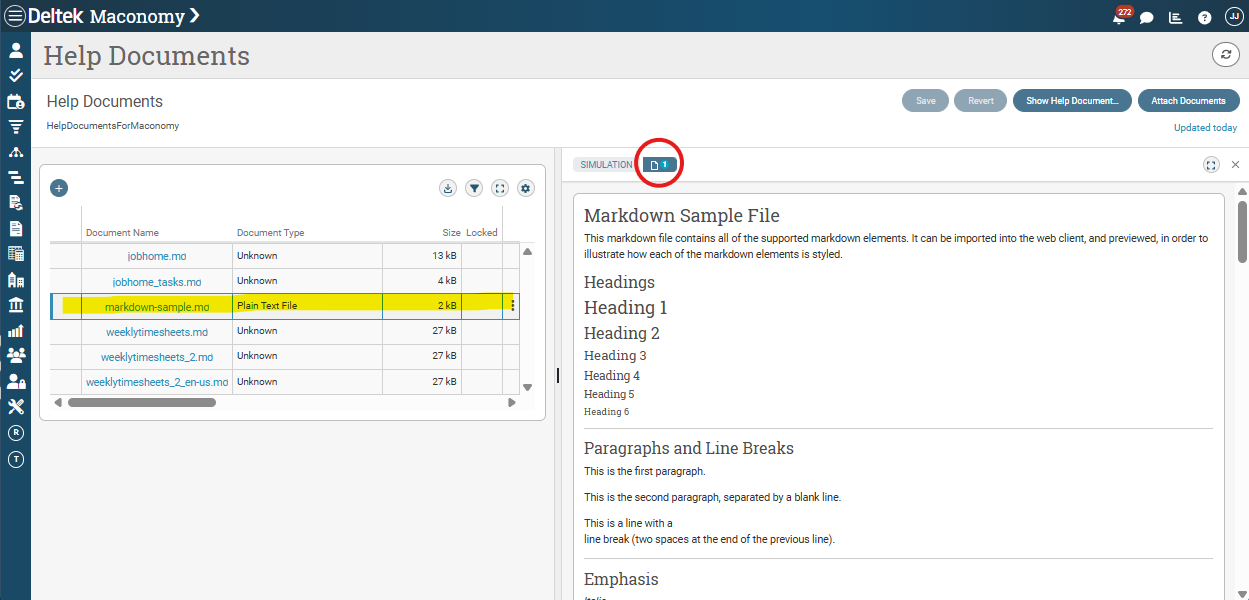
Deltek recommends that you navigate to the Help Documents layout, or any layout with a documents_assistant, and attach the document. You can then view it in the Simulation panel and delete it when no longer required.
To download the sample file, click here.
Further Information
For more details on Markdown in general, see the Markdown Guide.
Headings
Use # for headings. The number of # symbols indicates the heading level.
| Markdown | Rendered Output |
|---|---|
# Heading level 1 | Heading level 1 |
## Heading level 2 | Heading level 2 |
### Heading level 3 | Heading level 3 |
#### Heading level 4 | Heading level 4 |
##### Heading level 5 | Heading level 5 |
###### Heading level 6 | Heading level 6 |
Paragraphs
To create paragraphs, use a blank line to separate one or more lines of text.
| Rendered Output |
|---|
| This section discusses overall navigation and concepts to get you started with the Maconomy web client. There are several basic features that are used throughout the application. |
Line Breaks
To create a line break or new line <br>, end a line with two or more spaces, and then type ENTER.
| Rendered Output |
|---|
| This is a line with a line break. |
Emphasis
Add emphasis with italic or bold text.
Bold
To bold text, add two asterisks or underscores before and after a word or phrase. To bold the middle of a word for emphasis, add two asterisks without spaces around the letters.
| Markdown | Rendered Output |
|---|---|
Click **Unsubscribe** if you wish to stop receiving notifications for a specific conversation. | Click Unsubscribe if you wish to stop receiving notifications for a specific conversation. |
Click __Unsubscribe__ if you wish to stop receiving notifications for a specific conversation. | Click Unsubscribe if you wish to stop receiving notifications for a specific conversation. |
Click Un**subscribe** if you wish to stop receiving notifications for a specific conversation. | Click Unsubscribe if you wish to stop receiving notifications for a specific conversation. |
Italic
To italicize text, add one asterisk or underscore before and after a word or phrase. To italicize the middle of a word for emphasis, add one asterisk without spaces around the letters.
| Markdown | Rendered Output |
|---|---|
For more information about the web client installation, refer to the *Maconomy Web Client Install Guide.* | For more information about the web client installation, refer to the Maconomy Web Client Install Guide. |
For more information about the web client installation, refer to the _Maconomy Web Client Install Guide._ | For more information about the web client installation, refer to the Maconomy Web Client Install Guide. |
For more information about the web client installation, refer to the Maconomy*WebClient*InstallGuide. | For more information about the web client installation, refer to the MaconomyWebClientInstallGuide. |
Block Quotes
To create a blockquote, add a > at the beginning of a paragraph. For multiple paragraphs, add a > on the blank lines between the paragraphs. For nested blockquotes, add a >> at the beginning of the paragraph you want to nest.
| Markdown | Rendered Output |
|---|---|
> This section discusses overall navigation and concepts to get you started with the Maconomy web client. |
|
> This section discusses overall navigation and concepts to get you started with the Maconomy web client.
> There are several basic features that are used throughout the application. |
|
> This section discusses overall navigation and concepts to get you started with the Maconomy web client.
> There are several basic features that are used throughout the application. |
|
Tables
To add a table, use three or more hyphens (---) to create each column’s header, and use pipes (|) to separate each column. For compatibility, you should also add a pipe on either end of the row.
| Syntax | Description |
| --------- | ----------- |
| Header | Title |
| Paragraph | Text |
The rendered output looks like this:
| Syntax | Description |
|---|---|
| Header | Title |
| Paragraph | Text |
Aligning Tables
You can align text in the columns to the left, right, or center by adding a colon (:) to the left, right, or on both side of the hyphens within the header row.
| Left Aligned | Centre Aligned | Right Aligned |
| :--- | :----: | ---: |
| Header | Title | Here's this |
| Paragraph | Text | And more |
The rendered output looks like this:
| Left Aligned | Centre Aligned | Right Aligned |
|---|---|---|
| Header | Title | Here's this |
| Paragraph | Text | And more |
Formatting Text In Tables
You can format the text within tables. For example, you can add links, code (words or phrases in backticks (`) only, not code blocks), and emphasis.
You cannot use headings, blockquotes, lists, horizontal rules, images, or most HTML tags.
Lists
You can organize items into ordered and unordered lists.
Ordered Lists
To create an ordered list, add line items with numbers followed by periods. The numbers do not have to be in numerical order, but the list should start with the number one.
| Markdown | Rendered Output |
|---|---|
1. First item | 1. First item 2. Second item 3. Third item 4. Fourth item |
1. First item | 1. First item 2. Second item 3. Third item 4. Fourth item |
1. First item | 1. First item 2. Second item 3. Third item 4. Fourth item |
1. First item | 1. First item 2. Second item 3. Third item 1. Indented item 2. Indented item 4. Fourth item |
Unordered Lists
To create an unordered list, add dashes (-), asterisks (*), or plus signs (+) in front of line items. Indent one or more items to create a nested list.
| Markdown | Rendered Output |
|---|---|
- First item |
|
* First item |
|
+ First item |
|
- First item |
|
Code and Code Blocks
To denote a word or phrase as code, enclose it in backticks ( ` ).
| Markdown | Rendered Output |
|---|---|
| At the command prompt, type `console.log('hello world')`. | At the command prompt type console.log('hello world'). |
To create a code block, indent every line of the block by at least four spaces or one tab. You can also use fenced code blocks, as seen in the following example:
```
{
  "firstName": "John",
  "lastName": "Smith",
  "age": 25
}
```
The rendered output looks like this:
{
    "firstName": "John",
    "lastName": "Smith",
    "age": 25
}
Horizontal Rules
To create a horizontal rule, use three or more asterisks (***), dashes (---), or underscores (___) on a line by themselves.
| Markdown | Rendered Output |
|---|---|
| *** | |
| --- | |
| ___ |
Links, URLs, and Email Addresses
To create a link, enclose the link text in brackets (for example, [Markdown Guide]) and then follow it immediately with the URL in parentheses (for example, (https://www.markdownguide.org)).
To quickly render a URL or email address as a link, enclose it in angle brackets.
| Markdown | Rendered Output |
|---|---|
A useful website is [Markdown Guide](https://www.markdownguide.org). | A useful website is Markdown Guide. |
<https://www.markdownguide.org> | https://www.markdownguide.org |
<info@example.com> | info@example.com |
You can also disable the URL rendered as a link by enclosing the URL in backticks.
`http://www.example.com`
The rendered output looks like this:
http://www.example.com
Images
The process for adding images is similar to that for links. To add an image, type an exclamation mark (!), followed by alternative text in brackets, and then the path or URL to the image asset in parentheses. You can also opt to add a title in quotation marks after the path or URL.
To add a link to an image, enclose the Markdown for the image in brackets, and then add the link in parentheses.
Escaping Characters
To display a literal character that would otherwise be used to format text in a Markdown document, add a backslash (\) before the character.
| Markdown | Rendered Output |
|---|---|
\* Without the backslash, this would be a bullet in an unordered list. | * Without the backslash, this would be a bullet in an unordered list. |
| Character | Name |
|---|---|
| \ | backslash |
| ` | backtick |
| * | asterisk |
| _ | underscore |
| # | hash sign |
| + | plus sign |
| - | minus sign (hyphen) |
| . | dot |
| ! | exclamation mark |
| | | pipe (see also escaping pipe in tables) |
Strikethrough
You can apply strikethrough formatting by placing a horizontal line through the center of a word or phrase. This is useful for indicating that certain text is incorrect and not meant for inclusion in the document. To strikethrough words, use two tilde symbols (~~) before and after the words.
| Markdown | Rendered Output |
|---|---|
~~Users cannot export table data to spreadsheets.~~ The last statement is wrong. |
HTML
If you prefer certain HTML tags to Markdown syntax, you can use these in Markdown-formatted text. For example, you may find it easier to use HTML tags for images. Using HTML also helps when you need to change the attributes of an element, like specifying the color of text or changing the width of an image.
To use HTML, place the tags in the text of your Markdown-formatted file.
| Markdown | Rendered Output |
|---|---|
| This **word** is formatted in markdown. This <em>word</em> is wrapped in italic tags. | This word is formatted in markdown. This word is wrapped in italic tags. |
HTML Character Codes
You can also use HTML character codes instead of escaping Markdown characters.
| Markdown | Rendered Output |
|---|---|
\_Some text wrapped in markdown underscores\_ | _Some text wrapped in markdown underscores_ |
_Some text wrapped in the underscore character code_ | _Some text wrapped in the underscore character code_ |