Dedicated Clock In and Clock Out Terminals
This feature allows you to configure a terminal to only
allow clock in or clock out. This configuration may be useful if employees
need to clock in and clock out at terminals in different locations and
you want to make sure that the same terminal cannot be used for both clocking
in and clocking out.
For example, when employees start a shift, they clock in
at the Entrance Door in the front of the factory. When the shift ends,
the employees clock out at the Exit Door in the back of the factory. The
terminal at the Entrance Door is configured to only allow clock-ins and
the terminal at the Exit Door is configured to only allow clock-outs.
This configuration prevents employees from both clocking in and clocking
out at either door. Refer to the example below
for a more detailed explanation.
This feature is supported on the following terminals: InTeract
Client, InTouch, B-Net 9540, B-Web 9500, and Kaba Terminal 9700.
The following configuration is required for this feature:
Enable
the TERMINAL_EVENT_RESTRICTION PVE Plugin
Create the Event Groups
Add
the TERMINAL_EVENT_RESTRICTION Setting to the Terminals or Terminal Profiles
Enable
the TERMINAL_EVENT_RESTRICTION PVE Plugin
You must enable the PVE Plugin called TERMINAL_EVENT_RESTRICTION
in order to use this feature.
Click Main
Menu > Configuration > System > PVE Plugin.
Select the TERMINAL_EVENT_RESTRICTION
record and click Modify.
Make sure the Enabled
check box is selected, and click Save.
You must restart the application
server for this change to take effect.
Create
the Event Groups
You need to create an event group with the clock in event,
and an Event Group with the clock out event.
Click Main
Menu > Configuration > Event > Event Group Event.
Click Add.
Click the  quick link next to the Event Group
field and select Add from
the menu.
quick link next to the Event Group
field and select Add from
the menu.
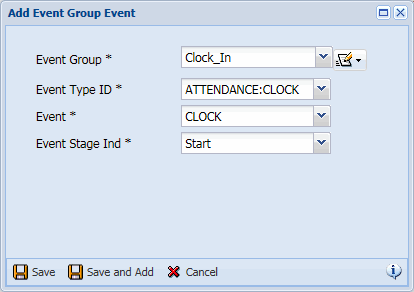
Enter a name and description
for the Event Group with the clock-in event (for example, Clock_In).
Then, click Save.
Select the new Event
Group from the drop-down list.
For the Event
Type ID, select ATTENDANCE:CLOCK.
For the Event,
select the clock event you want restrict users from posting at the
terminal.
For the Event
Stage Ind, select Start.
This Event Group will be used with the TERMINAL_EVENT_RESTRICTION
setting on the dedicated clock-out terminal, to prevent users from
posting a clock-in at the terminal.
Select Save
and Add.
Click the
quick link next to the Event Group
field and select Add from
the menu.
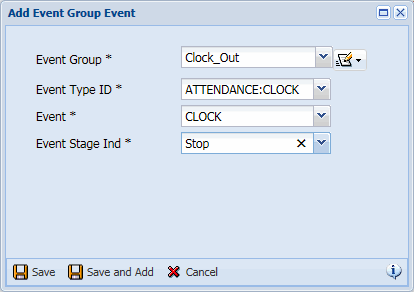
Enter a name and description
for the Event Group with the clock-out event (for example, Clock_Out).
Then, click Save.
Select the new Event
Group from the drop-down list.
For the Event
Type ID, select ATTENDANCE:CLOCK.
For the Event,
select the clock event you want restrict users from posting at the
terminal.
For the Event
Stage Ind, select Stop.
This Event Group will be used with the TERMINAL_EVENT_RESTRICTION
setting on the dedicated clock-in terminal, to prevent users from
posting a clock-out at the terminal.
Click Save.
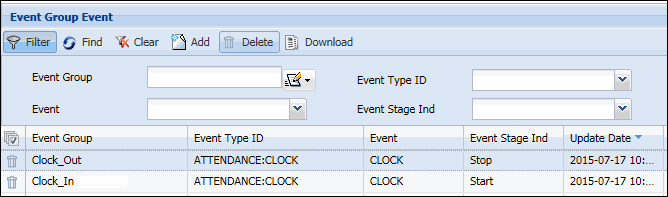
The new Event Groups will display on
the Event Group Event form.
Add
the TERMINAL_EVENT_RESTRICTION Setting to the Terminal or Terminal Profile
Once you have defined the Event Groups for the Clock In
and Clock Out events, you can configure the TERMINAL_EVENT_RESTRICTION
settings for the dedicated clock-in and clock-out terminals.
The TERMINAL_EVENT_RESTRICTION setting can be added to
a single Terminal or to multiple terminals via a Terminal Profile. The
steps below explain how to add this setting to a Terminal record.
Click Main
Menu > Configuration > Terminal > Terminal.
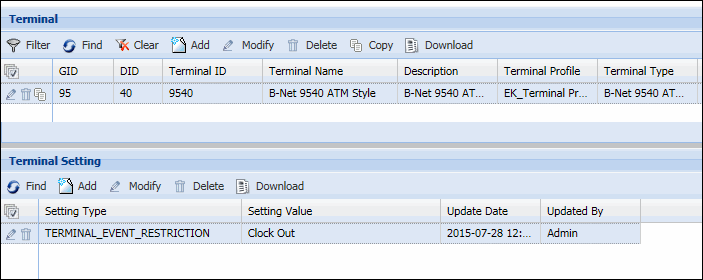
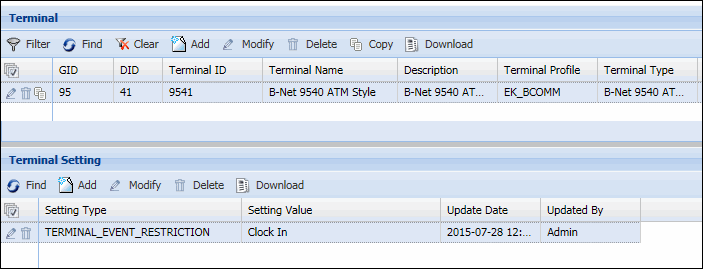
Select the record for the B-Net
9540 or B-Web 9500 terminal that will be used as a dedicated clock-in
terminal. Users will only be able to clock in at this terminal.
On the Terminal Setting tab,
click Add.
From the Setting
Type field, select TERMINAL_EVENT_RESTRICTION.
For the Setting
Value, select the Event Group you defined earlier that contains
the clock-out event.
Click Save.
This setting prevents users from being
able to clock out at the terminal.
You need to repeat these steps to configure the
dedicated clock-out terminal.
On the Terminal form, select
the record for the terminal that will be used as a dedicated clock-out
terminal. Users will only be able to clock out at this terminal
On the Terminal Setting tab,
click Add.
From the Setting
Type field, select TERMINAL_EVENT_RESTRICTION.
For the Setting
Value, select the Event Group you defined earlier that contains
the clock-in event.
Click Save.
This setting prevents users from being
able to clock in at the terminal.
Example
A facility has a dedicated clock-in terminal at the building
entrance, and a dedicated clock-out terminal at the exit door.
The dedicated clock-in terminal has TERMINAL_EVENT_RESTRICTION
set to Clock_Out, which is an Event Group with a clock out event. This
setting restricts the employee from posting a clock-out event at the terminal.
The dedicated clock-out terminal has TERMINAL_EVENT_RESTRICTION
set to Clock_In, which is an Event Group with a clock in event. This setting
restricts the employee from posting a clock-in event at the terminal.
An employee clocks in at the dedicated clock-in terminal
at the building’s entrance. The employee then enters the building and
works a full day. At the end of his shift, the employee clocks out at
the dedicated clock-out terminal at the exit door and goes home. Both
the clock-in and the clock-out are successful and are stored in the action
table.
The next day, the employee clocks in at the dedicated clock-in
terminal at the building’s entrance. The employee is then called to his
supervisor’s office in another building, and spends the day in meetings.
At the end of the day, the employee returns to the terminal at the building’s
entrance and tries to clock out. An error message displays that the clock
failed (you can change this error message using the Dictionary form).
The entrance terminal is for clock-ins only, and because the employee
is already clocked in, this terminal will not clock him out. The employee’s
clock-in is successful and is stored in the action table. The employee’s
unsuccessful clock-out is stored in the error table.
Note that if the terminal is offline when the employee
clocks in or out, the action will be saved in an offline data file. When
the terminal comes back online, Shop Floor Time will either clock in/clock
out the employee or record an error message, depending on the TERMINAL_EVENT_RESTRICTION
setting and the employee’s clock status.