To calculate labor utilization rates, Costpoint Analytics must be able to identify hours and amounts that represent direct labor, and hours and amounts that represent leave.
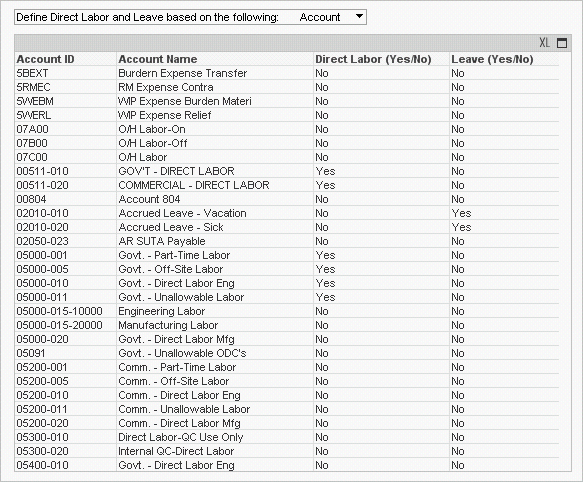
Use the Define Direct Labor and Leave based on the following options and the table below those options to specify either the accounts or project classifications and project types associated with direct labor and leave.
These settings apply to the detailed Labor Utilization Analytics in Costpoint Analytics – Employee and to the summary Labor Utilization Analytics in Costpoint Analytics – Summary.
To set up Costpoint Analytics so it can identify direct labor hours and amounts, complete the following steps:
Click Define Direct Labor and Leave based on the following to display the options.
To define direct labor based on labor expense accounts, select Account.
To define direct labor based on project classification and project type, select Project.
For each account or project classification/project type combination that represents direct labor, enter Yes in the Direct Labor (Yes/No) column of the table.
To make an entry, position the mouse pointer over the table cell. When ![]() appears in the cell, click it to highlight the text, and use the keyboard to make your entry.
appears in the cell, click it to highlight the text, and use the keyboard to make your entry.
Do not click in a table row other than on ![]() . If you do, some table rows will be hidden. If that happens, right-click in the table and select Clear All Selections on the shortcut menu to redisplay the rows.
. If you do, some table rows will be hidden. If that happens, right-click in the table and select Clear All Selections on the shortcut menu to redisplay the rows.
To set up Costpoint Analytics so it can identify leave hours and amounts, complete the following steps:
Click Define Direct Labor and Leave based on the following to display the options.
To define leave based on labor expense accounts, select Account.
To define leave based on project classification and project type, select Project.
For each account or project classification/project type combination that represents leave, enter Yes in the Leave (Yes/No) column of the table.
To make an entry, position the mouse pointer over the table cell. When ![]() appears in the cell, click it to highlight the text, and use the keyboard to make your entry.
appears in the cell, click it to highlight the text, and use the keyboard to make your entry.
Do not click in a table row other than on ![]() . If you do, some table rows will be hidden. If that happens, right-click in the table and select Clear All Selections on the shortcut menu to redisplay the rows.
. If you do, some table rows will be hidden. If that happens, right-click in the table and select Clear All Selections on the shortcut menu to redisplay the rows.
Normally, you do not change these settings after the initial configuration. However, if you make changes in Costpoint to the accounts or projects that identify direct labor or leave, you can change these settings at any time.