The Other Wizard Type is the one of seven types of wizards that you can use to record individual expenses on an expense report. This Wizard is designed for miscellaneous expenses. When you access this wizard depends on how you set up your expense report types. Wizards are highly flexible and user-configurable according to the expense type and expense report type.
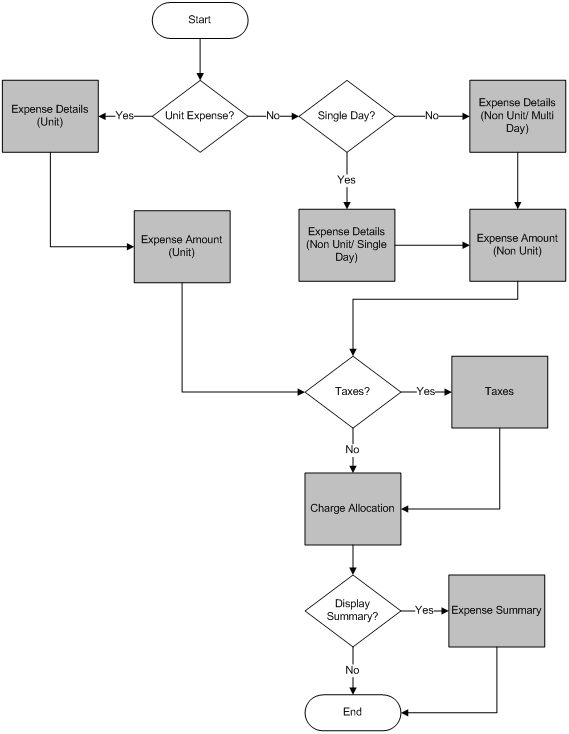
Wizards consist of individual pages on which you provide information. When you complete one page, select the Next button to go to next page of questions. Depending on the configuration settings for the expense being recorded, the flow from one Other Wizard page to the next may differ.
The following diagram illustrates the logic used.
Start the Wizard by either selecting the Add hyperlink to add a new expense or clicking on an existing expense amount to edit/view it.
Whether an existing expense can be edited depends on the status of the expense report and your modification rights. If you are looking at your own expense report, you cannot edit it if any of the following are true:
The Expense Report has a "Voided" or "Processed" Status.
The Expense Report is in the process of being exported.
You have read-only rights to the screen.
If your role allows you to look at another employee's expense report, the rules that determine whether or not you can modify the expense report are the same. In addition, your functional role must have the appropriate rights.
When you want to add a new expense, select either the Add hyperlink or the name of the category that was set up for the expense report type for "Other" expenses. You will be taken to the first page of the Other Wizard.
The Expense Type page of the Other Wizard will display only if there is more than one expense type for other expenses linked to the category that you selected for the expense report type selected.
Select an expense type from the drop-down box. The default is the expense type selected as the default in the Expense Report Types screen. The expense type that you select determines which fields are required on the proceeding pages.
Select this button to move to the previous page of the Other Wizard.
This button will only be displayed if:
There is more than one expense type for the category selected.
The layout of the expense report is "Standard."
The expense selected is an imported expense.
Select this button to move to the next page of the Other Wizard.
Select this button to return to the main Expense Report screen. If you select this button while entering a new expense, information regarding this expense will not be saved to the database. If you select this button when editing an existing expense, any changes that you made will not be saved to the database
Select this button for instructions on what to do on this page of the Other Wizard.
If you have other expenses that were imported from a credit card feed, you can select one of those items to expense on this expense report. You can view details regarding this expense by clicking the Details hyperlink on the right side of the screen. If you select an outstanding expense, some of the required fields will populate with information retrieved from the credit card interface. The list is made up of those expenses that have a source of "Other."
You are not required to select an outstanding expense if it exists. You can bypass this screen by selecting the Next button and manually entering another expense.
The Outstanding Expenses table consists of the following information:
Source - This field displays the wizard type for each outstanding expense. The valid values are "Car Rental" and "Other."
Transaction ID - This field displays the transaction ID that was imported or entered on the Maintain Expenses screen for this expense.
Merchant Name - This field displays the merchant name used for this expense. If the field is blank, the merchant name was not known at the time the outstanding expense was posted.
Date - This field displays the expense date that was imported or entered on the Maintain Expenses screen for this expense.
Amount - This field displays the amount of the outstanding expense.
Currency - This field displays the currency in which the expense was imported or entered on the Maintain Expenses screen for this expense.
Provider - This field displays the provider used for this expense. If the field is blank, the provider was not known at the time the outstanding expense was posted.
The information you need to enter in the Expense Details page depends on the expense type selected. All available fields are required.
If you are allowed to correct processed expense reports, but are not allowed to enter to corrections that would change the Expense Incurred amount, the following fields or buttons on the Expense Details page are disabled:
Starting Unit
Ending Unit
Number of Units
Personal Units
Rate Per Unit
Delete Expense
Currency (correcting this field would reset the Expense Amount to zero)
Expense Incurred
Use Calendar Lookup to select a date for the expense. This field is required regardless of the expense type selected.
Use the drop-down box to select the provider that was used for this expense. This field will display only if the Provider check box is selected in the Required Fields group box in the Input Options tab of the Expense Types screen.
Enter the starting unit number, for example, the starting odometer number, the copy number, etc. This is an optional field, which will display only if the Starting/Ending Units check box is selected and the Unit Label field has been entered in the Input Options tab of the Expense Types screen.
Enter the ending unit number. This is an optional field, which will display only if the Starting/Ending Units check box is selected and the Unit Label field has been entered in the Input Options tab of the Expense Types screen.
The system calculates the value in this field by subtracting the starting number of units from the ending number of units. It uses this value to determine the net number of units in order to reimburse each unit. This field will display only for those expense types that have the unit label entered in the Required Fields group box in the Input Options tab of the Expense Types screen.
Enter the number of units that were for personal use.
The system calculates this field by subtracting the personal units from the subtotal number of units. The system multiplies this value by the rate per unit; the resulting amount is reimbursed to the employee.
This field displays the rate at which each unit will be reimbursed. You can change this rate if the Override Unit Rate check box is selected in the Expense Types screen.
Use the drop-down box to select the user-defined value that was set up in the Expense Types screen and was used for this other expense. This field is required, if displayed. It will be available only if the expense type has been configured to require it.
Use the drop-down box to select the user-defined value that was set up in the Expense Types screen and was used for this other expense. This field is required, if displayed. It will be available only if the expense type has been configured to require it.
Use the drop-down box to select the user-defined value that was set up in the Expense Types screen and was used for this other expense. This field is required, if displayed. It will be available only if the expense type has been configured to require it.
This field will default a description of the expense type. It will be used in the Description field of the AP Voucher and the information displayed in the field is determined by the configuration of the expense type. This field is non-editable and is displayed regardless of the expense type selected.
Use this field to enter any comments regarding this other expense. This field is optional.
Select this button to return to the previous screen.
Select this button to move forward to the next page of the Other Wizard.
Select this button to return to the main Expense Report screen. If you select this button while entering a new expense, no information regarding this expense will be saved to the database. If you select this button when editing an existing expense, any changes that you made will not be saved to the database.
Select this button for instructions on what to do on this page of the Other Wizard.
The Expense Amount page of the Other Wizard displays information regarding how much was spent, how payment was made, and ceiling information.
Use the drop-down box to select the method that was used to pay for this expense. The default pay method is determined by the expense type selected and how it was configured. The list of valid payment methods is determined by those set up in the employees' expense class.
Use the drop-down box to select the currency that was used to pay for this expense.
Enter the full amount of the expense.
Enter the amount of the expense that is personal.
The system calculates this value. If the amount over the ceiling amount is NOT reimbursed, that amount will display in this field.
The system calculates this field by subtracting from the expense incurred any amount that is over the ceiling and is not reimbursed and by any personal amount.
This field displays the exchange rate for the selected transaction currency and the user's pay currency. You can change this rate if the Modify Exchange Rate check box is selected in the Expense Classes screen.
Enter the amount that is deemed "unallowable." This amount will be reimbursed.
This non-editable field displays the "not to exceed" ceiling for this type of expense. The system calculates it on a "per day" basis, meaning that, if the expense is for three days, it multiplies the ceiling amount by three and displays the result here.
Supervisors with rights to modify their employees' expense reports can use this field to adjust the ceiling amount up or down depending on the expense and the explanations given. For all other users, this field is non-editable.
This non-editable field displays the new ceiling, which is the original ceiling plus any adjustments that were made.
This field displays the amount of the expense that is over the company-defined ceiling amount. Whether it is reimbursed or not depends on how the expense type is configured.
Select this button to return to the previous page.
Select this button to move forward to the next page of the Other Wizard. If you have gone over the ceiling and the Require Over-Ceiling Explanation check box has been selected in the Expense Types screen, you will be asked to explain why you went over the ceiling. You must enter a reason before continuing to the next page.
Select this button to return to the main Expense Report screen. If you select this button while entering a new expense, no information regarding this expense will be saved to the database. If you select this button when editing an existing expense, any changes that you made will not be saved to the database.
Select this button for instructions on what to do on this page of the Other Wizard.
The Taxes page of the Other Wizard displays tax information for this expense type. Based on how the tax schedule selected for this expense type is configured, it may be a One Tier Tax or a Two Tier Tax. Also, if so configured, the user can edit the tax amounts.
This non-editable field displays the type of tax that is used for this expense type.
This non-editable field displays the tax schedule that the expense type is attached to. The schedule determines at what rate the expense amount is taxed.
Use the drop-down box to the location where the expense occurred. The values will be those locations that were set up for the tax schedule that is linked to the expense type.
Enter the tax ID for this expense. If you supplied a provider and that provider contains a tax ID, that ID will be shown. Otherwise, you must enter one.
This field displays the tax amount for the first-tier tax of this expense. The system calculates this amount by multiplying the expense incurred amount that was entered in the Expense Amount screen by the tax rate that was entered for the tax schedule or location (if one is required). You can change the rate if both the expense report type and the expense class allow you to do so.
If you change the tax amount, the system will validate this new amount to make sure that it falls within the tolerance limit as set up in the tax schedule.
This field displays the tax amount for the second-tier tax of this expense. The system calculates this amount by multiplying the expense incurred amount that was entered in the Expense Amount screen by the tax rate that was entered for the tax schedule or location (if one is required). You can change the rate if both the expense report type and the expense class allow you to do so.
This field displays the total amount of taxes for this expense. The system will add together both the first tier and the second tier tax amounts to get the total.
Select this button to move forward to the next page of the Other Wizard.
Select this button to return to the main Expense Report screen. If you select this button while entering a new expense, information regarding this expense will not be saved to the database. If you select this button when editing an existing expense, any changes that you made will not be saved to the database.
Select this button for instructions on what to do on this page of the Other Wizard.
The Charge Allocation page of the Other Wizard displays information regarding how the expense is allocated and allows you to change the percentage or the amount that is allocated to each of the charges.
Use the drop-down box to select how you want the expense allocated. The valid values are "Percentage" and "Amount." If you select "Percentage," you can edit the Percent field in the allocation table. If you select "Amount," you can edit the Amount field in the allocation table. The default is "Percentage."
The drop-down list in Expense Portion contains the following: Under Ceiling, Over Ceiling, Unallowable, Tax 1, and Tax 2. Select the portion of the expense for which you want to view or enter charge allocation information.
When you make a selection in Expense Portion, the allocation table is set up so you can enter or review charge allocations for the selected portion of the expense amount. When you are through with that portion of the expense, you can select another.
Use this table to select the charge types used for the selected portion of the expense. It also contains the default UDTs that you selected when entering the General portion of the expense report. All fields in this table can be configured to default in automatically, or you may be required to select a value for one or more of the fields. (If there is only one valid charge type, it is displayed in the Charge Type field, and you cannot change it.)
This non-editable field displays a system-configured number assigned to each allocation of the expense.
This field displays the percentage allocated to the charge. If you selected "Percentage" in the Allocate By drop-down box, you can change this percentage.
This field displays the amount allocated to the charge. If you selected "Amount" in the Allocate By drop-down box, you can change this amount.
Use the drop-down box to select a charge type. The charge type determines which other UDTs are used for this expense. Only those charge types that are linked to this expense type are available. If there is only one valid charge type, it is displayed in the Charge Type field, and you cannot change it.
Use Lookup to select a UDT01. Only UDT01s that are valid for the default charge are available. If there is only one valid UDT01, that value will default in and this field will be non-editable. This field will display only if the Show check box is selected for this UDT in the Expense Configuration screen.
|
|
This UDT will be used in Deltek Expense. |
|
|
This UDT will be used in Deltek Expense. |
If used, the UDT02 will default from the General Wizard. This field will display only if the Show check box is selected for this UDT in the Expense Configuration screen.
|
|
This UDT will most likely NOT be used in Deltek Expense. |
|
|
This UDT will be used in Deltek Expense for charges requiring a project. |
Use Lookup to select a UDT03. This field will display only if the Show check box is selected for this UDT in the Expense Configuration screen.
|
|
This UDT will be used in Deltek Expense. |
|
|
This UDT will most likely NOT be used in Deltek Expense. |
Use Lookup to select a UDT04. This field will display only if the Show check box is selected for this UDT in the Expense Configuration screen.
|
|
This UDT will most likely NOT be used in Deltek Expense. |
|
|
This UDT will most likely NOT be used in Deltek Expense. |
Use Lookup to select a UDT05. This field will display only if the Show check box is selected for this UDT in the Expense Configuration screen.
|
|
This UDT will most likely NOT be used in Deltek Expense. |
|
|
This UDT will most likely NOT be used in Deltek Expense. |
Use Lookup to select a UDT06. This field will display only if the Show check box is selected for this UDT in the Expense Configuration screen.
|
|
This UDT will most likely NOT be used in Deltek Expense. |
|
|
This UDT will most likely NOT be used in Deltek Expense. |
Use Lookup to select a UDT07. This field will display only if the Show check box is selected for this UDT in the Expense Configuration screen.
|
|
This UDT will most likely NOT be used in Deltek Expense. |
|
|
This UDT will most likely NOT be used in Deltek Expense. |
Use Lookup to select a UDT08. This field will display only if the Show check box is selected for this UDT in the Expense Configuration screen.
|
|
This UDT will most likely NOT be used in Deltek Expense. |
|
|
This UDT will most likely NOT be used in Deltek Expense. |
Use the lookup to select a UDT09. Only UDT09s that are valid for the default charge are available. If there is only one valid UDT09, that value will default in and this field will be non-editable. This field will display only if the Show check box is selected for this UDT in the Expense Configuration screen.
|
|
This UDT will be used in Deltek Expense. |
|
|
This UDT will be used in Deltek Expense. |
Use the drop-down box to select a UDT10. Only UDT10s that are valid for this charge are available. If there is only one valid UDT10, this field will be non-editable. This field will display only if the Show check box is selected for this UDT in the Expense Configuration screen.
|
|
This UDT will most likely NOT be used in Deltek Expense. |
|
|
This UDT will most likely NOT be used in Deltek Expense. |
Enter a reference code for this expense. This column will display only if "None" is not selected in the Expense Reference Source field in the Charge Types screen.
Select this button to add an additional Charge Allocation to the list of allocations that were entered when you initially filled out the expense report. You will be taken to a different Wizard page where you can add one or more allocations that can be used for this expense and any remaining expenses to be entered.
If your system is set up to provide direct access to a Costpoint database for charge lookups rather than using Time & Expense with ESS charge trees, see Charge Lookup Using Direct Costpoint Access if you need help selecting charges.
This field displays the total amount allocated to the portion of the expense selected in the Expense Portion drop-down box. (The label for this field changes to match the selection in Expense Portion.)
Select this button to return to the previous screen.
Depending on how your system is configured, this button will be labeled either Next or Finish. If the Expense Summary page is available, it will be labeled Next. Select this to move forward to the next page of the Other Wizard. If the Expense Summary page is not available, it will be labeled Finish. Select this button to complete the expense and return to the main Expense Report screen.
Select this button to return to the main Expense Report screen. If you select this button while entering a new expense, no information regarding this expense will be saved to the database. If you select this button when editing an existing expense, any changes that you made will not be saved to the database.
Select this button for instructions on what to do on this page of the Other Wizard.
The Default Charge Allocation page of the Wizard will be displayed if you selected the Add Allocation button on the Charge Allocation screen. On this Wizard page, you can add additional charge allocations that can be used for the expense you are currently entering as well as any later expenses.
This table displays the specific charging information that will default on the expense report.
Click Add Charge Allocation to add a default allocation ID to this expense report. You must fill out the following:
Charge Type - Use the drop-down box to select the charge type that will be used. The valid values are UDT01 or UDT02.
Charge - Use Lookup to select a valid charge that will be used for this expense report. (If your system is set up to provide direct access to a Costpoint database for charge lookups rather than using Time & Expense with ESS charge trees, see Charge Lookup Using Direct Costpoint Access if you need help selecting charges.)
Default Allocation % - Enter the allocation percentage that will be the default for this charge.
Select the charge allocation that you wish to delete by selecting the check box next to the row that you wish to edit. Then use the Delete Charge Allocation function to delete the row.
To keep a charge in your list of "Favorites," select the one(s) you wish to save by checking the check box in the field to the left of the row. Then select the Add Line to Favorites function. This will put the charge in your list of favorites where it can easily and quickly be selected when entering another expense report.
OK - Select the OK button to save the additional charge allocation entries that were made. You will then be brought back to the Charge Allocation page of the expense that you were entering. You can then change any allocation amounts or percentages that need to be changed for this expense.
Cancel - Select the Cancel button to disregard any new allocations that were just entered. You will be brought back to the Charge Allocation page of the expense that you were entering.
The Expense Summary page of the Other Wizard is optional, and will display only if the Display Expense Summary check box is selected in the Expense Report Types screen. This page displays summary amount information regarding the expense just entered. You can view it in the transaction currency or your pay currency.
Use the drop-down box to select the currency in which to view the summary.
This non-editable field displays the total expense that was incurred.
This non-editable field displays the total amount of taxes that were incurred.
This non-editable field displays the amount of the expense that was entered as personal. This amount will not be reimbursed to the employee.
This non-editable field displays the amount of the expense that will not be reimbursed to the employee.
This non-editable field displays the amount of the expense that will be reimbursed to the employee.
This non-editable field displays the amount of the expense that is billable. It is based on the configuration of the charge type.
This field displays the amount of the expense that is not billable. It is based on the configuration of the charge type.
This field displays the ceiling amount after any adjustments have been made.
This field displays the amount that is over the company-defined ceiling after any ceiling adjustments have been made.
Select this button to return to the previous screen.
Select this button to complete the expense and return to the main Expense Report screen.
Select this button to return to the main Expense Report screen. If you select this button while entering a new expense, no information regarding this expense will be saved to the database. If you select this button when editing an existing expense, any changes that you made will not be saved to the database.
Select this button for instructions on what to do on this page of the Other Wizard.
When you want to edit an existing expense, select the amount in the hyperlink that corresponds to the date of the expense and the category you wish to edit.
If there is more than one expense for that date and category, you will be taken to the Select Expense screen where you can select the expense that you wish to edit.
If there is more than one expense for that date and category, you will be taken to the Select Expense screen where you will select the expense that you wish to edit. This screen contains a table with information that can help you determine the proper expense.
Based on the configuration of your expense class, the type of change that is made and the status of the expense report, you may need to enter an explanation for the change and resign the expense report. Then the expense report will go through the approval process again. These steps are required if any of the following occurs:
The user or supervisor changes the amount of the reimbursement.
The user or supervisor changes the allocation of the expense.
When an expense needs to be deleted from an expense report, select the amount hyperlink that corresponds to the date of the expense and the category that you wish to delete. You will be brought to the Expense Details screen for that expense. Select the Delete button.
Based on the configuration of your expense class and the status of the expense report, you may need to enter an explanation when deleting an expense. A confirmation message will appear to verify that the expense should be deleted. Once it is confirmed, the expense will be deleted from the expense report and you will return to the main Expense Report screen.