Install and Configure ODBC Driver
You must install and configure a driver on every workstation that will be used to connect to the Costpoint database.
The user who installs the ODBC drivers must, at a minimum, have local administrator privileges.
To install and configure the driver:
-
Download the ODBC driver installer from the appropriate link below.
Select either the 32-bit or 64-bit driver that corresponds to the application from which the ODBC connection will be established. For example, if the ODBC connection will be made from the 32-bit version of Excel, then use the 32-bit version of the driver (regardless of the architecture of the operating system).
- Run the ODBC driver installer. Follow the prompts, accepting all of the defaults.
-
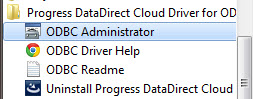
Click
, and select
ODBC Administrator.
-
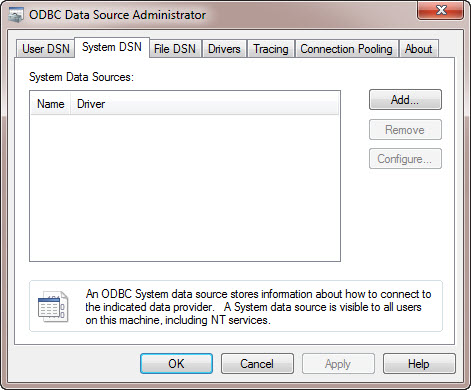
From the ODBC Data Source Administrator dialog box, you can create either a
User DSN or
System DSN.
User DSNs are for a single user; System DSNs are available to all users of the workstation. Select the User DSN or System DSN tab, based on your needs.
-
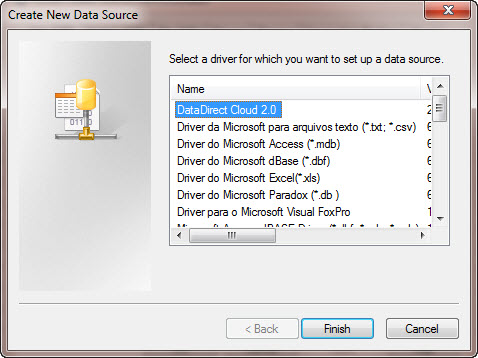
Click
Add. In the Create New Data Source dialog box, select
DataDirect Cloud 2.0, and click
Finish.
-
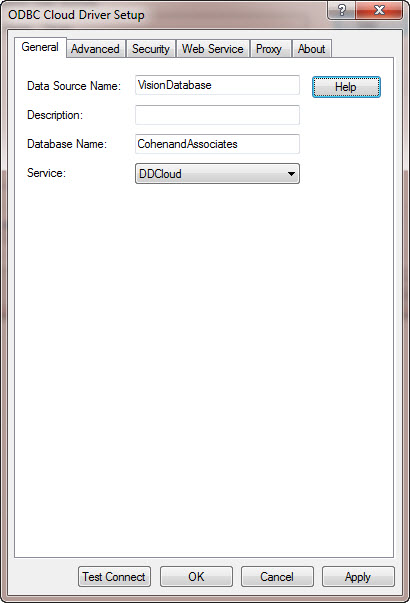
In the ODBC Cloud Driver Setup dialog box, enter a name in the
Data Source field.
This can be any name that helps you identify the data source.
You do not need to add a value in the Description field.
-
In the
Database Name field, enter the database name that you received from Deltek Cloud Ops when you requested the ODBC accounts.
This should be the same as your Costpoint System Name.
-
In the
Service field, select
DDCloud.
- Click Test Connect, enter the credentials that you received from Deltek Cloud Ops when you requested the ODBC accounts, and click OK.
- When the Connection established! message displays, click OK.
- Click OK in the ODBC Cloud Driver Setup dialog box, and click OK in the ODBC Data Source Administrator dialog box.
-
The final steps is to add two entries to the registry.
If you need help doing this, see your system administrator. Follow these steps:
-
Take one of the following actions:
- For a User DSN, go to \HKEY_CURRENT_USER\Software\ODBC\ODBC.INI\<datasource>
- For a System DSN, go to \HKEY_LOCAL_MACHINE\SOFTWARE\Wow6432Node\ODBC\ODBC.INI\<datasource>
The <datasource> value is the name that you entered in the Data Source field in Step 6 above.
- Add a new String Value with the name WorkArounds and a value of 16777218.
- Add a new String Value with the name WorkArounds2 and a value of 8192.

-
Take one of the following actions: