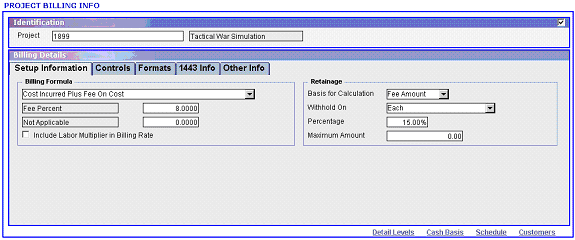
Example of tabs and links:

While in Form View on some Costpoint web screens, you will see tabs that are similar in appearance to the tabs you might find on file folders. When the information for a specific screen cannot all be viewed at the same time, tabs are used to group similar fields to enable easy access without the need for scrolling.
All of the fields in each of the tabs are associated with the same record, but there may be too many to fit on one screen. Lookups and validations will still occur as though all the fields are on one screen. When you click on a specific tab, the tab color will change from dark blue to light blue to indicate that it has been selected and the fields for that tab will display on the screen.
While a screen is in Table View, tabs are not necessary because all the fields for the record display as columns that can be accessed by scrolling through the record.
Many Costpoint web screens have links, which display at the bottom right of the screen. You can click on a link to access a separate but related screen. Links replace the pushbuttons that were available in Costpoint client/server. Available link names display in dark blue and are underlined. When you access a link, the selected link name changes to bolded blue while the unselected other link names change to gray (because the subtask you are opening is now the active result set and all items in an inactive result set turn gray). Once you have clicked on a link, the accessed screen displays either below the main screen or as an overlay to the main screen. [Accessed screens that overlay the main screen are called “pop-ups,” and provide a screen in which related information can be entered or referenced.]
The linked screen is typically dependent on the main screen and allows you to enter additional information related to that record. You can close the link by clicking the OK button at the bottom right of the linked screen. The unselected links are still available for access when another link has already been opened. When selected, the link changes to bolded black and the accessed screen replaces the previously linked screen.
You can set a link to auto-close, which means that the link will close if you click on another link. Rather than requiring you to access each related screen through a link, some linked screens will automatically open when their main screens are opened. For example, on a transaction screen, the header information identifying the transaction will be visible when the screen is opened and the table containing the individual rows of the actual transaction will also display.
Links are also associated with a new level of user security in Costpoint web. In addition to security at the main screen level, you can also restrict user access to specific links on a specific screen. This type of security, known as Result Set security, is set up in the Administration domain and enables companies to restrict or permit access to a specific screen and its associated links. All links, therefore, will not be accessible to all users.
Although more than one screen or result set may be visible at a time, only one of these screens may be considered "active" at any one time. You can make a screen active by clicking anywhere within that screen. When you do this, the active screen and its contents display in blue and the inactive screens display in gray. You can edit an active screen by means of manual entry or by the selection of data using Lookups or by clicking on checkboxes, radio buttons, and drop-down boxes.
To edit an inactive result set, simply click on it, since this action will make the result set active and will deactivate the previous result set.
User flows guide you through the process of setting up key data (for projects, employees, items, and vendors) and display related screen links in a logical order at the top of the screen. You enter the identifying record (e.g., project, vendor, etc.) in the first screen of the flow and access the subsequent screens in the user flow via the links to enter the information related to that identifier. You can access the links in any order or you can go backwards or forwards in the flow and skip over unneeded flows. When you access a linked screen, the system automatically displays the link name in bold in the user flow to help you identify where you are in the flow.
Please refer to the User Flows topic in this document for more information.