Costpoint 5.0 offers newly developed multicompany functionality. Previous versions of Costpoint allowed multiple taxable entities to exist within the same database through the use of organizational structures. All taxable entities shared the same security access, business rules, and functional currency. With Costpoint 5.0's multicompany features, taxable entities can share a common database while, at the same time, individual companies can make their own selections regarding security, business rules, and functional currency.
You establish multicompany capabilities by assigning a unique company ID to each company. The company ID is associated with and assigned to each transaction, organization, reference number, reorganization, project, employee, and product.
You must assign one or more company ID(s) to the users when setting them up for the first time in Costpoint 5.0. You can grant or limit user access to a specific company or companies. For each company ID, you can assign users a user group and/or an org security group. Each user can access only the Costpoint modules, applications, and organizations that have been assigned to his group.
In order to establish different business rules for each company, you must complete the Settings screens for each company in Costpoint. (You may need to define segment levels and lengths for project structures, set up financial statements, designate A/P voucher approvers, establish pay periods for payroll, etc.)
You will usually initialize Settings screens for each company.
You will, however, initialize some Settings screens at the corporate level for global business rules that are established across the entire database and are therefore applied to each company. These rules include setup in the following areas:
Countries and states;
Fiscal years, periods, and accounts;
Definition of the first segment length for organizations;
Reference numbers and reorganizations;
Customer terms, types, credit limits, and credit ratings;
Project types and change order statuses;
Individual social security numbers to be used for employee IDs; and
Federal, state, and local taxes.
Please review the Costpoint initialization checklist for a complete list of Settings screens, along with the company or corporate level setup requirements of each.
You must also specify the functional currency for each company that you set up in Costpoint. The currency may differ from company to company. The functional currency is the currency used to prepare the financial statements and maintain the General Ledger.
Organizations, reference numbers, and reorganizations are assigned to a specific company, and each must be unique across the entire database and cannot be reused for another company.
Accounts are shared by the entire database and are not unique to each company.
Financial statements are set up and computed by company.
Journal entries are assigned to a specific company. Organizations that have not been assigned to that company cannot be used in the journal entry. Cross-company journal entries are not currently possible.
Vendors and customers are assigned to a specific company, and each must be unique across the entire database and cannot be reused for another company.
Vouchers and cash receipts are assigned to a specific company and cannot be reused for another company.
Projects are assigned to a specific company.
Projects can be charged labor expenses only for employees belonging to the same company as the project.
Projects can be charged non-labor expenses only for vouchers posted to the same company as the project.
Labor and non-labor expenses incurred for a project other than the owning company can be transferred by an inter-company transaction, using Costpoint Inter-Company Work Orders (IWOs).
Employees are assigned to a specific company.
If an employee becomes an employee of another company, either through a transfer or by leaving and then returning, you must set up the employee with a new employee ID.
Items (and associated bills of material) are assigned to a specific company if the Separate Items by Company checkbox is selected in the Product Definition Corporate Settings subtask of the Product Definition Settings screen. Otherwise, items are shared by all companies.
Routings, inventory, orders, and requisitions must be set up by specific company.
Material Requirements Planning (MRP) can be run by specific company or across all companies.
Costpoint Procurement Planning will allow different transactional currencies on each requisition.
Carefully think things over before setting up new companies in Costpoint. If separate taxable entities exist that require different functional currencies, different levels of security, and/or different business rules, setting up a new company in the same database may be appropriate. You can use one of Deltek's Enterprise Tools designed specifically for consolidations and budgeting to consolidate the reporting of different companies that share the same database.
If your objective is only to enable separate reporting capabilities, do not create a new company. Instead, create the taxable entities within the same company and assign them to a unique organization. If the organizations used to assign the taxable entities roll up to the same top-level organization, you can get consolidated reporting without using Costpoint Consolidations.
Costpoint is delivered with Company 1 already set up as a default. Following is a list of steps detailing how to create one or more additional companies and their system security. For additional information, see the documentation for the appropriate screens.
Initialize the Set Up Company screen in Costpoint System Administration.
Users will not be able to access the new company until they have been given permission. Use the Maintain Users screen in the System Security menu in Costpoint System Administration.
To set up additional taxable entities for the new company, use the Set Up Company Info screen in the Organizations menu in Costpoint General Ledger.

First, close all Costpoint application screens.
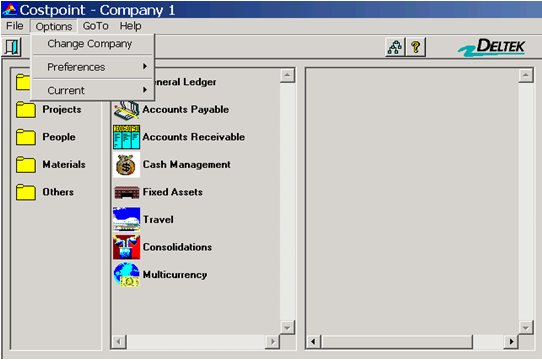
From the Costpoint menu bar, select Options. From the drop-down menu, select Change Company.

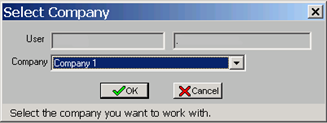
The Select Company dialog will display. Use the drop-down box in the Company field to choose a company and select the OK pushbutton. This will log you into the selected company.