
To create a budget, complete the following steps:
These parameters will govern how the organization budgeting and re-budgeting (Outlook) tools function.
These parameters include setting up a holiday schedule, a PTO pattern, indirect cost/base pool rate specifications, and freezing employee hourly rates.
These parameters affect the details of the budget tool templates and various assumptions that are created for each organization, and they drive various cost calculations.
The organization Outlook tool inherits these parameters and settings from the original budgets.
Select AOM3 Organization Budget Cycle Initialization in the Reports & Actions menu.
Select a Source Year and a Target Year to begin the initialization.
If approved org budgets exist for the target year, some options may not be available.
Green indicates data exists for the indicated FY.
Red indicates no data exists for the indicated FY.
If the source year is Red, there is nothing to copy to the target year.
Yellow indicates an optional action and that no data exists for the indicated FY.
When there is no colored box in the source year, you can only edit the target year.
Click Modify to modify the Holiday Schedule.
Click Add Holiday to create a new entry in the field.
Click Select to edit a current holiday.
The first four tabs of the org budget use the holiday schedule to calculate direct and indirect labor.
Enter fractional values of PTO time taken each period.
The 12 values must equal 100.
The more accurate you are, the fewer variances you’ll see in reports.
Click Update when finished to save your pattern.

Click Re-Clone to clone your Pool Specifications from the last FY.
Click Re-Freeze next to Employee Specifications to take a snapshot of the current labor force and hourly rates associated with them and create a frozen copy of that information. This means the org budget you create won’t change every time you open it.
Click Edit to edit the Pool Rates you cloned above.

Click Edit to edit a pool.
When you click Edit to edit a Dollar Base Type, a field enables you to change the Target Rate.
Click Update when finished.

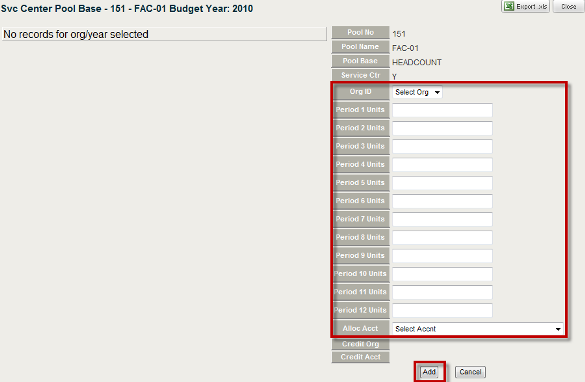
Click Edit to edit a Units Base Type pool. Click Units to open another window.

Click Add in the upper right corner to input the units per period.
Select an Org ID.
Input Units per period.
Input a zero if no number is applicable.
Select an Allocation Account from the drop-down list.
Click Add when finished.
Click Edit to edit Employee Specifications.
Choose the Budget Year and Org from the drop-down lists in the upper right corner.
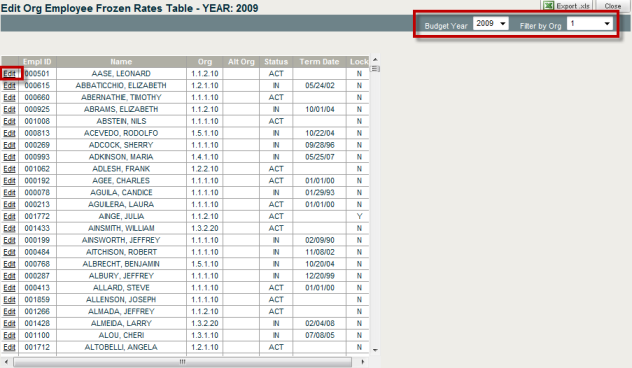
Click Edit to make any changes to a resource.
The fields that appear below the Frozen Rates Table allow you to change the Org Id, the Hourly Rate, the PTO Accrual Rate, the Default Direct Labor Account and the Default Indirect Labor Account associated with the resource. You can also Lock the Settings. The PTO Accrual rate is showing hours per accounting period.

Click Update to save any changes you make.
Re-Clone the NLab% Specifications if you plan to use that tab in the org budget. This tab is where you estimate non-labor costs as a factor of your base accounts based on historical cost relationships.
Click Edit to edit your NLab% Base Setup.
This is where you designate what the allocation is based on.
Fill in the Base Pool No and the Base Description and then click Add.

Click Edit next to the Base ID you just added. Then click Accts to add the NonLabor Percent Base Accounts upon which that allocation will be based from the drop-down list. Click Add each time to add multiple accounts.

Click Edit to edit the NLab% Specifications. Here you are telling B&P what accounts you want to allocate to based on the base you just created in NLab% Base Setup.

Input the Account ID.
Select the Base Pool from the drop-down list.
Select Y or N to indicate if the account is active.
Select Y or N to indicate if the account is company wide.
Select Y or N to ask B&P to prepopulate the account.
Click Add when finished.

Click Edit next to an Account ID in the list that you need to change. Click Update to save any changes made.
Close the Org Budget Cycle Initialization window and return to the Budget Development module.
In the organization navigation list boxes, navigate to where you want to create a budget.
Click org ID segments from left to right in the list boxes.
Org budgets can be created at any level, so you can specify expense at a low level and manage at the top level.
If you create a budget at the top level of the org structure, you can’t also create a budget at a lower level of that org.
You must be an org budget creator and approver for the level at which you want to create an org budget.
This can be done in M.A.O.3 Maintain Organization Budget Approvers.
In Reports and Actions, click B.O.I.1 Create/Modify Budget for an Organization to open it.
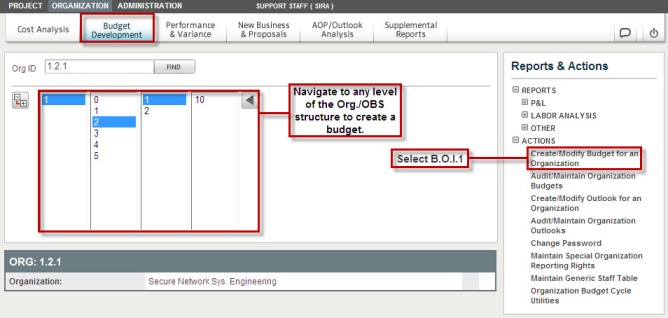
At the intermediate launch page that appears, select the fiscal year from the drop-down list.

Click Go to open the Org budget tool.
The budget tool emulates an Excel workbook.
The tabs, Escalation, PTO, FTE, Util%, NLab% and NLab$ correspond to worksheets in the budget tool and are defined as follows:
Escalation = Escalation
PTO = Personal Time Off
FTE = Full time equivalents
Util% = Contract Utilization Percent
NLab% = Non-Labor Percent
NLab$ = Non-Labor Dollars
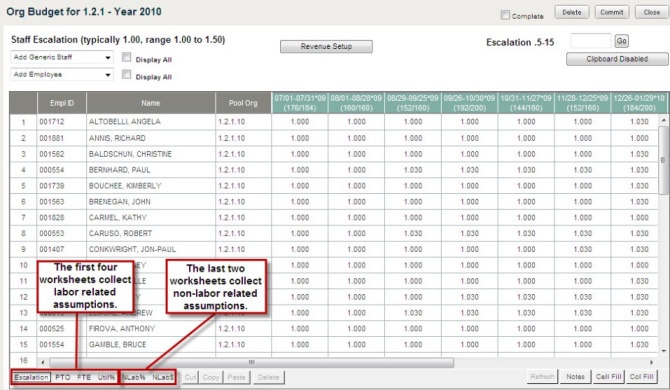
The first four tabs collect labor related assumptions.
The last two tabs collect non-labor assumptions and are additive.
Use the common options available on each worksheet to manage your data.
Cut: Removes data to the clipboard.
Copy: Copies data from the clipboard.
Paste: Pastes data from the clipboard.
Delete: Allows one row at a time to be deleted.
Scroll: Moves you to the bottom of the worksheet.
Refresh: Refreshes the page you’re on and saves your changes.
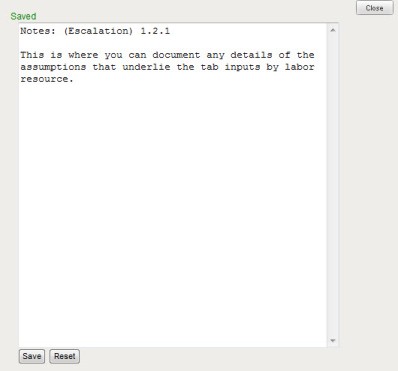
Notes: Click the Notes button to open a notepad.
Each tab of the origination budget tool has its own note.
Click Reset to erase what you’ve just typed.
Click Save to save the note.
Cell Fill: Use this feature to copy information from one cell to multiple cells.
Col Fill: Use this feature to copy information from one column to multiple columns.
Complete: A check in this box communicates to the budget approver that the original budget is complete and waiting for approval.
Use this check box to flag the Org./OBS budget as complete. This flag is required before the budget can be approved.
Click Delete to clear the worksheet and close the budget tool.
Clicking this will not delete any previously saved data, but will simply clear the working storage area that holds the changes you are in the process of developing.
It also removes the working copy from the Audit/Maintain grid.
Click Commit to save the latest data input.
Clicking this saves the contents of the working storage area to the budget data stores that are used for reporting purposes.
It will then clear out the working storage for the org budget you are working on, and close the budget tool.
Close: Click to close the budget.
When you click Close, a working copy of the budget appears in the Audit/Maintain grid.
Click Clipboard Disabled to toggle between enabling or disabling the use of the clipboard where you can collect and paste multiple items.
It must be enabled in order for B&P to be able to copy into and out of other applications.
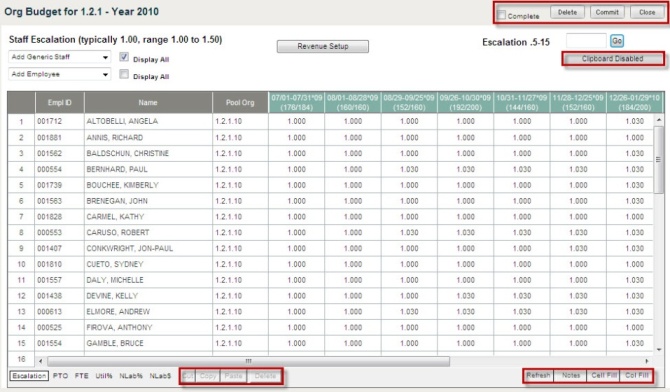
The budget tool opens at the Escalation worksheet. Click the drop-down lists to Add Generic Staff and Add Employees to the budget.
The staff already populated are currently assigned to the Org./OBS.
If any appear in the drop-down lists, they may be new employees that you should add.
Click Display All and then click Refresh to see a global list of generic staff and a list of employees outside your org that you have rights to see.
Click on an empty row to add new staff.
If new staff is added, click Refresh to ensure the other worksheets reflect those additions (or deletions).
There are 5 empty rows at the bottom of each worksheet. If you have input data on the last row, click Refresh to add 5 more empty rows.
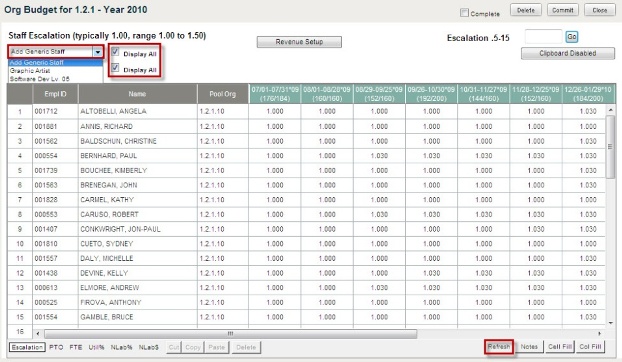
The first 3 columns provide unique information about each employee: Empl ID, Name, and Pool Org.
The remaining columns reflect the accounting periods or sub-periods.
The numbers in parentheses under the period/subperiod date range reflect the number of total hours in the period and the number of available hours to work in that period, excluding holidays.

To apply a global escalation across all resources, indicate the Escalation factor (xx.x) in the field provided, and click Go.
Input a percent in the Escalation factor field and the application translates it to a decimal format in the grid.
An escalation factor of 1 tells B&P to use the employee’s current salary for all calculations.
You must decide how salary escalations will be determined so the configuration can be set.
You can specify the amount and timing of the escalations by individual staff, and by accounting periods or sub-periods.
Escalations can be applied automatically on recorded individual review dates, manually set, or applied all at once to all staff on a given date.
![]()
Click ![]() to set the default revenue accounts for your raw costs, and to set
the fee rates for each.
to set the default revenue accounts for your raw costs, and to set
the fee rates for each.
This enables you to designate different fee rates for different direct cost elements.
If your Org manager has set up programs in the AOP/Outlook Analysis module using Maintain Budget Programs A.O.M.2, the settings there will override the Org Revenue Setup settings here.
Select different default revenue accounts from the drop-down lists.
Click Update to save any changes.
Click the printer icon to print the Org Revenue Setup.
Click Close to close the dialog box.
