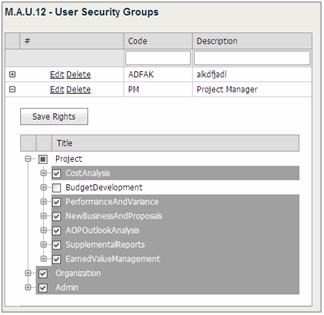
To create a User Security Group, complete the following steps:
Open the Administration area and in the Reports & Actions pane, click Actions » User Management » Maintain User Security Groups (M.A.U.12).
The User Security Groups screen displays.

Click New Security Group.
When the blank row displays, enter information in the following fields:
Code field.
Description field.
Click Update to save the data. The User Security Groups screen refreshes and the Project, Organization and Admin tree structure displays where you can modify rights for that group starting at the top level.
Assign access rights through the check boxes within the tree structure. When you assign full, partial, or no rights, the check box reflects the change of state as follows:
A check mark indicates full rights (default status when you add a new group) to the selected area.
A black square indicates that partial rights have been assigned within the selected area.
A clear check box indicates the group has no rights to the selected area.
Click the plus sign next to the module area (Project, Organization and Admin) to drill down further within the tree structure.
Select or clear check boxes to assign specific rights to the group.

Click Save Rights to save changes.