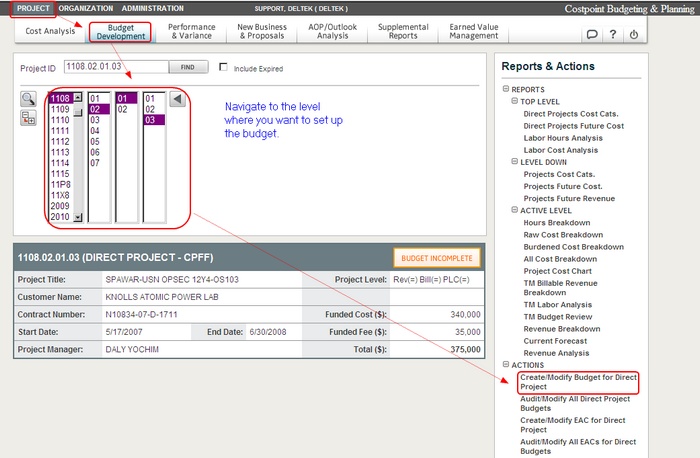
To create a budget, complete the following steps:
On the Management Context menu bar, click Project, and then click Budget Development as the Module.
Select a project using the Project Navigation list boxes.
Budgets should not be created at a rollup level that is higher than the revenue (Funding) level.
If a budget is created at a rollup level, then lower level budgets are not allowed unless the rollup level budget and all related EACs are first deleted.
From the Reports & Actions menu, click Create/Modify Budget for a Direct Project (B.P.I.1).

The following screen displays.
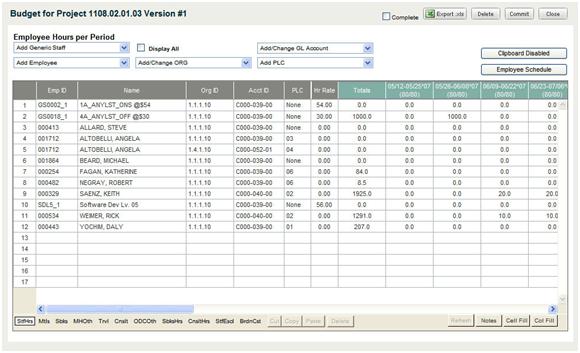
Click a tab at the bottom of the screen to open a worksheet and begin inputting data.

The worksheets are defined as follows:
StfHrs (Staff Hours) — Input labor hour resources to be expended for that account for the entire period-of-performance for the project or task ID.
Mtls (Materials) — Record the raw cost of vendor materials on this worksheet.
Sbks (Subcontractors) — Record the raw cost of subcontractor work on this worksheet.
MHOth (Material Handling and Other Costs) — Specify miscellaneous material handling related costs on this worksheet.
Trvl (Travel) — Record the raw cost of staff and vendor travel here.
Cnslt (Consultants) — Record the raw cost of consultant effort on this worksheet.
ODCOth (Other Direct Costs) — Specify miscellaneous other direct costs that will be burdened with G&A on this worksheet.
SbksHrs (Subcontractor Hours) — Similar to the subcontractors (Sbks) worksheet, but hours and raw hourly rates are specified.
ConsltHrs (Consultant Hours) — Similar to the consultant (Conslt) worksheet, but hours and raw hourly rates are specified.
StfEscl (Staff Escalations) — Change the percent of escalation of staff salaries.
BrdnCst (Burdened Cost) — Project information regarding revenue, cost, and profit.
Use the options available on each worksheet to Cut, Copy, Paste, Delete, and replicate cell entries within the matrix of resources.

Cut — Removes data to the clipboard.
Copy — Copies data to the clipboard.
Paste — Pastes data from the clipboard.
Delete — Allows one row at a time to be deleted.
Refresh — Click to save any changes.
Moving from tab to tab causes an automatic refresh and data is saved.
When Refresh is grayed out, no changes have been detected by the system.
Notes — Record assumptions or other information here that relates to that particular worksheet.
Cell Fill — Use this feature to copy information from one cell to multiple cells.
Col Fill — Use this feature to copy information from one column to multiple columns.
All worksheets have the following options:
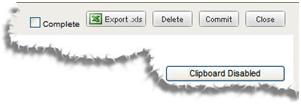
Select the Complete check box to move the budget to the next step in the process.
When Complete is selected, it lets project budget approvers know that the creator of the budget has completed the budget development process.
It can then be approved by project managers in Audit/Modify All Direct Project Budgets (B.P.I.2).
Excel — Click this button to export the data from the worksheet into Excel.
Once in Excel, highlight the data rows you want to manipulate and change the format from Custom to General to successfully import the data back into Deltek Budgeting & Planning.
The dark column headers on each worksheet in the project budget tool designate unique data that Deltek Budgeting & Planning does not allow you to change.
Delete — Click this button to clear the worksheet, delete the working copy of the budget from the Audit/Modify (B.P.I.2) grid, and close the budget tool.
Clicking this will not delete any previously saved data, but will only clear the working storage area that holds the changes you are in the process of developing.
Commit — Click this button to save the latest data input.
Clicking this saves the contents of the working storage area to the budget data stores that are used for reporting purposes. It will then clear out the working storage for the project/task you are working on, and close the project budget tool.
Once committed, budget data displays in reports.
Once committed and approved, an EAC can be created.
Close — Click this button to close the project budget tool and leave the contents for the project/task you are working on undisturbed for further fine tuning.
Clipboard Disabled — Click this button to toggle between enabling or disabling the use of the clipboard where you can collect and paste multiple items.
Input data on the desired worksheets.
Click the BrdnCst tab to open the Burdened Costs worksheet.
The worksheet shows fully burdened costs by resource sorted by indirect pool.
If any resources resolve to an indirect pool labeled 0, then the account/org. combination is absent from the pool/base setup in the accounting system.
Once the resources have resolved to the correct indirect pools, the burdened costs tab will resolve every staff or vendor resource specified in each of the other tabs in the budget tool to its appropriate pool showing its fully burdened cost.
All labor pools include G&A in their resource cost figures.
If funding has been distributed to the project/task ID, then it is compared to the total cost of the project budget.
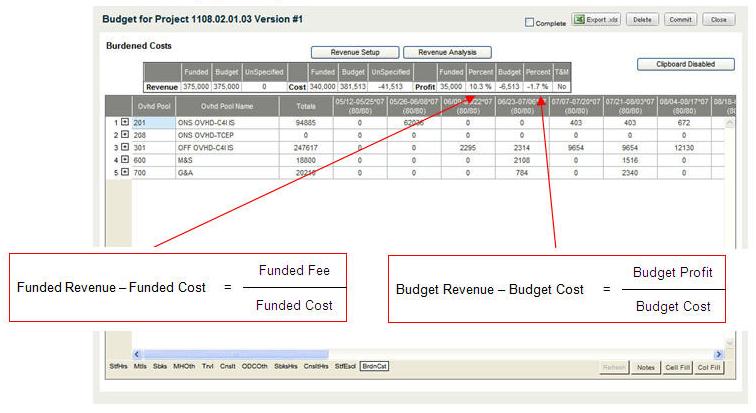
The worksheet has information clearly labeled at the top.
Revenue — Funded, Budget, and Unspecified
Cost — Funded, Budget, and Unspecified
Profit — Funded, Percent, Budget, Percent, and T&M
Click the Revenue Setup button to see how the project revenue is calculated.
This information is brought into Deltek Budgeting & Planning from the accounting system's billing/revenue setup details, but it can be changed here by selecting the Override Settings check box. If the check box is cleared, the information becomes read only.
The following warning message appears at the top of the setup window :
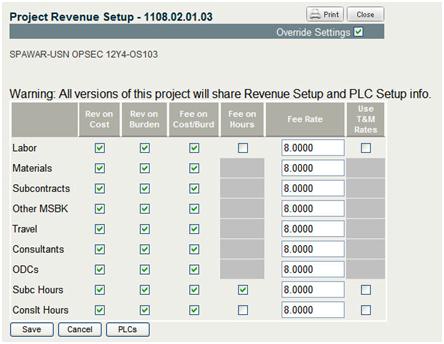
Click Save so that revenue is included in the Commit process.
You will see a "Save complete" message.
Click the printer icon to print the Revenue Setup.
When finished with the BrdnCst worksheet, click Commit to save the latest data input or click Complete and Commit to move the budget to the next step in the process— Budget Approval.
When you open a committed budget (complete or incomplete), Deltek Budgeting & Planning makes a copy of the committed budget in the working tables, keeping the previously committed version in the permanent or reporting tables.
If you click Close to close the project budget tool, the working copy of the budget will not be deleted from the working tables, and it remains listed in the audit/modify grid as a working copy.
If you click Delete instead of Close, the project budget tool will close, delete the working table copy, and the working copy will not appear in the audit/modify grid.
If you make changes to a working copy of a budget and recommit it (it can be complete or incomplete), the project budget tool first saves the working copy to the budget tables that are used for reporting, and then it closes and deletes the working copy.
If you approve a committed, complete budget and try to create a new one for that same project, you have to do one of the following:
Delete the approved version
Unapprove the approved version
Create a new version of the approved budget
Further training is available that covers approving budgets, creating EACs, creating and managing proposals, creating and managing non-backlog budgets, and importing structured proposals and budgets.